

A few days before the April 2022 Mid Atlantic Bonsai Festival, April Grigsby posted a photo on her Facebook page of the largest container she made indicating it came out of her kiln, straight. This is often a difficult task because many warp during the firing process. I was impressed with her container as much I was when I saw her as vendor at the 2021 7TH US National Bonsai Exhibition. When I saw the container on her sales table at the Mid Atlantic Bonsai Festival I quickly snatched it. April Grisby may be contacted through her web site: aprilgrigsbyceramics.com


I was thrilled with my new container! It was a good size, not too big or too small, unglazed with shading to suggest patina, oval with straight sides and small lip, with two small belts to give the illusion it was more shallow than it actually was and the inside was scored to promote a downward root growth rather than horizontal. That’s my taste for an evergreen forest container, rather than the deciduous forests I commonly create.

I don’t have many evergreen forests because it is extremely difficult to find suitable material. I don’t like Sargents junipers for this style because of trunk thickness and shapes. Well, I just happen to have the true Ezo spruce, Picea glehnii, not the commonly available species sometimes found in the United States, Picea jezoensis. I just so happen to have over 800 two and three year old seedlings to select from. After an hour, several were selected and the bottom of the trunks were located. It took some time to select the trees because they are all seedlings and many have different characteristics such as needle color, branching and bud formation. Spruce do not generally bud back on old wood, or even on branches with needles. When trimming spruce it is important to cut just above a bud so new growth will develop.

Ezo spruce seedling variations


Don’t leave a stub, cut closer

Perfect cut!
The major problem for this proposed forest is that all the Ezo spruce are approximately the same diameter, heights can be easily adjusted, so I don’t worry about that. When a large main tree is needed in a forest for a focal point or to indicate eye movement there two techniques to create a focal point. Two trees can be planted right next to each other so the trunks appear as one or making a small mound of soil for the trees to make them higher in the pot. Even if I completely filled the container with trees, the composition would still not be in balance. The container depth was a bit too deep for relatively thin trunks and viewers would first look at the pot, rather than the forest. So I needed some heavy “trunks.”
Saburo Kato authored Forest, Rock Planting and Ezo Spruce Bonsai in 1963. The National Bonsai Foundation published the book in 2001 and I was honored to compile and edit the text. In this book and other bonsai creations Mr. Kato sometimes used a dead tree to suggest age and a focal point. So I had a solution to my trunk size problem. Just use a deadwood tree. However, I don’t happen to have any larger Ezo spruce, alive or dead. Marc Arpag looked in the fields during his seven hour daily walk for dead carcasses.
I figured the next best possibility was to use another spruce because of the branch characteristics. This was an easy solution because the Dwarf Alberta spruce it is a spruce and had similar branching. They are commonly available in nurseries and garden centers. This cultivar is often used for bonsai training, but not successfully because the tree has a “poor memory” for branch shaping. A tree can be wired, and even allowed to cut into the bark and scar, after removing the wire they return to the original positions. There are, however, many forest of Dwarf Alberta spruce which look good and also a technique used to maintain branch shapes.

Three Dwarf Alberta spruce of different sizes were selected
Off I went to a few garden centers to find three Dwarf Alberta spruce to use as the three main trees in the forest. This was not as easy as you think, because the trees needed had to have the right trunk thickness in relation to the height. Also, I was looking for taper. Finally, I found three trees and took them home for a week, thinking long and hard about using them as deadwood for the forest bonsai. Since I don’t have any living or dead Dwarf Alberta spruce, these three trees needed to be “prepared” for the forest. I could not do it, either could two of my friends. We spend all our time trying to keep trees alive. Finally I found an executioner to prepare the three trees.

Main tree

Preparing the tree

Determining height


Tearing and removing the bark
Since the trees were still alive it was easy to remove the bark and cambium layer, trim branches and remove bark. If the bark was allowed to dry out, it would take a considerable time for removal. Often it was easy to find a small flap and just tear the bark off in long strips. All three trees of different diameters and heights were stripped of their bark.

Main trees prepared for the forest.

Prepare the container, note the screen is not anchored
The first step in creating a forest bonsai is to prepare the container. In the photo the wire positions are indicated with a black line from one hole to the other. Usually I do not like to cross wire under the container, looks messy and sometimes get caught when moving. The wires actually surround the pot perimeter. No. 14 gauge annealed wire was used for anchoring the trees. Also, notice that each piece of the plastic screening is NOT anchored to the bottom of the pot. It is much more time effective for me to simply use a larger piece of plastic screen and not anchoring and to be careful how the trees are moved so the screen does not move.


Brian Witcomb, in a yellow, hoodie prepared each tree by exposing surface roots, removing most of the soil and trimming roots. They were put in three groups, large, medium and small, according to trunk diameters. Alan Adair in a green shirt helped to hold the trees in their approximate locations while I continued to add more and more trees, until the balance of trees and container were to my taste. Finally, six hands were required to complete the forest and tie the trees in place. The ten pieces of annealed copper wires were tied together to stabilize the composition. The ends were not immediately cut off as some ends were used again to grab trunks.

Note: the trees were not trimmed or thinned out, only the bottom of the trunk positions were important at this stage of composition. Next fine, thin, green moss covered the soil surface. The moss was wet so it could be easily used to adjust trunk positions. The forest was now complete, except for the final pruning and thinning out of the branches. First the heights of each tree were established, including the stripped trunks, to create an asymmetrical, stable triangle of the three main trunks. Tree positions were easily changed with the moist moss. Then branch selection took place. The new Ezo spruce forest was photographed (dry trees show more detail and true color) and finally watered. Using that photo as a guide, more branches were thinned. A photo is much better than seeing the bonsai because it picks up views the eye misses.


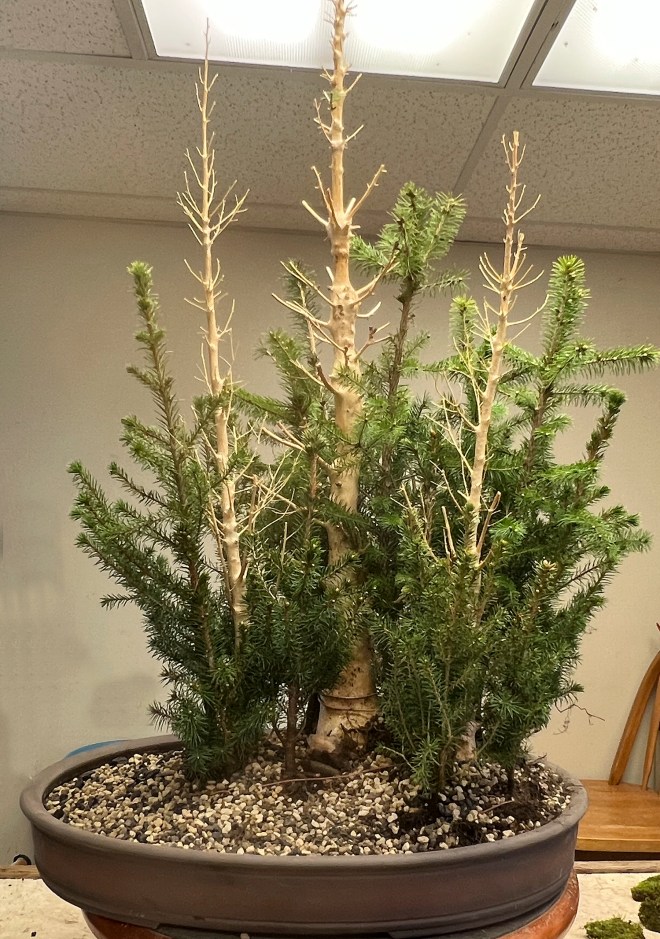
After first trimming: After second final trimming for this beginning stage of development
Selecting the trees took about an hour. Preparing the trees another hour and planting the composition required about three hours. I have no idea of how many trees I used, except for the three deadwood trunks. I’ll count them sometime, but now busy creating more forests. It will now take several years to finish the composition and refine the Ezo spruce bonsai for enjoyment.