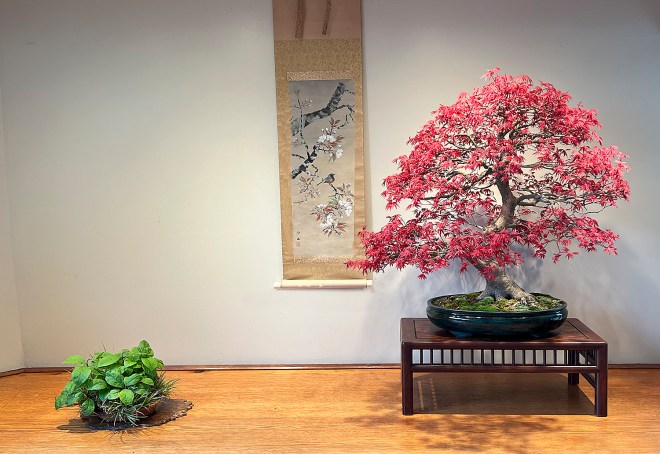
The ABS Rendezvous On The River Conference was held in Memphis, TN on May 26-29, 2022. It was hosted by the Memphis Bonsai Society and Brussel’s Bonsai Nursery. The venue, Whispering Woods Conference Center was decorated by masterpiece bonsai from Brussel Martin. Welcoming visitors in the lobby was a magnificent Satsuki azalea in full bloom.
There were two displays in the spacious room, an invitational exhibit from bonsai collections and professional bonsai artists and a special “creative displays, where artists thought “out of the box” for their presentations. All the bonsai were of very high quality.
The International Bonsai Arboretum will be hosting the Spring 2022 Bonsai Open House & Sale on May 21-22, 2022 in Rochester, New York.
Come, visit and see what’s new in the garden and enjoy a 20% discount on most items. See how bonsai are propagated, trained and maintained in the garden as well as formal bonsai displays.
The Bonsai Society of Upstate New York will be having a one day exhibition on Sunday, May 22 from 9am to 5pm at the Golosano Autism Center. The exhibition is about a 10-15 minute drive to the International Bonsai Open House. Make a weekend of it and visit both!
49th Upstate New York Bonsai Exhibition & Sale
Sunday, May 22, 2022 (One day only)
9am to 5pm
GOLOSANO AUTISM CENTER
50 Science Parkway
Rochester, New York
Our members are thrilled to be able to have our bonsai exhibition again to promote bonsai to the area and nearby bonsai organizations. A warm welcome to anyone who would like to join us for this special Bonsai Exhibition & Sale. A suiseki exhibit will be hosted by the Suiseki Study Group of Upstate New Work. Bonsai demonstration on Sunday at 2pm.
A few days before the April 2022 Mid Atlantic Bonsai Festival, April Grigsby posted a photo on her Facebook page of the largest container she made indicating it came out of her kiln, straight. This is often a difficult task because many warp during the firing process. I was impressed with her container as much I was when I saw her as vendor at the 2021 7TH US National Bonsai Exhibition. When I saw the container on her sales table at the Mid Atlantic Bonsai Festival I quickly snatched it. April Grisby may be contacted through her web site: aprilgrigsbyceramics.com
I was thrilled with my new container! It was a good size, not too big or too small, unglazed with shading to suggest patina, oval with straight sides and small lip, with two small belts to give the illusion it was more shallow than it actually was and the inside was scored to promote a downward root growth rather than horizontal. That’s my taste for an evergreen forest container, rather than the deciduous forests I commonly create.
Black lines indicate where the anchoring wires should go
I don’t have many evergreen forests because it is extremely difficult to find suitable material. I don’t like Sargents junipers for this style because of trunk thickness and shapes. Well, I just happen to have the true Ezo spruce, Picea glehnii, not the commonly available species sometimes found in the United States, Picea jezoensis. I just so happen to have over 800 two and three year old seedlings to select from. After an hour, several were selected and the bottom of the trunks were located. It took some time to select the trees because they are all seedlings and many have different characteristics such as needle color, branching and bud formation. Spruce do not generally bud back on old wood, or even on branches with needles. When trimming spruce it is important to cut just above a bud so new growth will develop.
Ezo spruce seedling variations
Tip will die back to the bud, cut closer
Don’t leave a stub, cut closer
Perfect cut!
The major problem for this proposed forest is that all the Ezo spruce are approximately the same diameter, heights can be easily adjusted, so I don’t worry about that. When a large main tree is needed in a forest for a focal point or to indicate eye movement there two techniques to create a focal point. Two trees can be planted right next to each other so the trunks appear as one or making a small mound of soil for the trees to make them higher in the pot. Even if I completely filled the container with trees, the composition would still not be in balance. The container depth was a bit too deep for relatively thin trunks and viewers would first look at the pot, rather than the forest. So I needed some heavy “trunks.”
Saburo Kato authored Forest, Rock Planting and Ezo Spruce Bonsai in 1963. The National Bonsai Foundation published the book in 2001 and I was honored to compile and edit the text. In this book and other bonsai creations Mr. Kato sometimes used a dead tree to suggest age and a focal point. So I had a solution to my trunk size problem. Just use a deadwood tree. However, I don’t happen to have any larger Ezo spruce, alive or dead. Marc Arpag looked in the fields during his seven hour daily walk for dead carcasses.
I figured the next best possibility was to use another spruce because of the branch characteristics. This was an easy solution because the Dwarf Alberta spruce it is a spruce and had similar branching. They are commonly available in nurseries and garden centers. This cultivar is often used for bonsai training, but not successfully because the tree has a “poor memory” for branch shaping. A tree can be wired, and even allowed to cut into the bark and scar, after removing the wire they return to the original positions. There are, however, many forest of Dwarf Alberta spruce which look good and also a technique used to maintain branch shapes.
Three Dwarf Alberta spruce of different sizes were selected
Off I went to a few garden centers to find three Dwarf Alberta spruce to use as the three main trees in the forest. This was not as easy as you think, because the trees needed had to have the right trunk thickness in relation to the height. Also, I was looking for taper. Finally, I found three trees and took them home for a week, thinking long and hard about using them as deadwood for the forest bonsai. Since I don’t have any living or dead Dwarf Alberta spruce, these three trees needed to be “prepared” for the forest. I could not do it, either could two of my friends. We spend all our time trying to keep trees alive. Finally I found an executioner to prepare the three trees.
Main tree
Preparing the tree
Determining height
Tearing and removing the bark
Since the trees were still alive it was easy to remove the bark and cambium layer, trim branches and remove bark. If the bark was allowed to dry out, it would take a considerable time for removal. Often it was easy to find a small flap and just tear the bark off in long strips. All three trees of different diameters and heights were stripped of their bark.
Prepar
Main trees prepared for the forest.
Prepare the container, note the screen is not anchored
The first step in creating a forest bonsai is to prepare the container. In the photo the wire positions are indicated with a black line from one hole to the other. Usually I do not like to cross wire under the container, looks messy and sometimes get caught when moving. The wires actually surround the pot perimeter. No. 14 gauge annealed wire was used for anchoring the trees. Also, notice that each piece of the plastic screening is NOT anchored to the bottom of the pot. It is much more time effective for me to simply use a larger piece of plastic screen and not anchoring and to be careful how the trees are moved so the screen does not move.
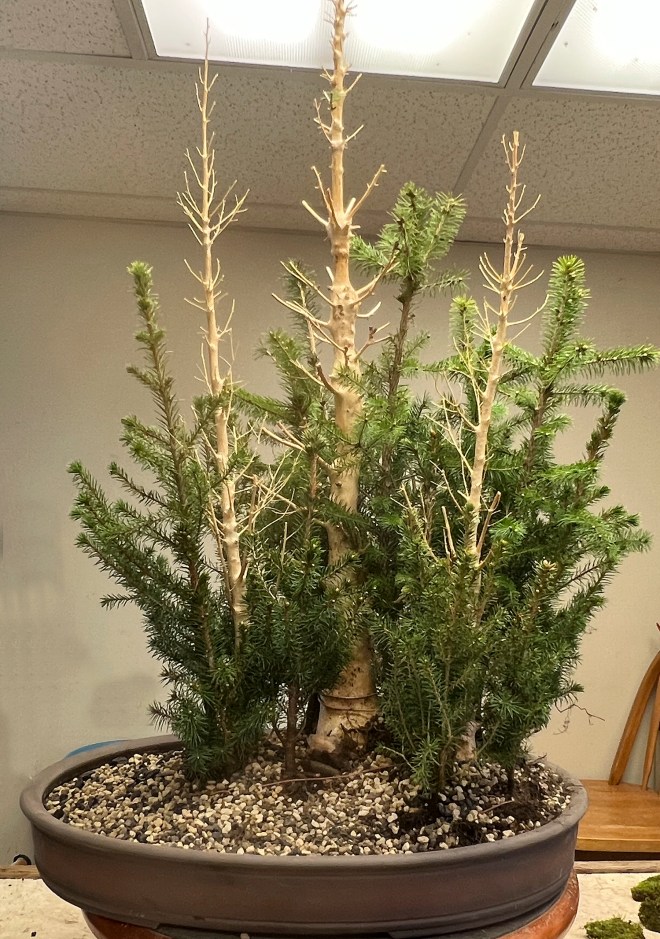
Preparing the treesPlanting the treesFinal positioning
Brian Witcomb, in a yellow, hoodie prepared each tree by exposing surface roots, removing most of the soil and trimming roots. They were put in three groups, large, medium and small, according to trunk diameters. Alan Adair in a green shirt helped to hold the trees in their approximate locations while I continued to add more and more trees, until the balance of trees and container were to my taste. Finally, six hands were required to complete the forest and tie the trees in place. The ten pieces of annealed copper wires were tied together to stabilize the composition. The ends were not immediately cut off as some ends were used again to grab trunks.
Before mossing and trimmingMossed and beginning trimming
Note: the trees were not trimmed or thinned out, only the bottom of the trunk positions were important at this stage of composition. Next fine, thin, green moss covered the soil surface. The moss was wet so it could be easily used to adjust trunk positions. The forest was now complete, except for the final pruning and thinning out of the branches. First the heights of each tree were established, including the stripped trunks, to create an asymmetrical, stable triangle of the three main trunks. Tree positions were easily changed with the moist moss. Then branch selection took place. The new Ezo spruce forest was photographed (dry trees show more detail and true color) and finally watered. Using that photo as a guide, more branches were thinned. A photo is much better than seeing the bonsai because it picks up views the eye misses.
After first trimming: After second final trimming for this beginning stage of development
Selecting the trees took about an hour. Preparing the trees another hour and planting the composition required about three hours. I have no idea of how many trees I used, except for the three deadwood trunks. I’ll count them sometime, but now busy creating more forests. It will now take several years to finish the composition and refine the Ezo spruce bonsai for enjoyment.
Selecting a container for bonsai is of paramount importance as it adds to the beauty the tree presents to the viewer. Also, by definition, a bonsai must be potted. There are many factors in determining the correct container including the following aspects.
Purpose: If the tree is undeveloped, it is best to train in a round deep pot. The depth will help the tree grow vigorously, while shallow pots, which are normally used for training bonsai will develop a more compact root system, but the tree will grow better in a round deep pot. Roots have an easier time to follow the curved interior of a round pot when growing, while roots in rectangular training pots or wooden boxes must make a 90 degree turn and grow slower.
Therefore, trees which are being trained or encouraged to grow are usually planted in larger, rather than smaller pots. While developed bonsai are potted, usually in ceramic exhibition containers.
Size: An appropriate size container must be selected for beauty, balance and the horticultural growth of the tree. Many flowering and fruiting species prefer to be grown in deeper containers to support the flowers and fruit. While evergreens can withstand drying out, shallow containers are commonly used.
Also, the climate must be considered. Often bonsai grown in tropical or hot areas are planted in deep containers, so the roots do not dry out. Bonsai are often planted in deep containers which hold more heat during the winter to protect the trees in cold and frigid climates.
There are many different formulas to determine the specific size of a bonsai container. The method I use for standing style bonsai is the height of the tree should equal the length and depth of the container. This is determined by visual mass. A 12 inch tree could be planted in a pot 10 inches long and 2 inches deep. The same 12 inch tree would also look and be balanced in a pot 8 inches long and 4 inches deep. In general bonsai appear to be larger in smaller sized containers.
Species can also determine the size of containers. Fast growing bonsai such as Weeping willow or Crape myrtle are best grown in larger, deeper containers. Of course, heavier trunks should be planted in deeper containers for visual balance and thin delicate trunks look great in shallow pots. Also, the original root formation of collected native species sometimes determine the size and shape of the pot, until a compact root system is trained. This is also the case for nursery or field grown trees until smaller root systems are developed.
Shape: There are many different shaped containers, but basically, they all fall in one of the following two categories, equal sided and unequaled shapes. Examples of unequaled sided containers are rectangular and oval. Equal sided containers include round, square, hexagonal and multi sided.
Generally standing style bonsai are grown in unequal sided containers when the width or branches are to be emphasized. While equal sided containers tend to enhance tall trees, such as literati style because the eye movement will travel upward faster. Equal sided are also usually used for the cascade styles only deeper for visual stability.
Color: Color selection is mostly determined by personal taste and understanding of bonsai. Some like to harmonize or compliment the main color of the tree and container, like a red azalea in a red pot. Others like to use contrasting colors, like a white Flowering crabapple in a blue, green or colorful glazed pot. Of course, unglazed brown, red, grey and tan colors are quiet and are usually used for evergreen species, so they do not detract from the beauty of the bonsai. Almost any species look good in brown unglazed containers, but they are so commonly used that they can seem boring.
It is also important to consider what time of the season you intend to enjoy your bonsai. A bright yellow container might make a great contrast with colorful maples in autumn, while after leaf drop the yellow would be overwhelming. Many who grow small and shohin bonsai often have several pots which are seasonally used. I have ten different colored and shaped containers for one maple bonsai. They are changed according to the season of enjoyment or how they are used in box display tables to avoid duplication.
Design: The container rim, side body and feet all play an important part in selecting the right pot for your tree. Outer rimmed containers usually look good for deciduous and flowering and fruiting species. While straight rimmed pots are often used with pines and other evergreen when a simple feeling is preferred.
The side bodies can be straight or angled or curved. Straight sided containers are often used for bonsai with straight trunks where a more formal appearance is desired. Oval containers are the most versatile shape, especially one with curved sides. Additionally, painted pots with designs are often used in smaller size bonsai where the color and design would not be overwhelming.
Quality: One important factor for selecting containers for bonsai, which is often not considered is the quality. I have often seen beautifully shaped bonsai in inexpensive bonsai pots. I have, as well, seen undeveloped trees in training gown in old antique containers. Most bonsai hobbyists do not consider the quality, but as they gain more experience and exposure to higher quality pots, they begin to understand that container quality is important to release the full beauty of a bonsai for appreciation, yours and to the viewers.
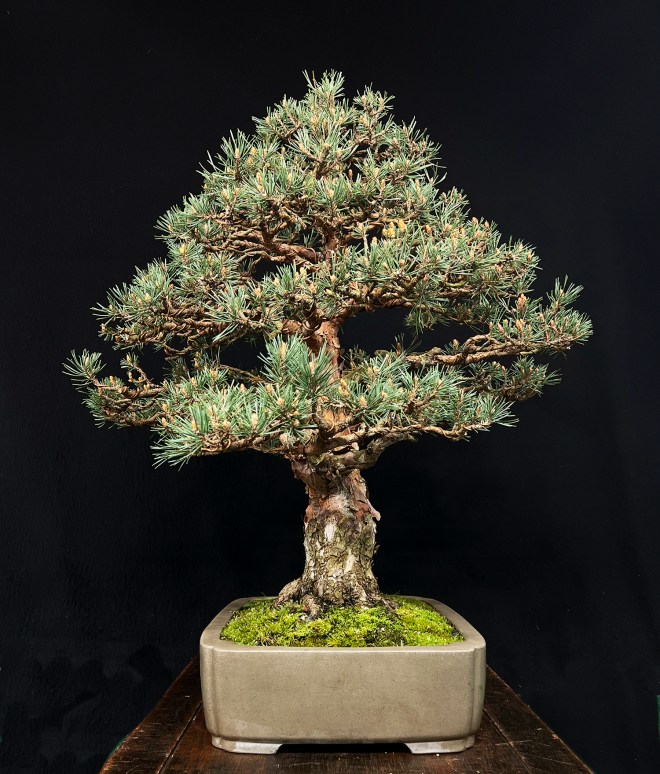
Selecting A Container for a Dwarf Scots pine
For several months I’ve been on search for the “perfect” container for one of my Dwarf Scots pine. This last week we narrowed the selection to two unglazed grey pots. Then, as we were potting, suddenly three more unglazed brown pots were considered. I would have preferred a brown pot because the needles of this Dwarf Sots pine are bluish and would sharply contrast with the brown pot. I tried to avoid the two final unglazed grey containers which are kind of similar to the foliage. Of the three new pots to pick from, one was too plain, one was too large and one not of high value or quality.
Watereri Scots Pine
Pinus sylvestris ‘Watereri’ generally develops into an upright pyramidal bush or small tree, often used in rock gardens. However, the original tree, selected in 1865 is still alive and now reaches about 24 feet in England. They rarely grow that fast in smaller sizes. This cultivar must be asexually propagated by grafts, budded or air layered. I have not seen this cultivar root. Some of the original tissue must be maintained. While some have produced seedlings, they are not identical to the original Waterei Scots pine. The graft union is very good for my tree. When and if the different bark colors bother me, I’ll glue additional reddish orange at the bottom.
A good graft union
Side A deep container Side A shallow container
In small sizes, the Waterei Scots pines are usually container grown and develop into nice compact shapes, perfect for bonsai training. They can be commonly found in rare plant nurseries and garden centers. The needles are quite short naturally with a bluish green coloring. Using the correct bonsai training techniques, they can be maintained to about one or two inches in length. The orange buds are attractive in spring as they open as is the reddish orange peeling bark, which is also characteristic of the common Scots pine.
Side B deep container Side B shallow container
Once the final container was chosen the tree needed to be lifted from the small brown bonsai container it was grown in for about 15 years from a container grown grafted plant. The reddish orange bark is paper thin and fragile as well as attractive. There are two methods to handling trunks with fragile or colorful bark. First the tree can be lifted from lower branches, avoiding touching the trunk. Another method often used is to carefully wrap the upper bark with moist newspapers or paper towels and to only handle the paper, not the trunk. I have seen many valuable and old bonsai, especially with Cork bark Chinese elm, ruined by not protecting the bark when moving and repotting.
Lifting tree from branches to protect bark Lifting tree using moist paper towel to protect bark
Yesterday I posted two photos of my Dwarf Scots pine on Facebook and invited readers to select their choice of containers. Many comments were posted, and the vast majority preferred the deeper pot. Me too!
The deeper container was selected because of the size, rim shape, feet, quality and sides. The shallow container seemed a bit small for the tree, but when root pruned the tree fit in perfectly. Using my formula for determining the pot size for standing style bonsai, the tree is 24 inches tall, the length 16 inches while the depth is 4 inches. The dimensions, 16 inches plus 4 inches is 20 inches, which is about the ideal size. I know in two or three years, should I still own this bonsai, the twigging will increase and present a full massive canopy which will fit the straight sided deep container.
The outer lip and bottom belt on the shallow pot were a bit too busy for my taste. Usually, I like to use rectangular pots for evergreens, especially pines because they are the most formal and powerful of all species.
The deeper container presented a more stable feeling for this bonsai. The plain undecorated sides really contrast with the reddish orange bark. Although I prefer rectangular containers with no rims. The gentle corners picked up the feeling of the character branch on the right side. The shallow pot had a stepped foot, while the deeper pot had a flat foot, thus adding more stability and dignity for this pine bonsai. The shallow pot was a bit too elegant for my taste for this bonsai massive bonsai.
It is interesting to note that I purchased this Japanese Tokoname-ware container from Saburo Kato when I was an apprentice in Omiya Bonsai Village, Japan 50 years ago. I believe the container artist is Seizan, who was the father of Reiho. Fifty years ago, I easily hand carried the container home from Japan. Today, I could not even lift the empty pot.
After carefully trimming and arranging the roots the tree was positioned in the container. My preference is just off center with one edge of the trunk touching the center line. This unusual bonsai can be appreciated from both sides. Rather than plant the tree with the top leaning slightly forward we positioned the tree straight up so the tree would look good on both sides. Having two front viewing sides is an important factor for my bonsai design because I like to share my trees through display. Sometimes the trunk movement is in the wrong direction for the display area, or the scroll painting is in the opposite direction. With having two pleasing fronts the tree can be displayed in both trunk movement directions.
Also, one basic factor in selecting the viewing side was the shape of the trunk. All trees do NOT grow in an even shaped circle. Many are oval, making the trunk appear narrower from one side. We selected the viewing side which showed a more tapering trunk.
Removing ugly stump A large curved knob cutter was used twice
A sharp chisel used to shape cut Brown cut paste was pressed into the deep wound
Small, thin, fragile pieces of bark were pressed into the brown cut paste
However, one determining factor to select “a” preferred viewing side was the unusual first branch on the right with unique curves. This focal point, or character branch, had an ugly stump hiding the beauty of the entire length of the branch. We took a large, curved knob cutter and first removed most of the stump. It was old, dried out and hard. Although a large size tool could have easily removed the stump, it was taken off in two steps to make an exacting smooth cut. The second cut made a slightly concave cut. Then a sharp chisel was used to make the cut deeper. Brown cut paste, usually used for evergreens was packed into the wound and pressed hard. Finally, small pieces of the reddish orange fragile bark were carefully placed on the cut paste and pressed to maintain contact. One would never know an ugly stump was there an hour earlier. The tree was mossed, photographed and finally watered.
Narrow trunk base Heavier trunk base with taper
I hope some people will find these thoughts helpful with their bonsai creation and container selection. Have fun transplanting. Spring has finally arrived in Upstate New York, and we are praying it stays.
Side B, preferred viewing side
Side A, another viewing side
Trunk positioned straight up so both sides can be appreciated


You must be logged in to post a comment.