The Joys of an Early Rochester Springtime!

Image

On Friday morning a few distant students from my Classical Bonsai MasterClass remained. So, as my custom, I put them to work. Nobody stands around here…

Image

Image

The migrant workers, Diego from Brazil and John from Ithaca volunteered to help move some of the dormant bonsai outside with Alan Adair my assistant. Only evergreens and deciduous bonsai with tight buds were moved. A few other friends came later on and my garden began to look more like a bonsai garden than a grey winter scene.

Saturday morning my Saturday Crew came and moved all of the large and two-man, bonsai outside into the display and sales area. As they know, just put the trees outside, I’ll move them all later and even if I tell them exactly where I want them, I’ll still move them around. So when you look at the trees on the tables, note many are not straight and parallel with the table edge, however, I guarantee they will be straightened out at a later date.

As the Saturday Crew was moving trees someone mentioned that we were in a winter storm warning. It’s a good thing they only moved trees, which were still in deep dormancy. Other trees, which had enlarged, and opening buds remained inside the poly houses. The low temperatures were only forecast to be about 29-31F. which is fine. Remember, my trees have been acclimated to 27F. However, IF the temperature forecast drops to about 20F. we will be a bit busy around here moving some trees into the garage or under the tables.

Image

Harvey spent most of the day refining and cleaning the roots of his Japanese maple.


Image

Bob Pfromm worked on a Japanese five-needle pine.


Image

Fran Mahoney wired two Nishiki Japanese-black pines.


Image

Jim Dolce worked on a Chinese quince.

Image

Bob Blankfield worked on a Japanese yew.

Image

It took both of us pushing hard to compact the top section of the bonsai using three guy wires, but we did it!


Image

Rick Marriott likes small size bonsai and always brings a load of tree and selection of containers.

My two Open Workshops finished at 4pm on Saturday. After cleaning a bit and checking my e-mails I was so exhausted from teaching 11 classes in five days I simply went to bed at 6pm. I woke up at 9pm (don’t need much sleep) to find freezing rain and snow coming down quite hard. Got dressed, took my camera and went outside into to check the trees and to take a few photos. Then I went to bed, again after having a quick bowl of Sapporo Ichiban noodles.

Saturday evening:

Image


Image


Image


Sunday morning I woke up to a “Winter Wonderland” and took a few more photos. I agree the trees look beautiful in a fresh snow covering, but I hate snow and really only like it on Xmas cards. We had at least 9″ of HEAVY wet snow and deeper drifts. Wet snow is about three times as heavy as common snow.

Image


Image


Image


Image


Image

Image


Image

People often ask why I live in Rochester with the “interesting” weather. Well, I have made many close friends here during the past 46 years, and I’ve trained numerous students as well. It would be impossible for me to promote bonsai, in my style, without their dedicated support. Also, if one purchases a bonsai from me, you are pretty sure it will be winter hardy in your area, if you live south of the North Pole.

Image

A “snow hat” keeps Yuji Yoshimura warm, or did he really want to be a “cone head?”

I am anxiously awaiting better weather, hopefully, this week. There are many bonsai to be trimmed and repotted and I have a couple of special new creations in the works, especially one in an unusually long container.

Creating A Beech Forest Bonsai

Image

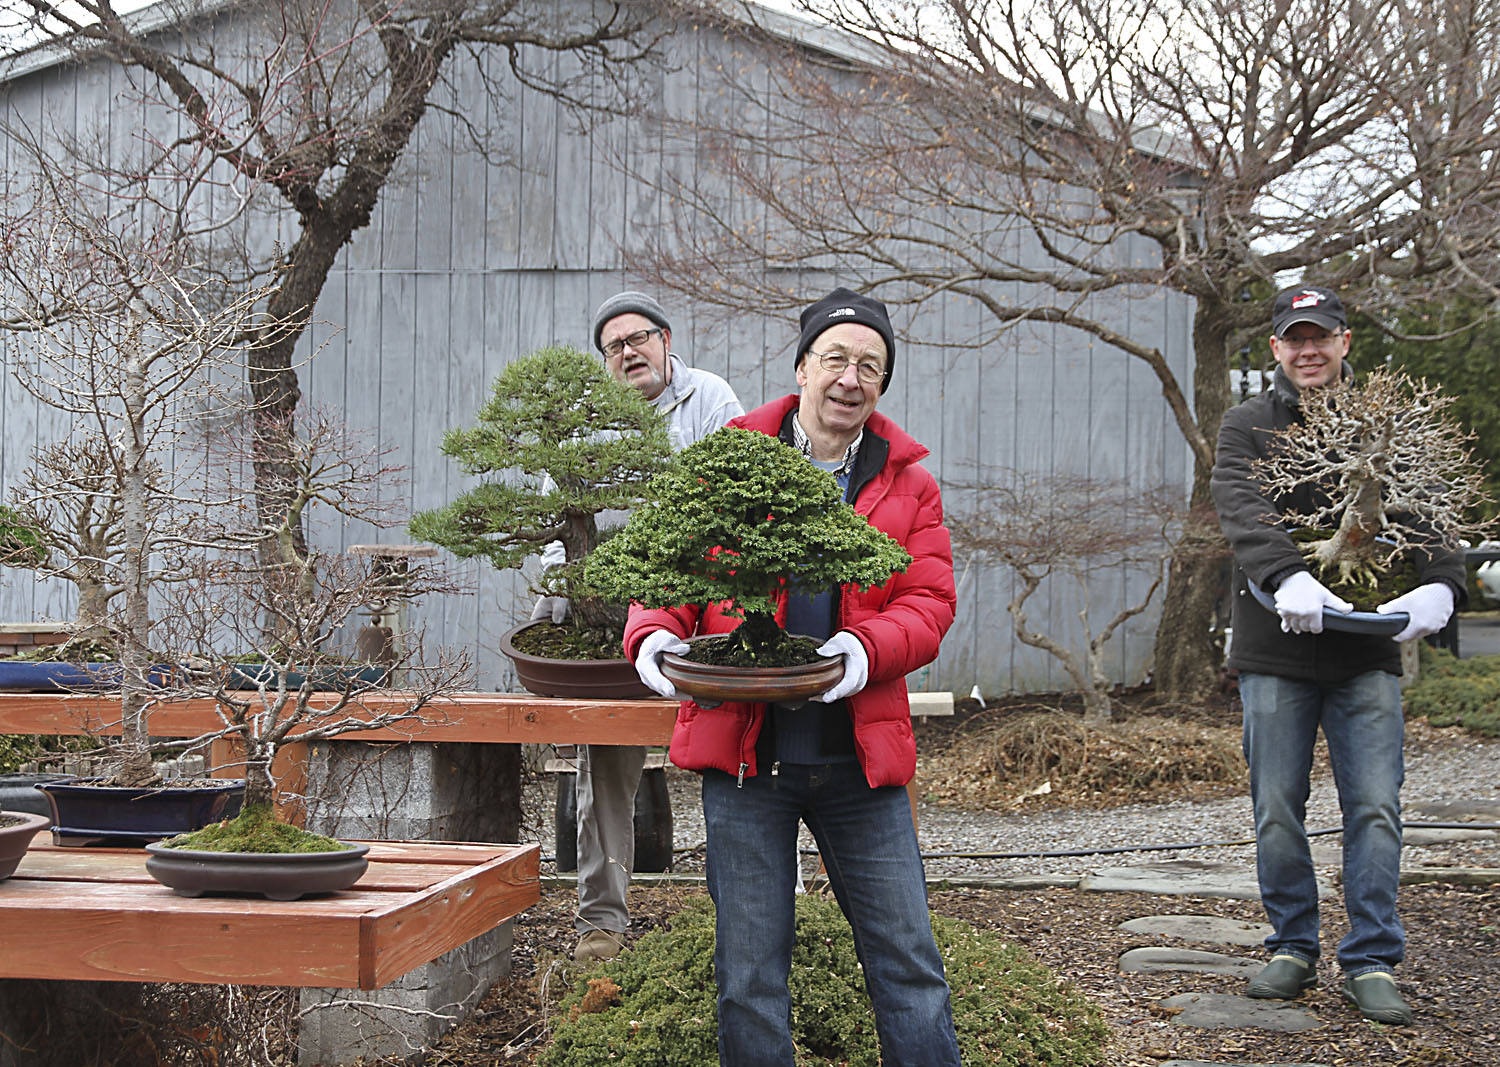
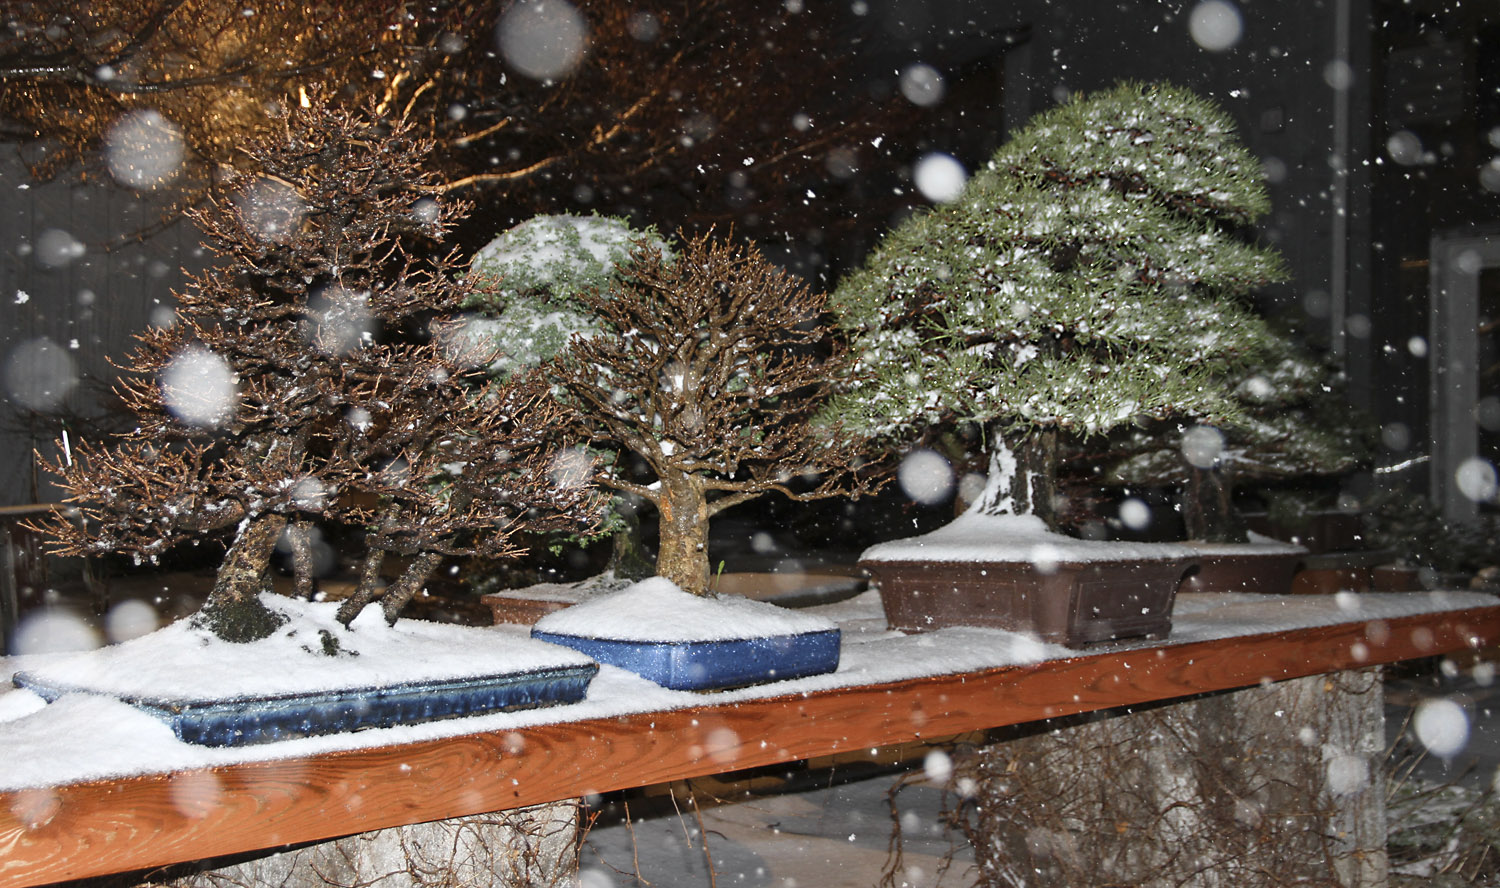
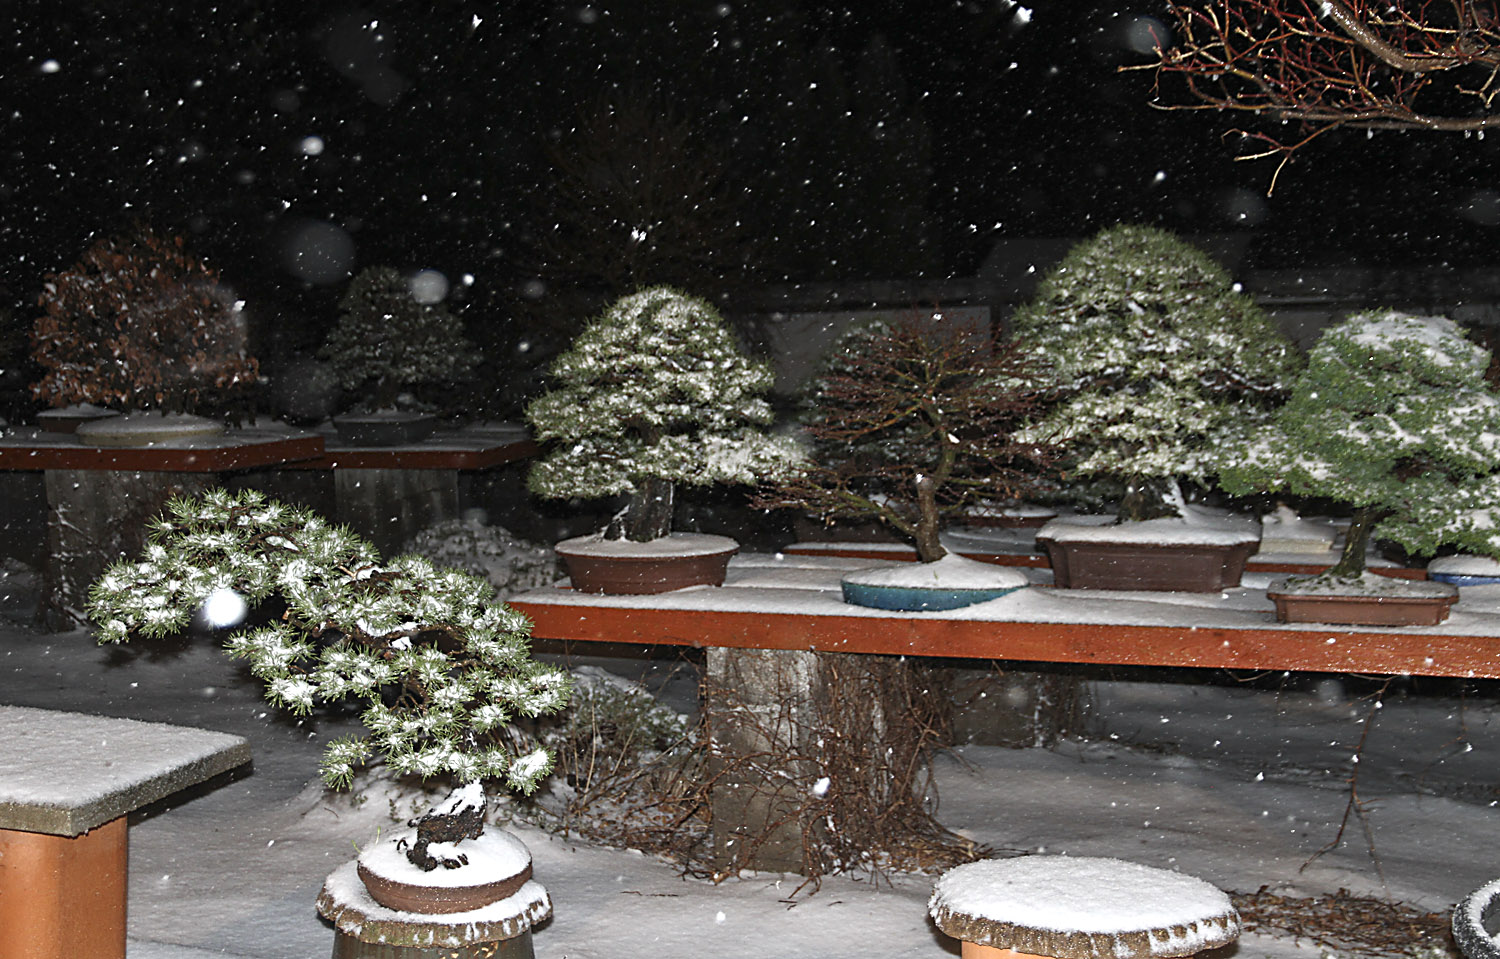
Beech are highly prized for bonsai because of their characteristic white bark, beautiful foliage, winter hardiness and easy training. There are several beech species native to Japan. The Japanese beech, Fagus crenata is the most commonly trained species for bonsai in Japan. Specimens near Mt. Fuji are especially valued because of their small thick foliage. The American beech, Fagus grandifolia, has rather large thin foliage and often collected specimens are grown for bonsai. The European beech, Fagus sylvatica, is trained for bonsai in Europe and spectacular bonsai are created from thick trunked collected trees.

In the United States European beech, and its numerous cultivars are commonly used in the landscape for different colored foliage or unusual growth patterns. These cultivars are usually grafted onto seedlings of European beech, so they are a widely grown nursery stock.

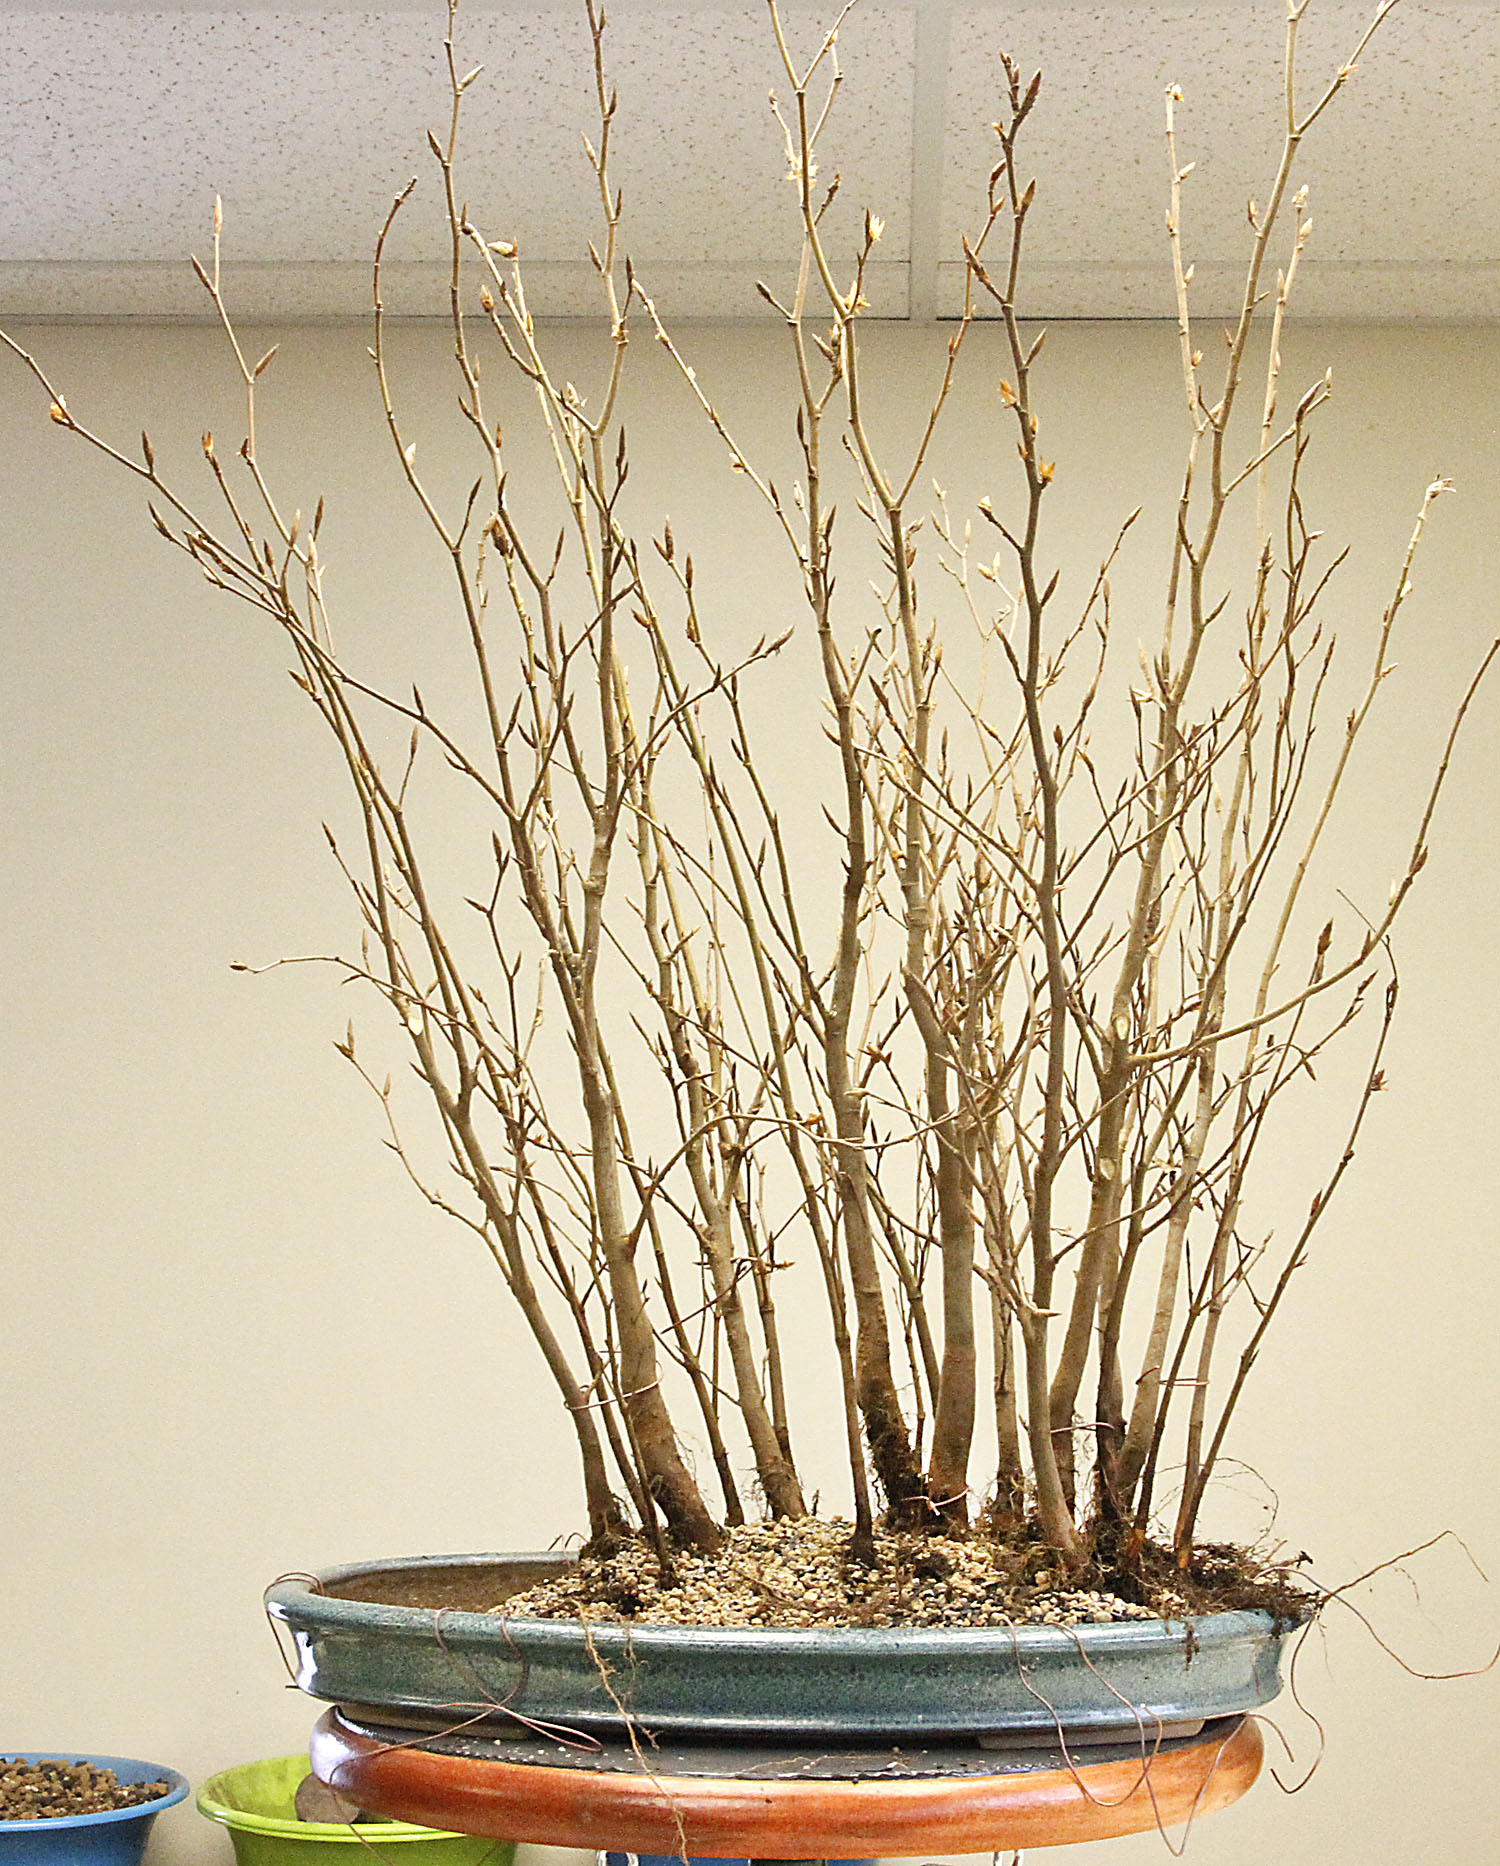
The normal leaf size of European beech is a bit larger than Japanese beech. Although individual seedlings vary in leaf size and character, European beech mostly have thick leathery foliage, which quickly reduce in size. Whitish bark quickly develops in approximately six to ten years.

Image

A few weeks ago I received a nursery offering for one to two foot European beech seedling transplants with low branching for hedges. European beech are often used for hedges in Europe and old estates in the United States. The offering sounded great and 150 sample trees were ordered. They were intended for single tree workshops for my next year’s Introductory Bonsai Course. Upon arrival, after inspection, the branching was not ideal for single tree bonsai, but excellent for forests.

I was quite excited about the shapes of the new plants and immediately created five European beech forests of different designs. Only a few of the seedling transplants were selected for single trunk bonsai. Since I was working alone I did not take the time to photograph the process of creating a forest bonsai. The five forests came out great and have the possibility of developing into future fine bonsai, so I ordered another 100 seedling transplants to make another forest with a friend photographing the creative process.


Image

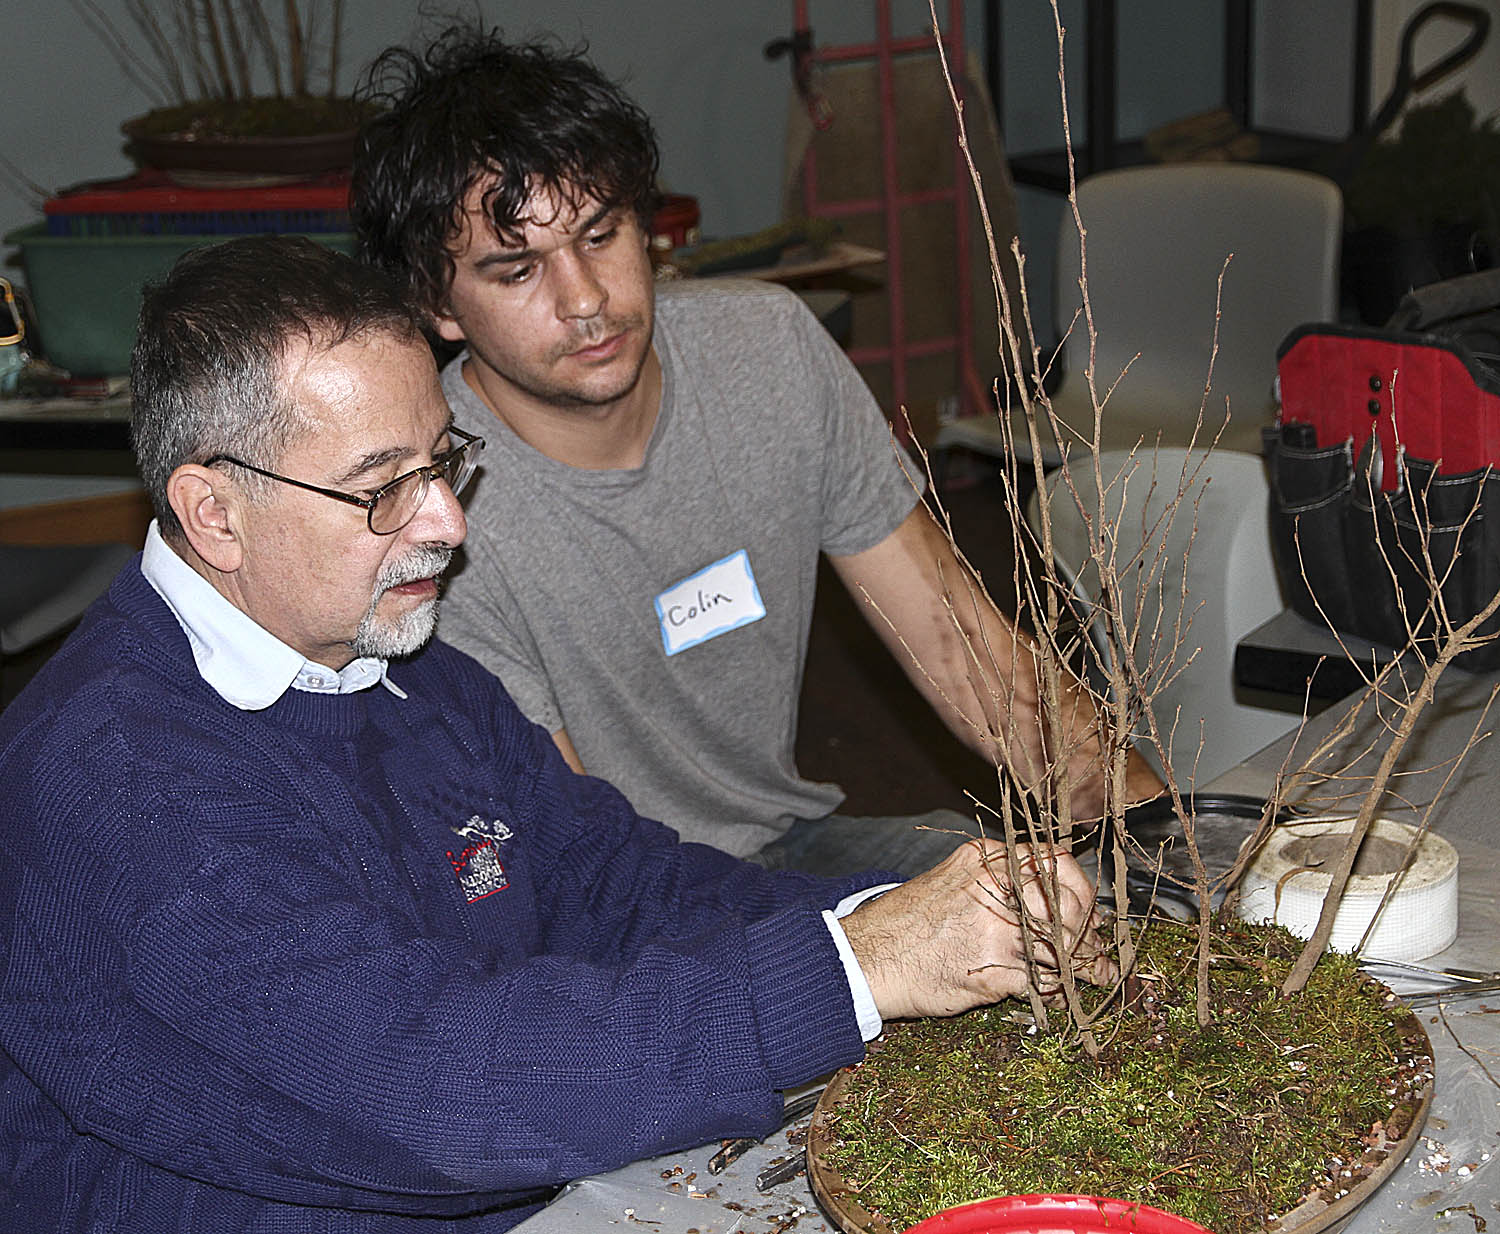
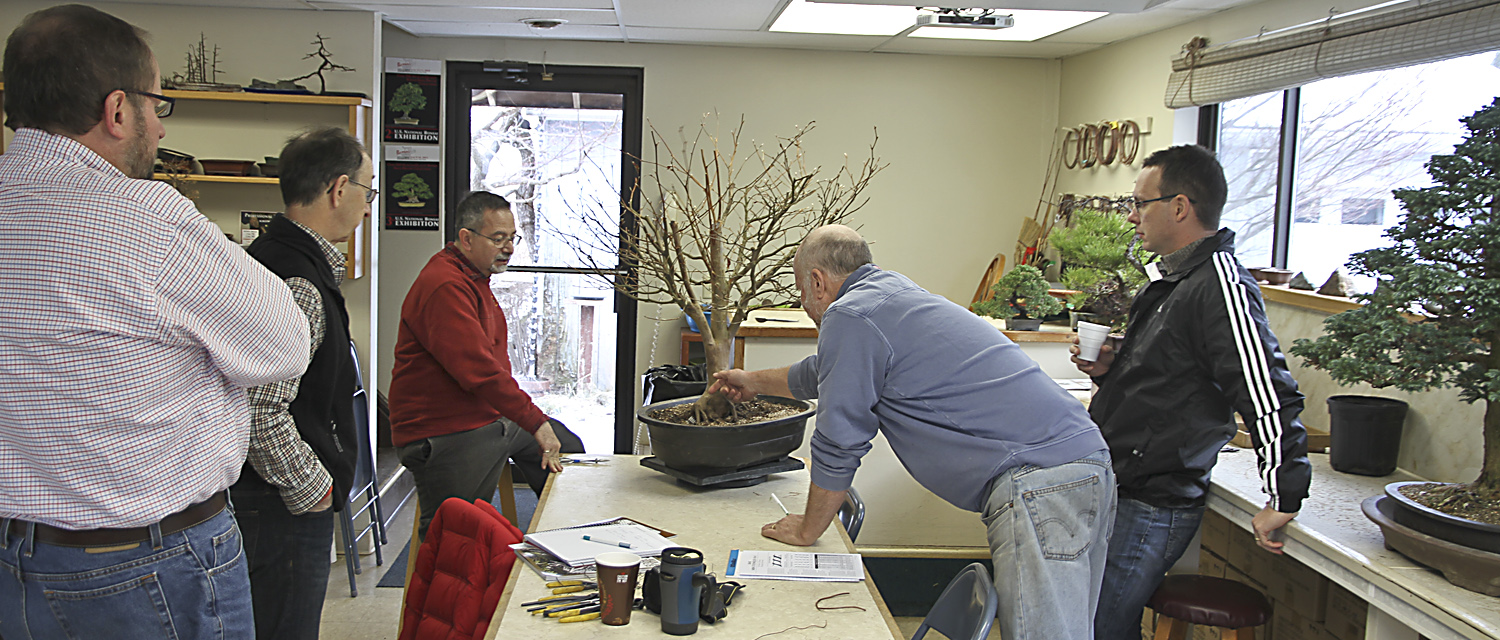
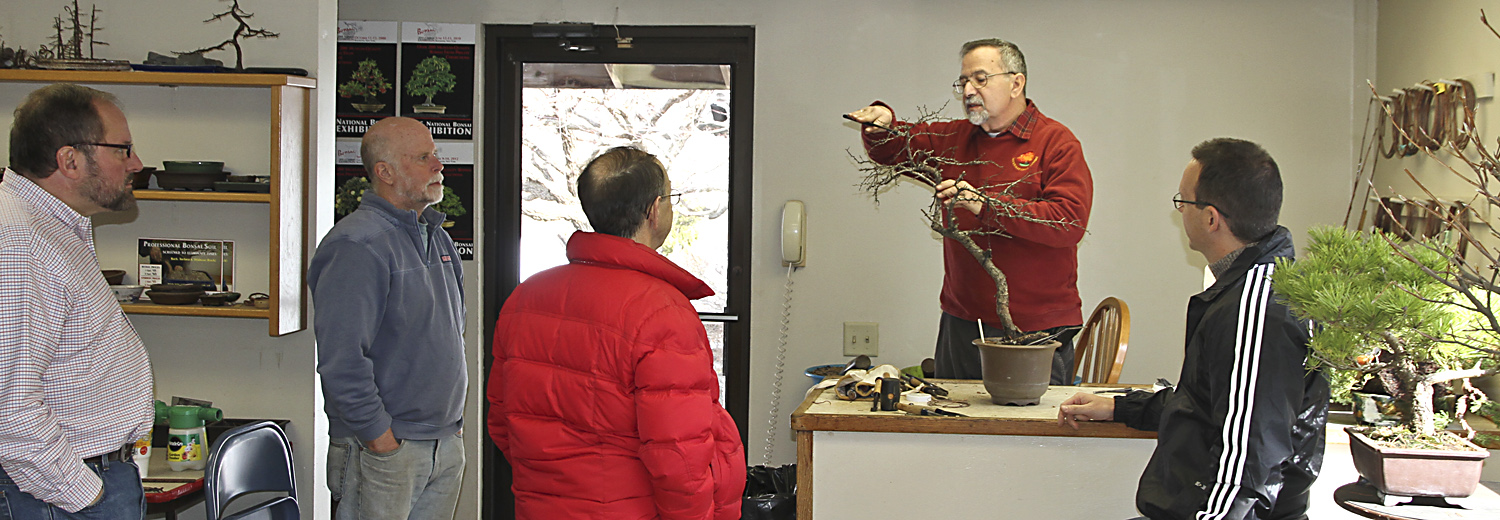
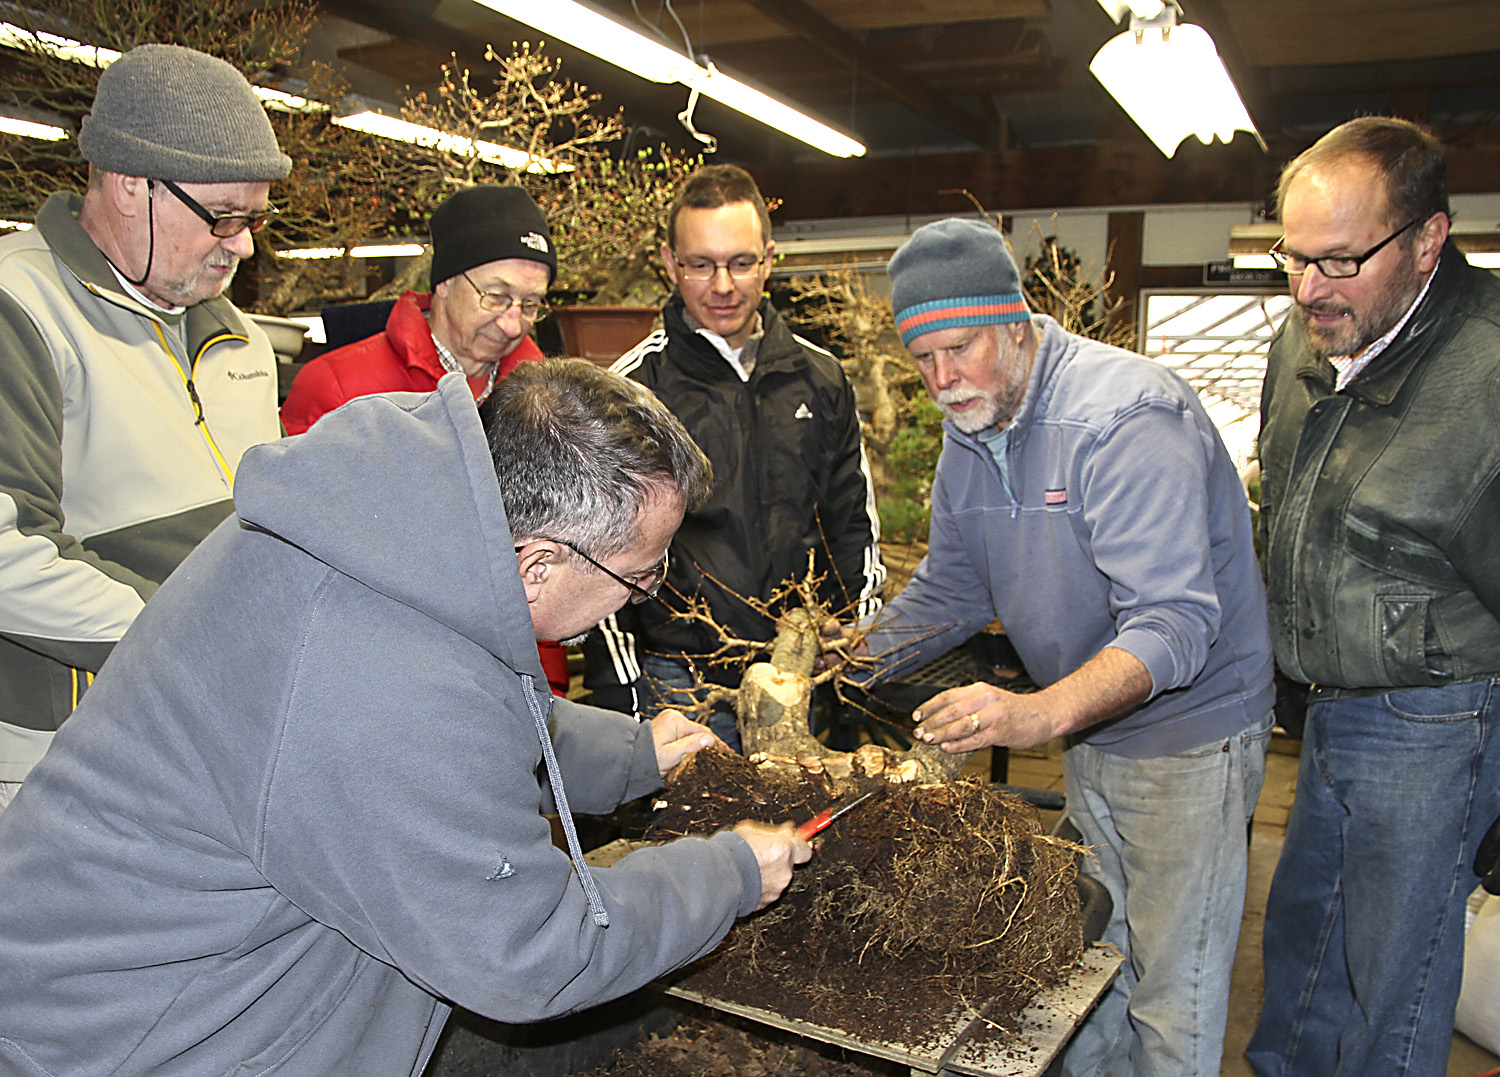
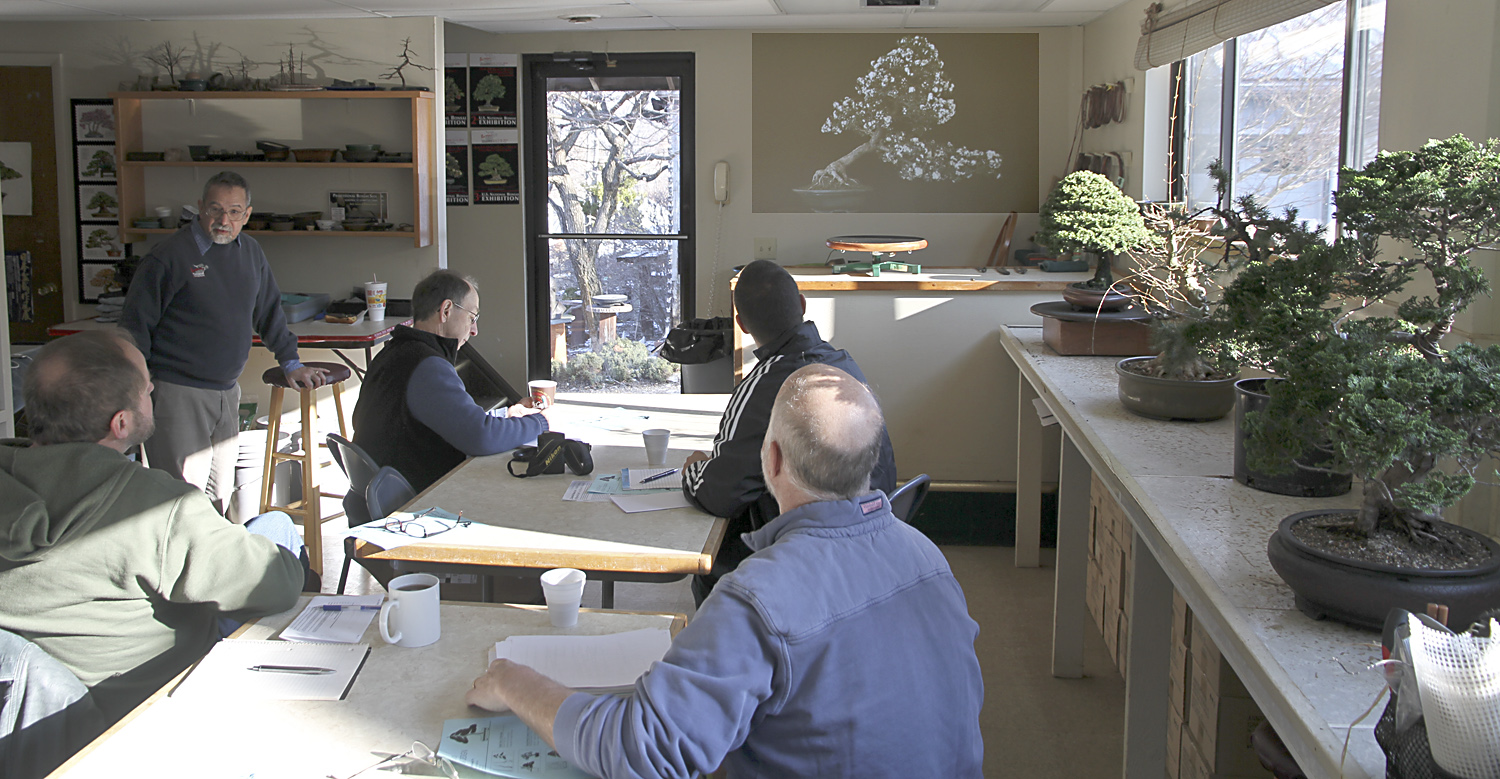
The seedlings arrived last week, but I did not have an opportunity to create the forest because I was preparing for my new Classical Bonsai MasterClass. Three of the four students arrived a day early to drop off their bonsai and since my preparations were complete I seized the opportunity to create the European beech forest while presenting a private demonstration lesson for the early arrival three students.


Image

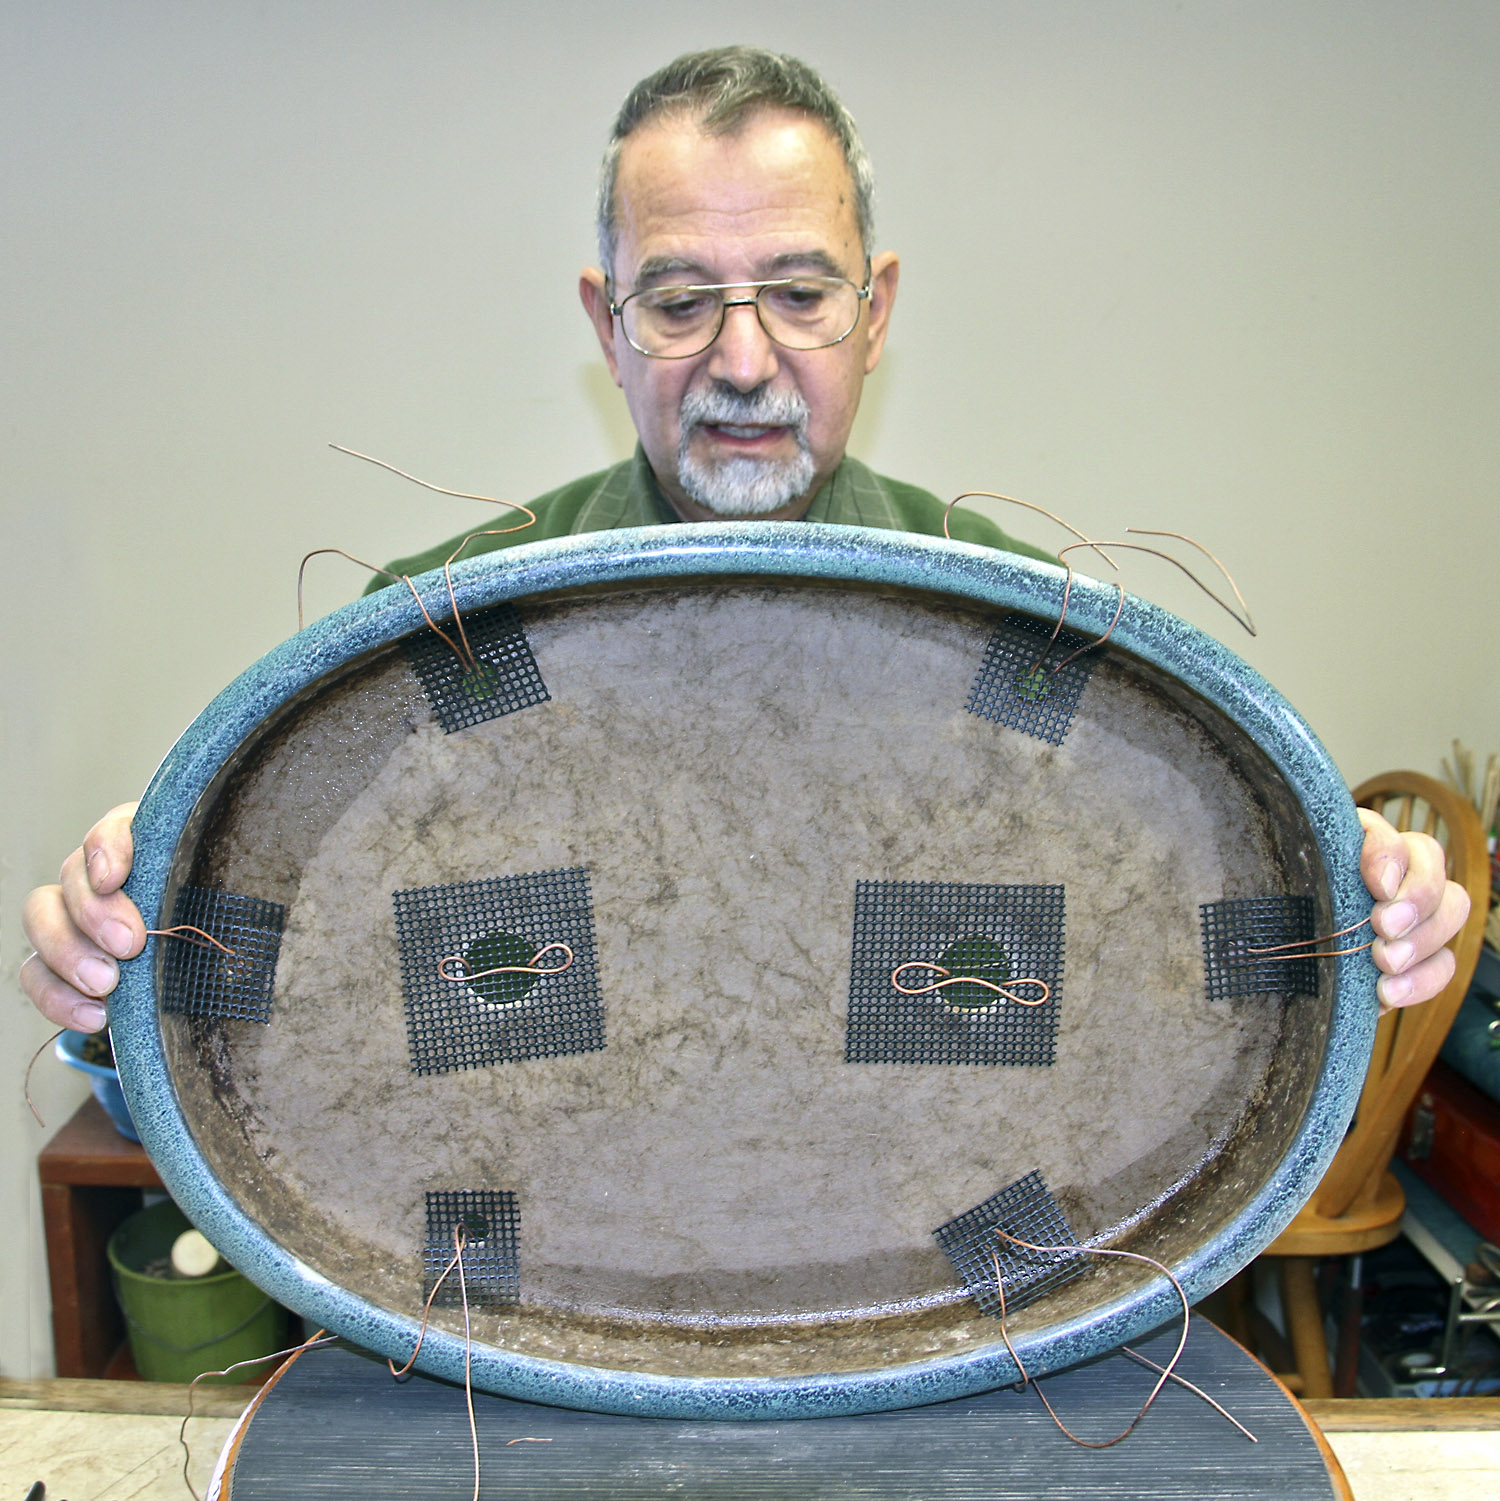
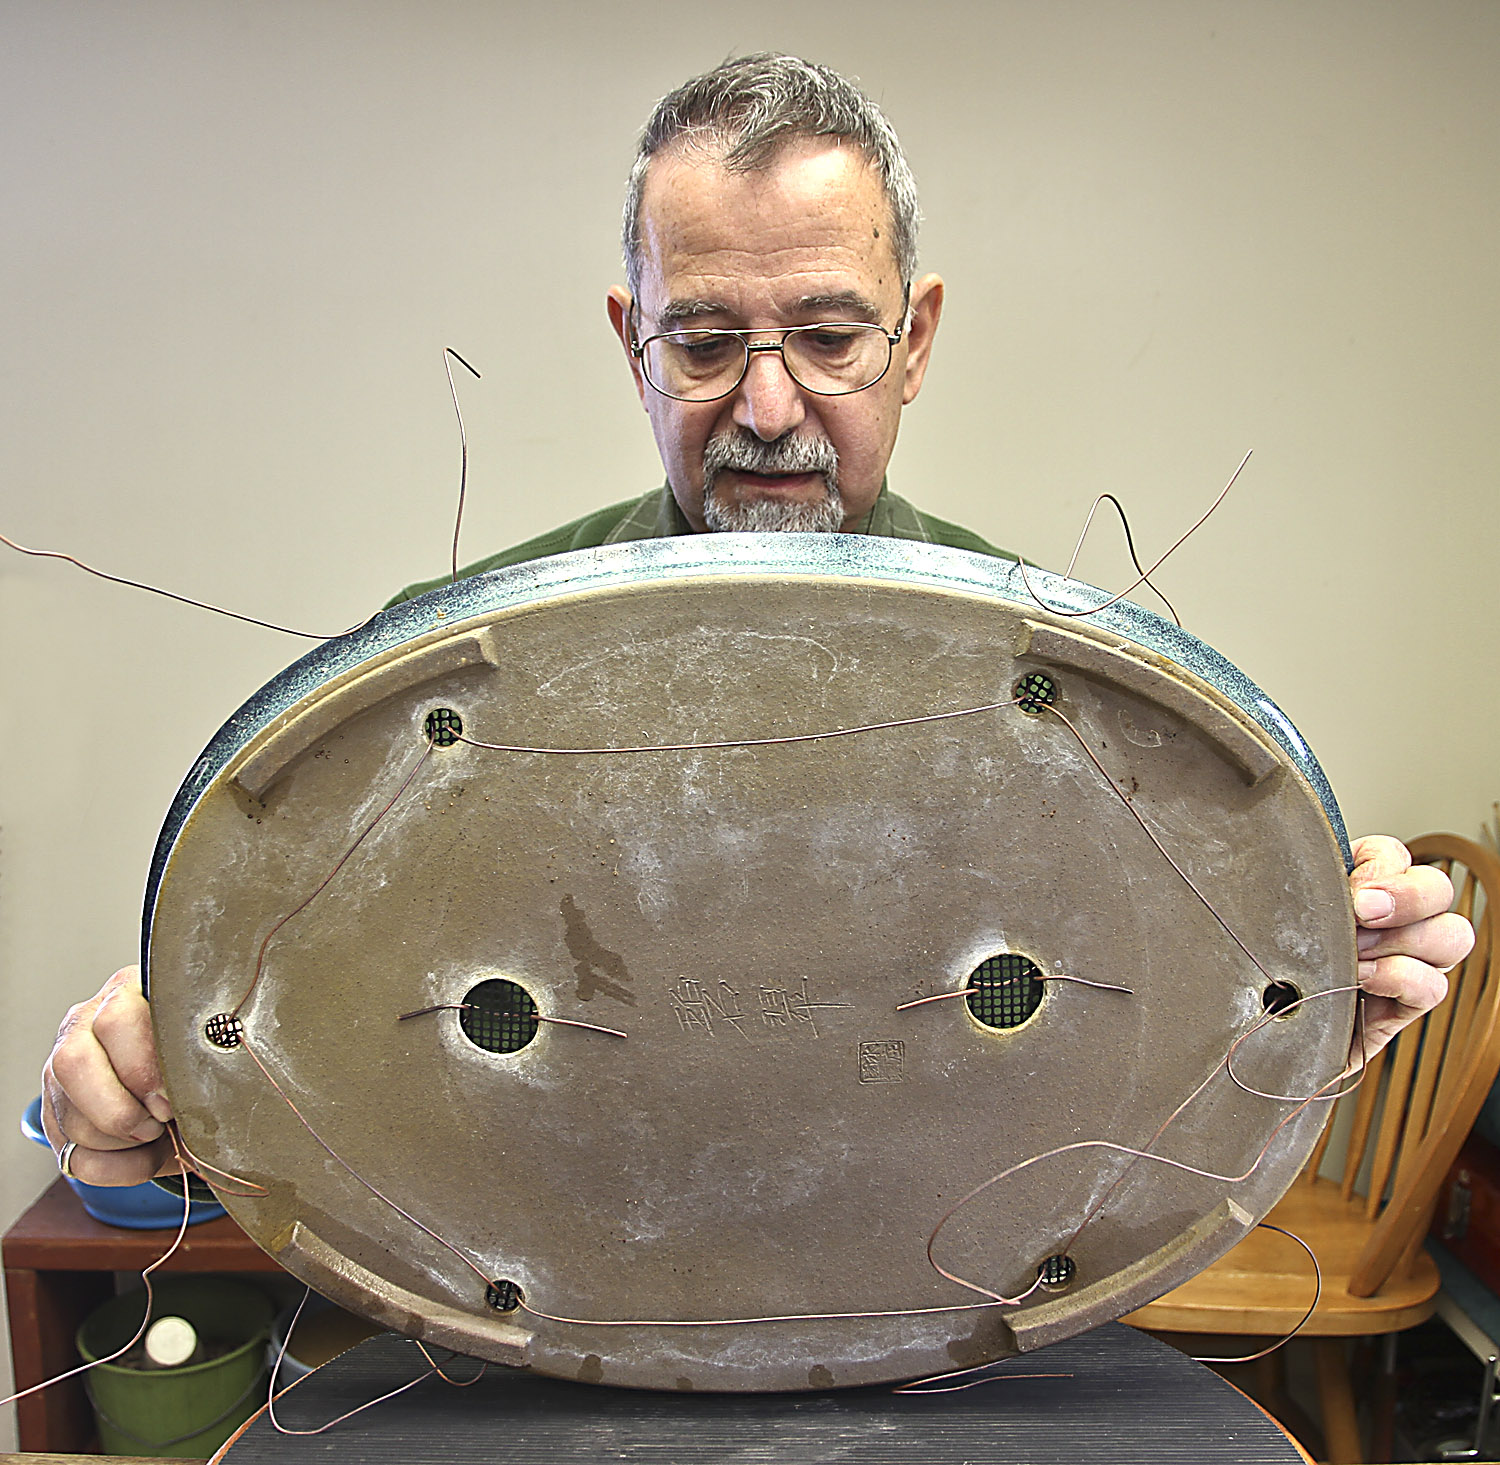
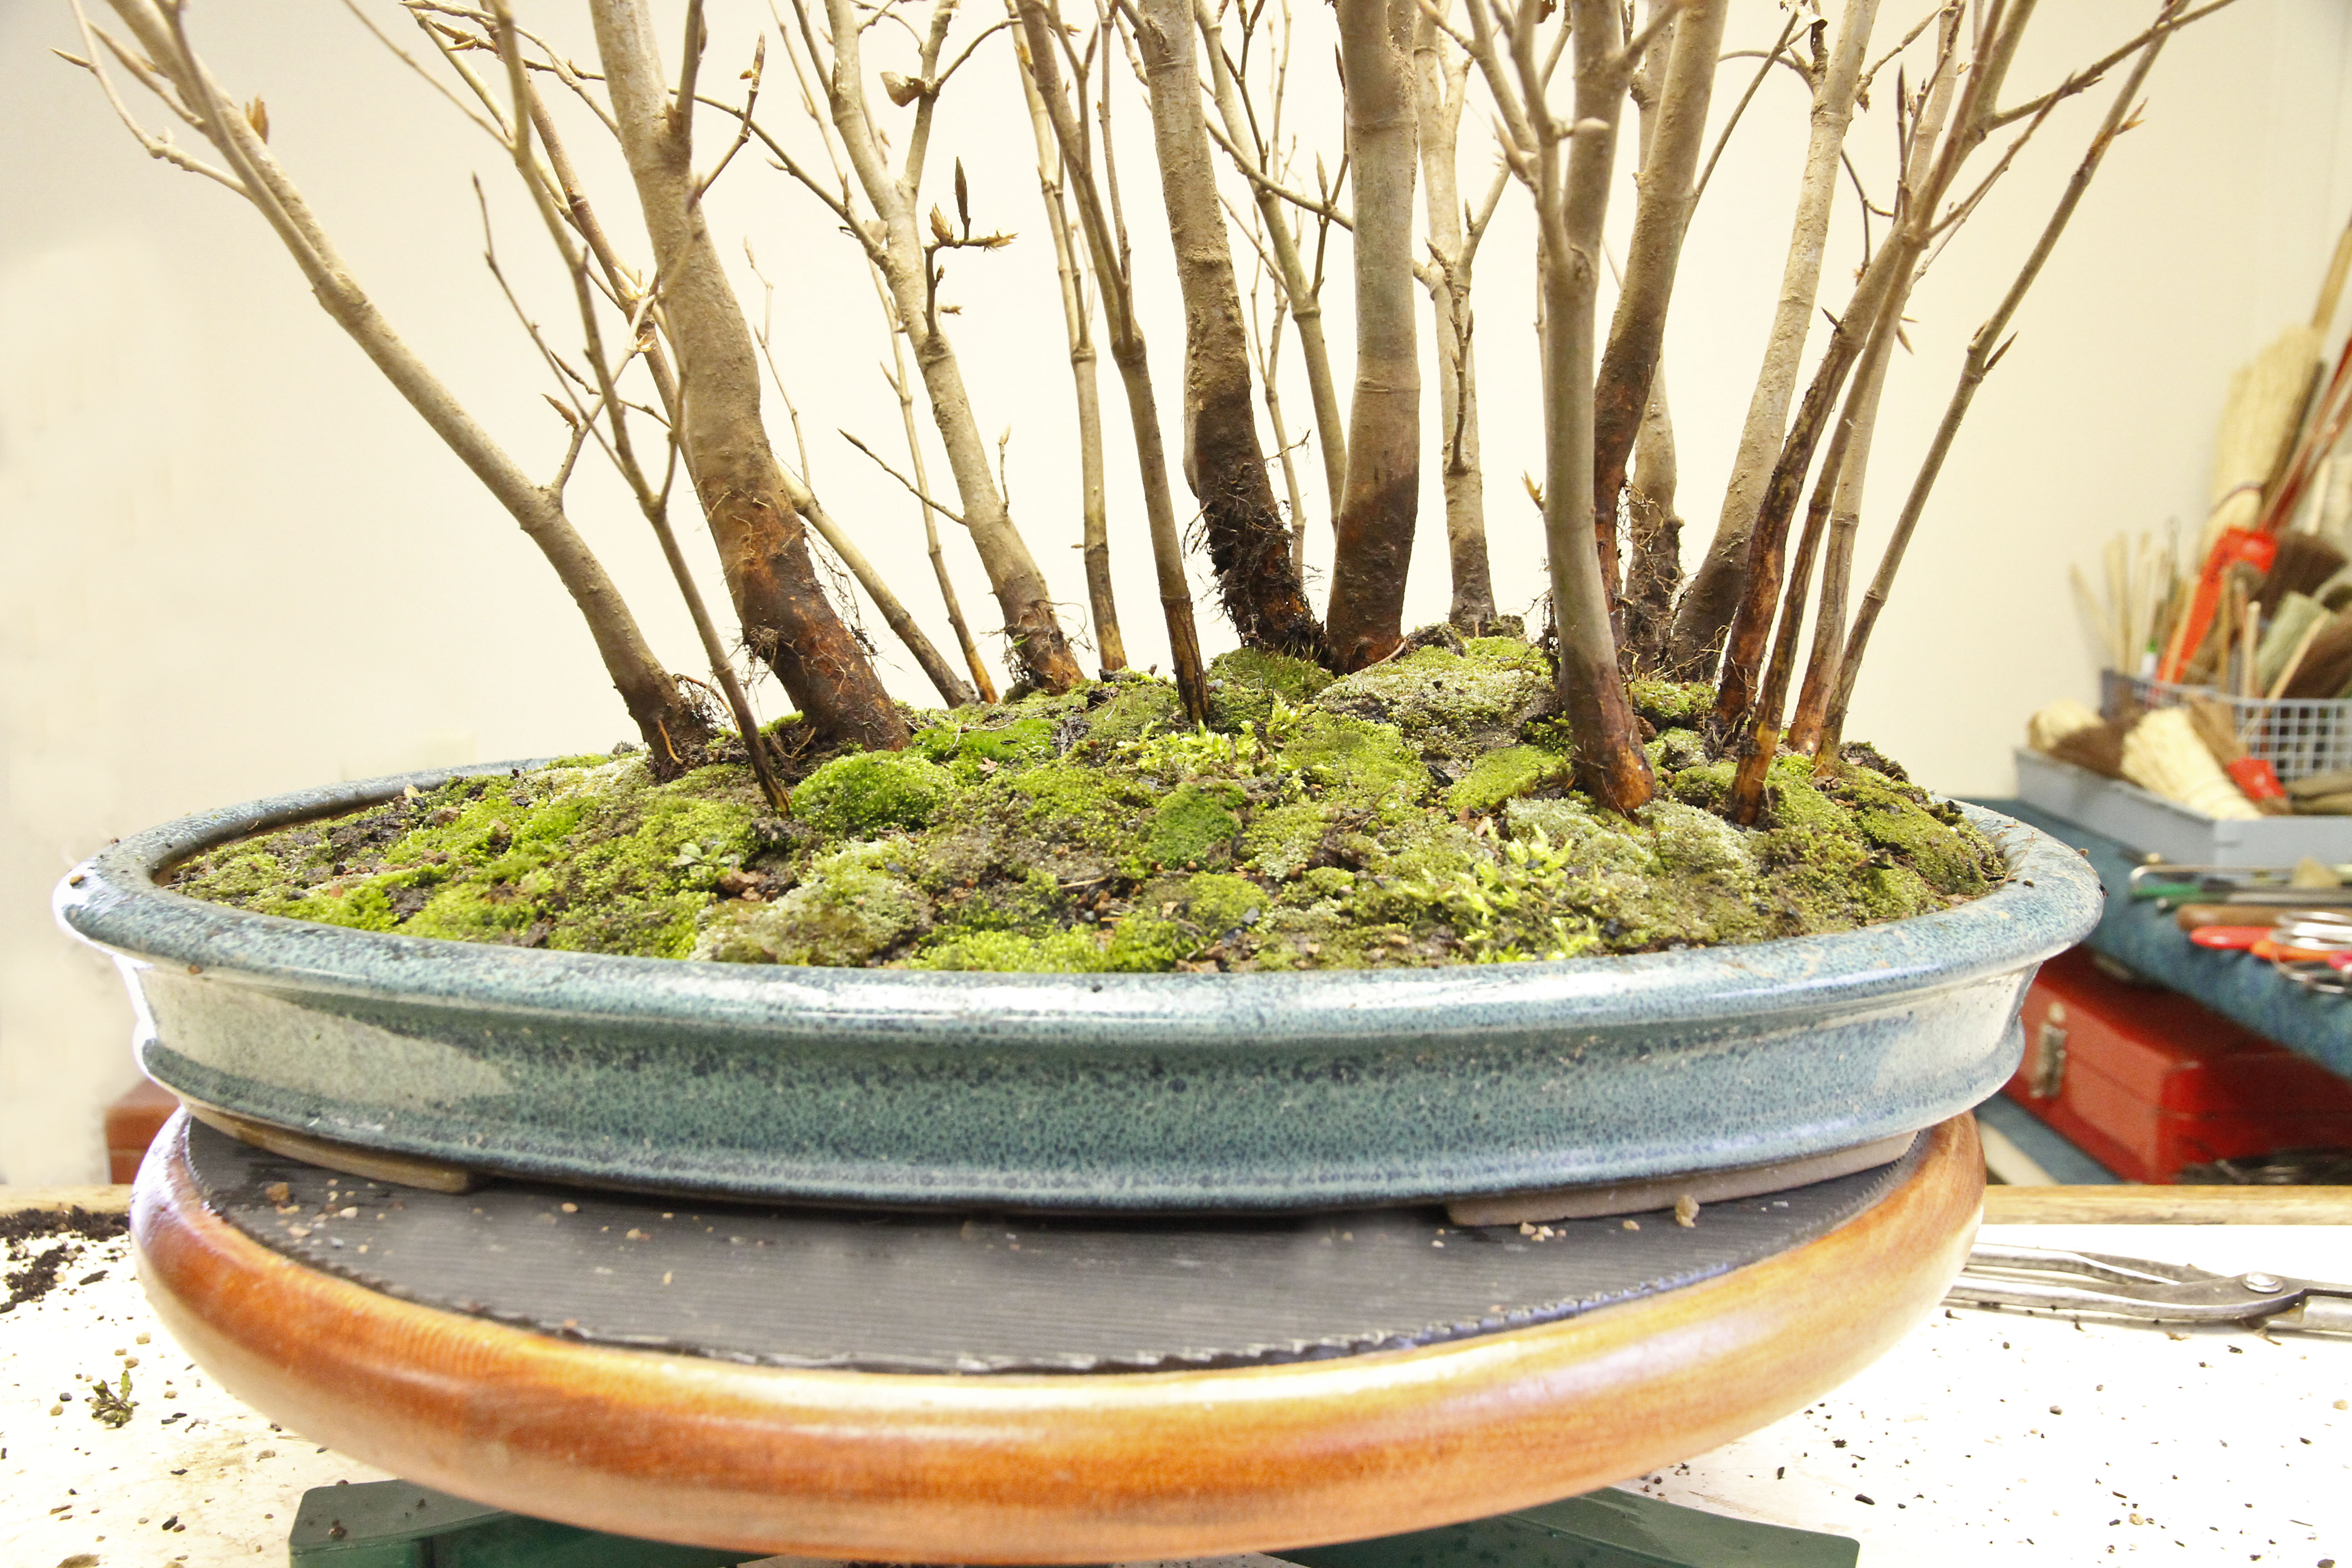
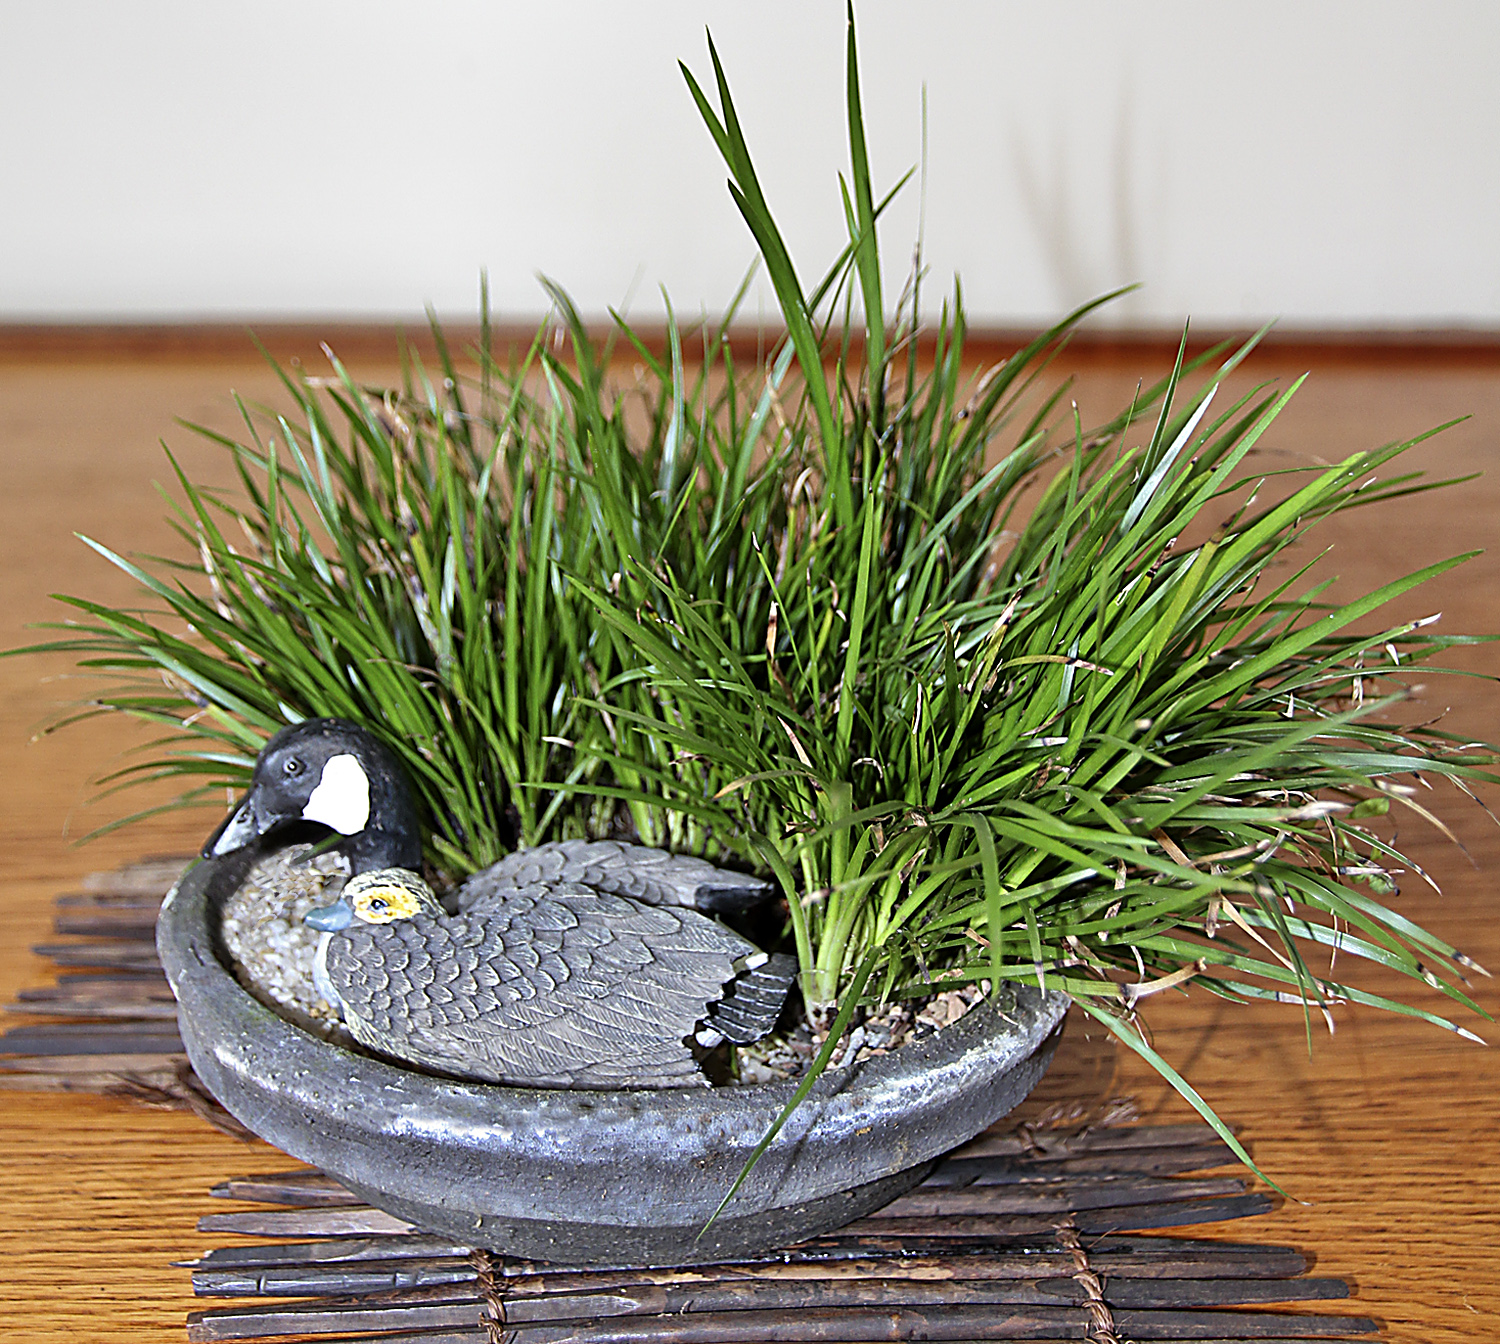
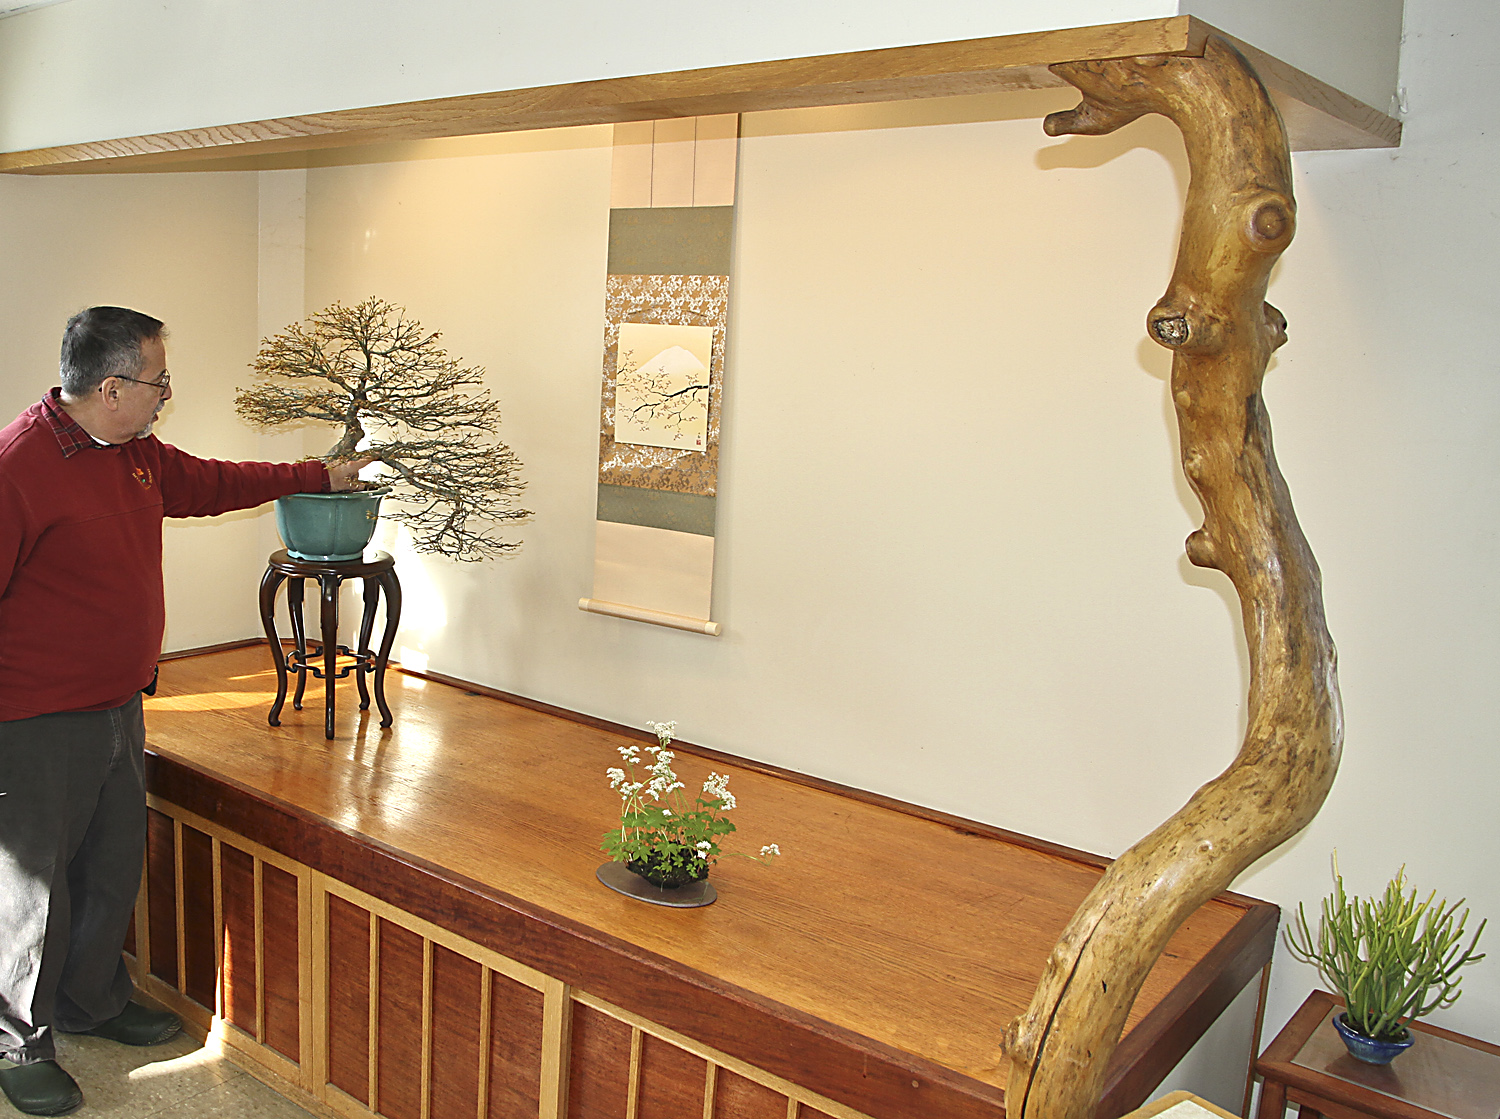
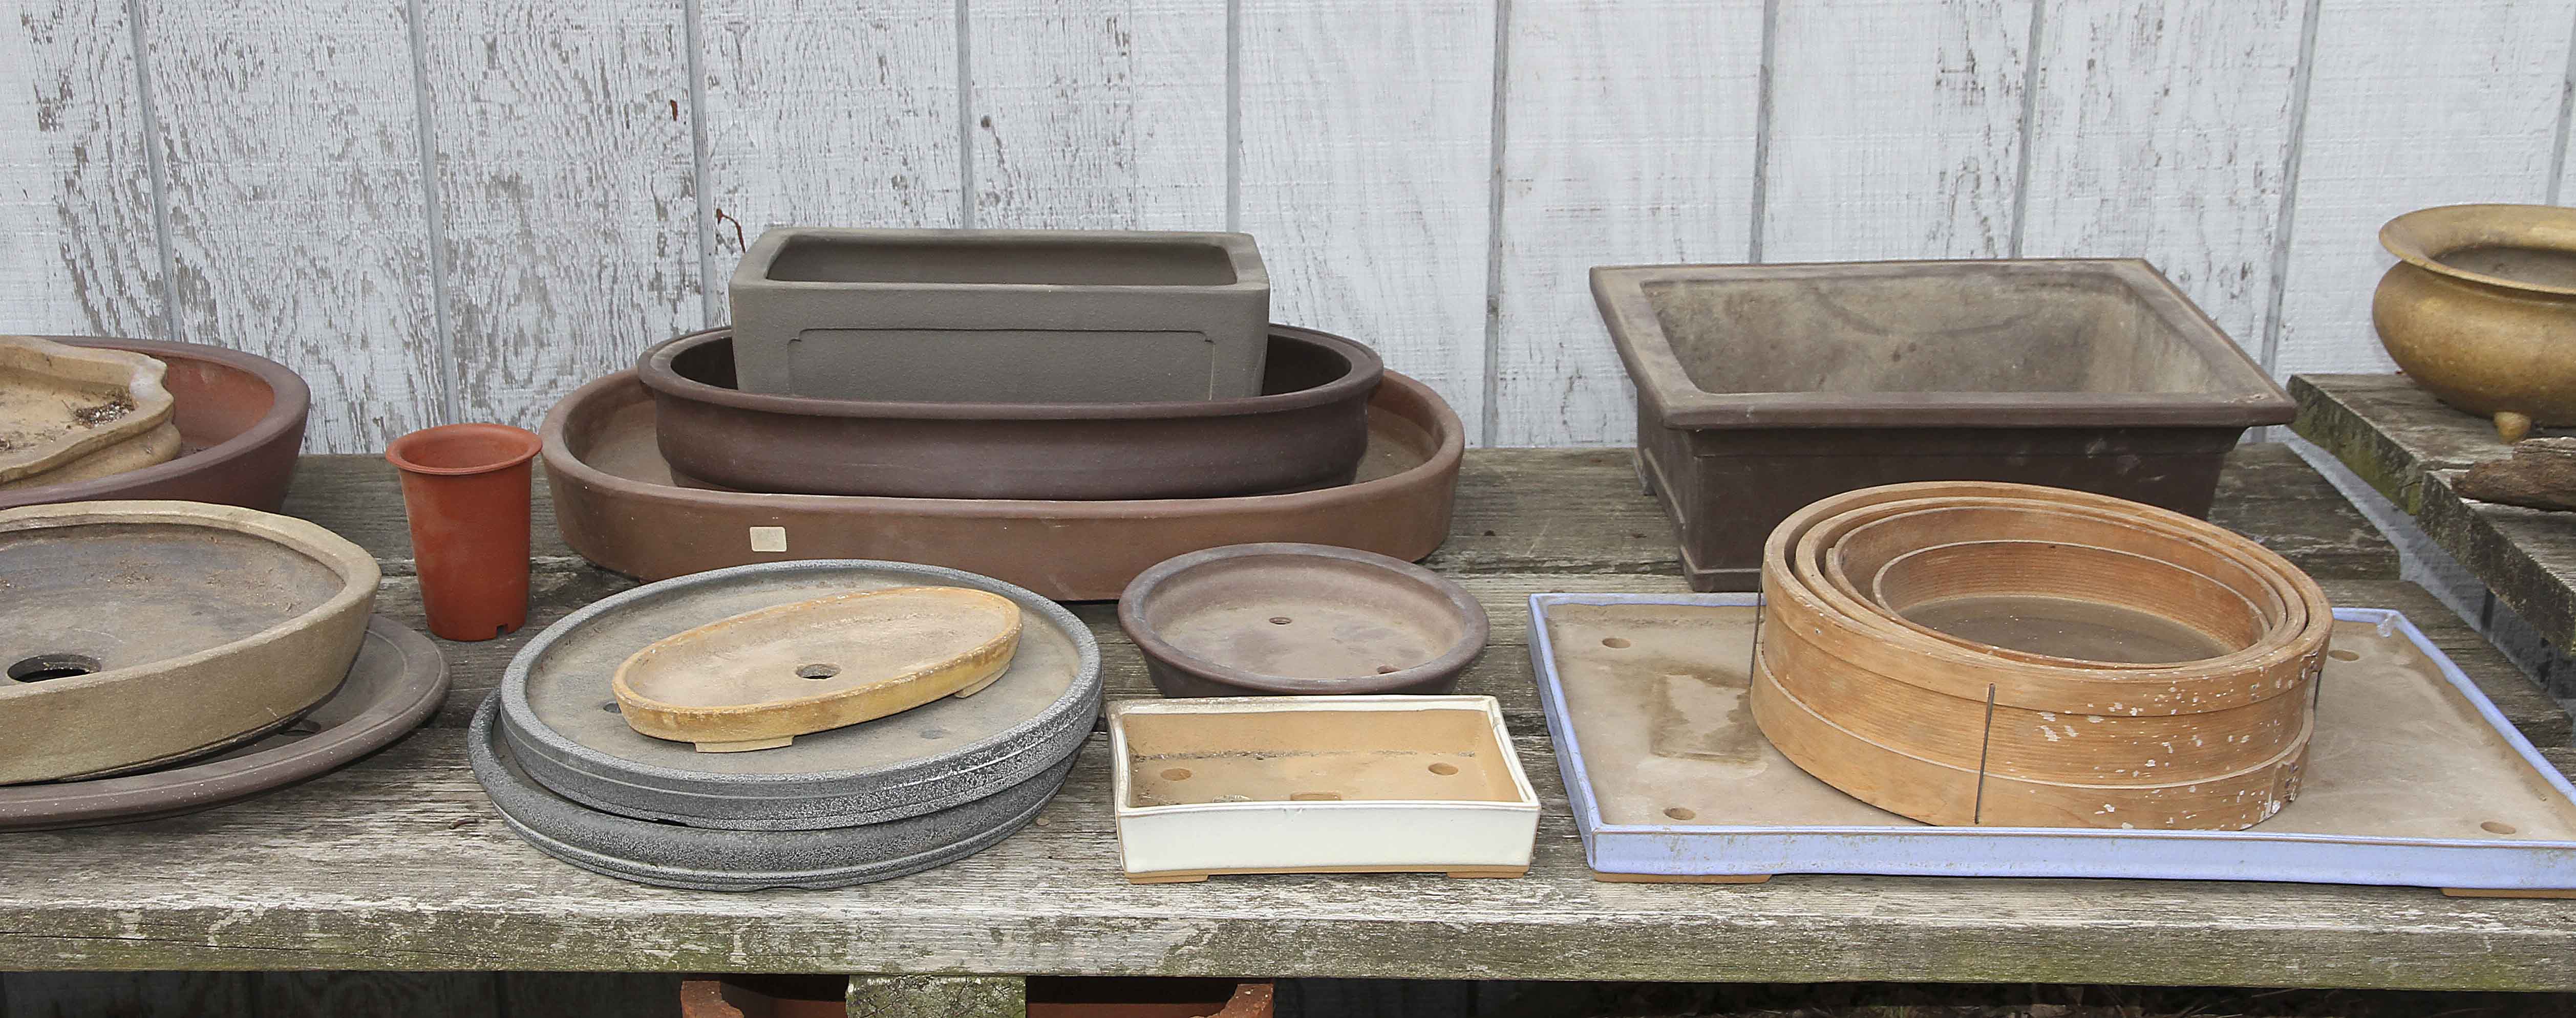
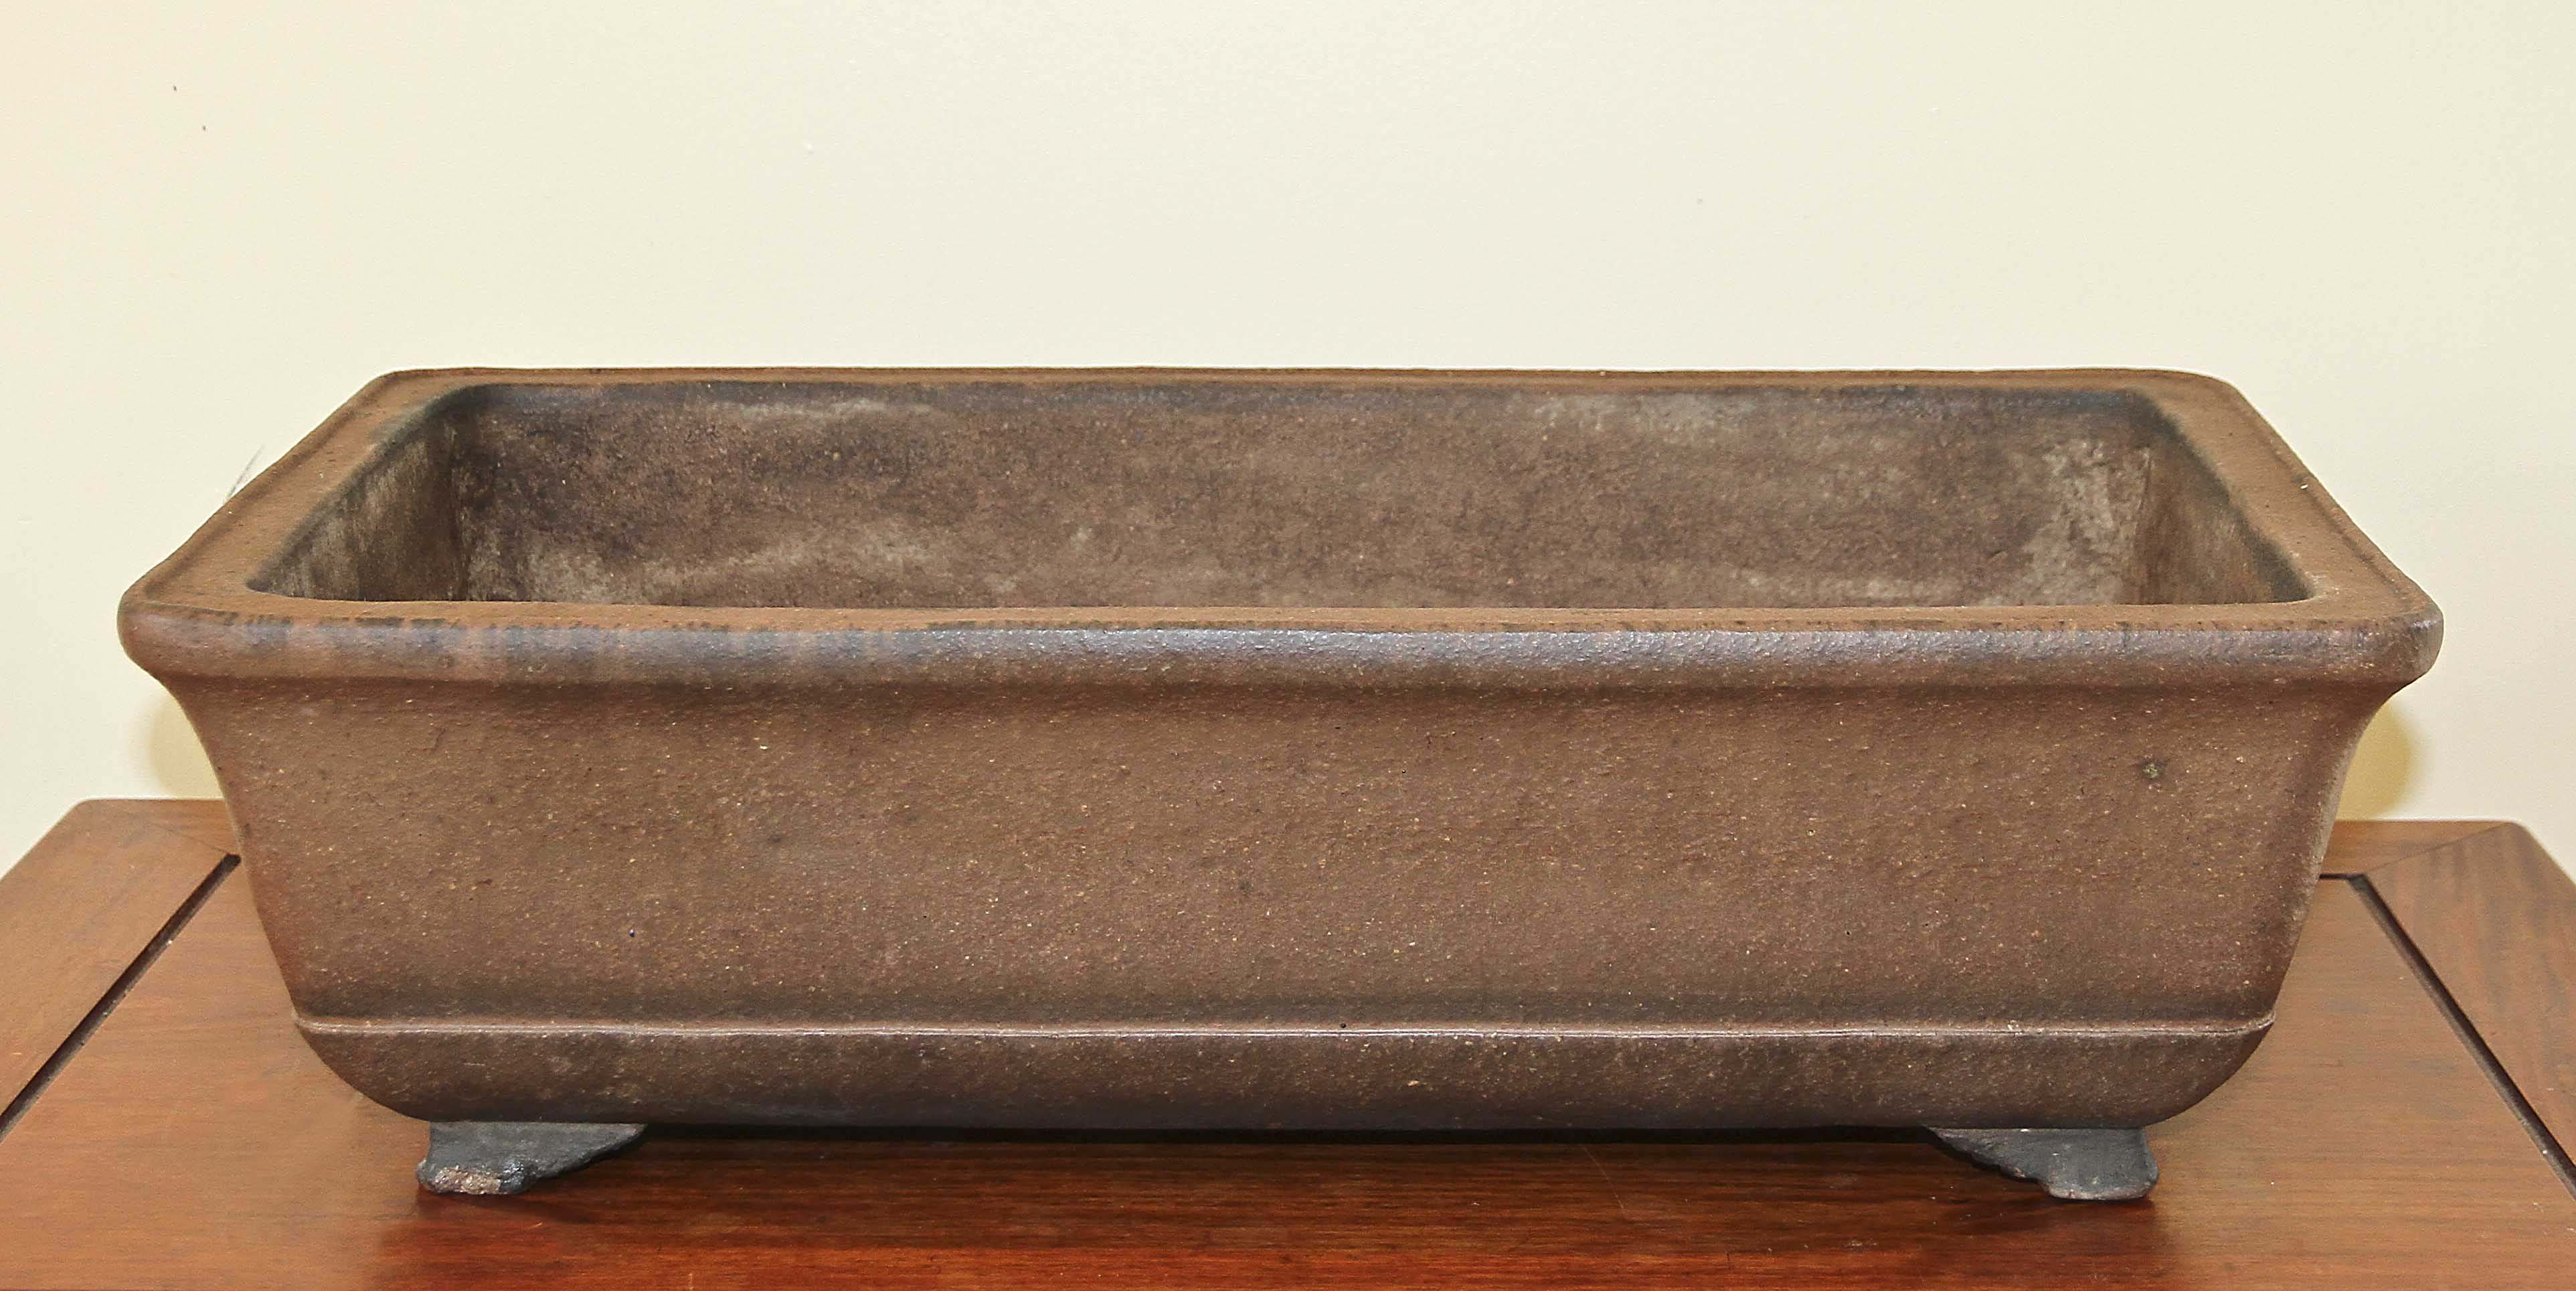
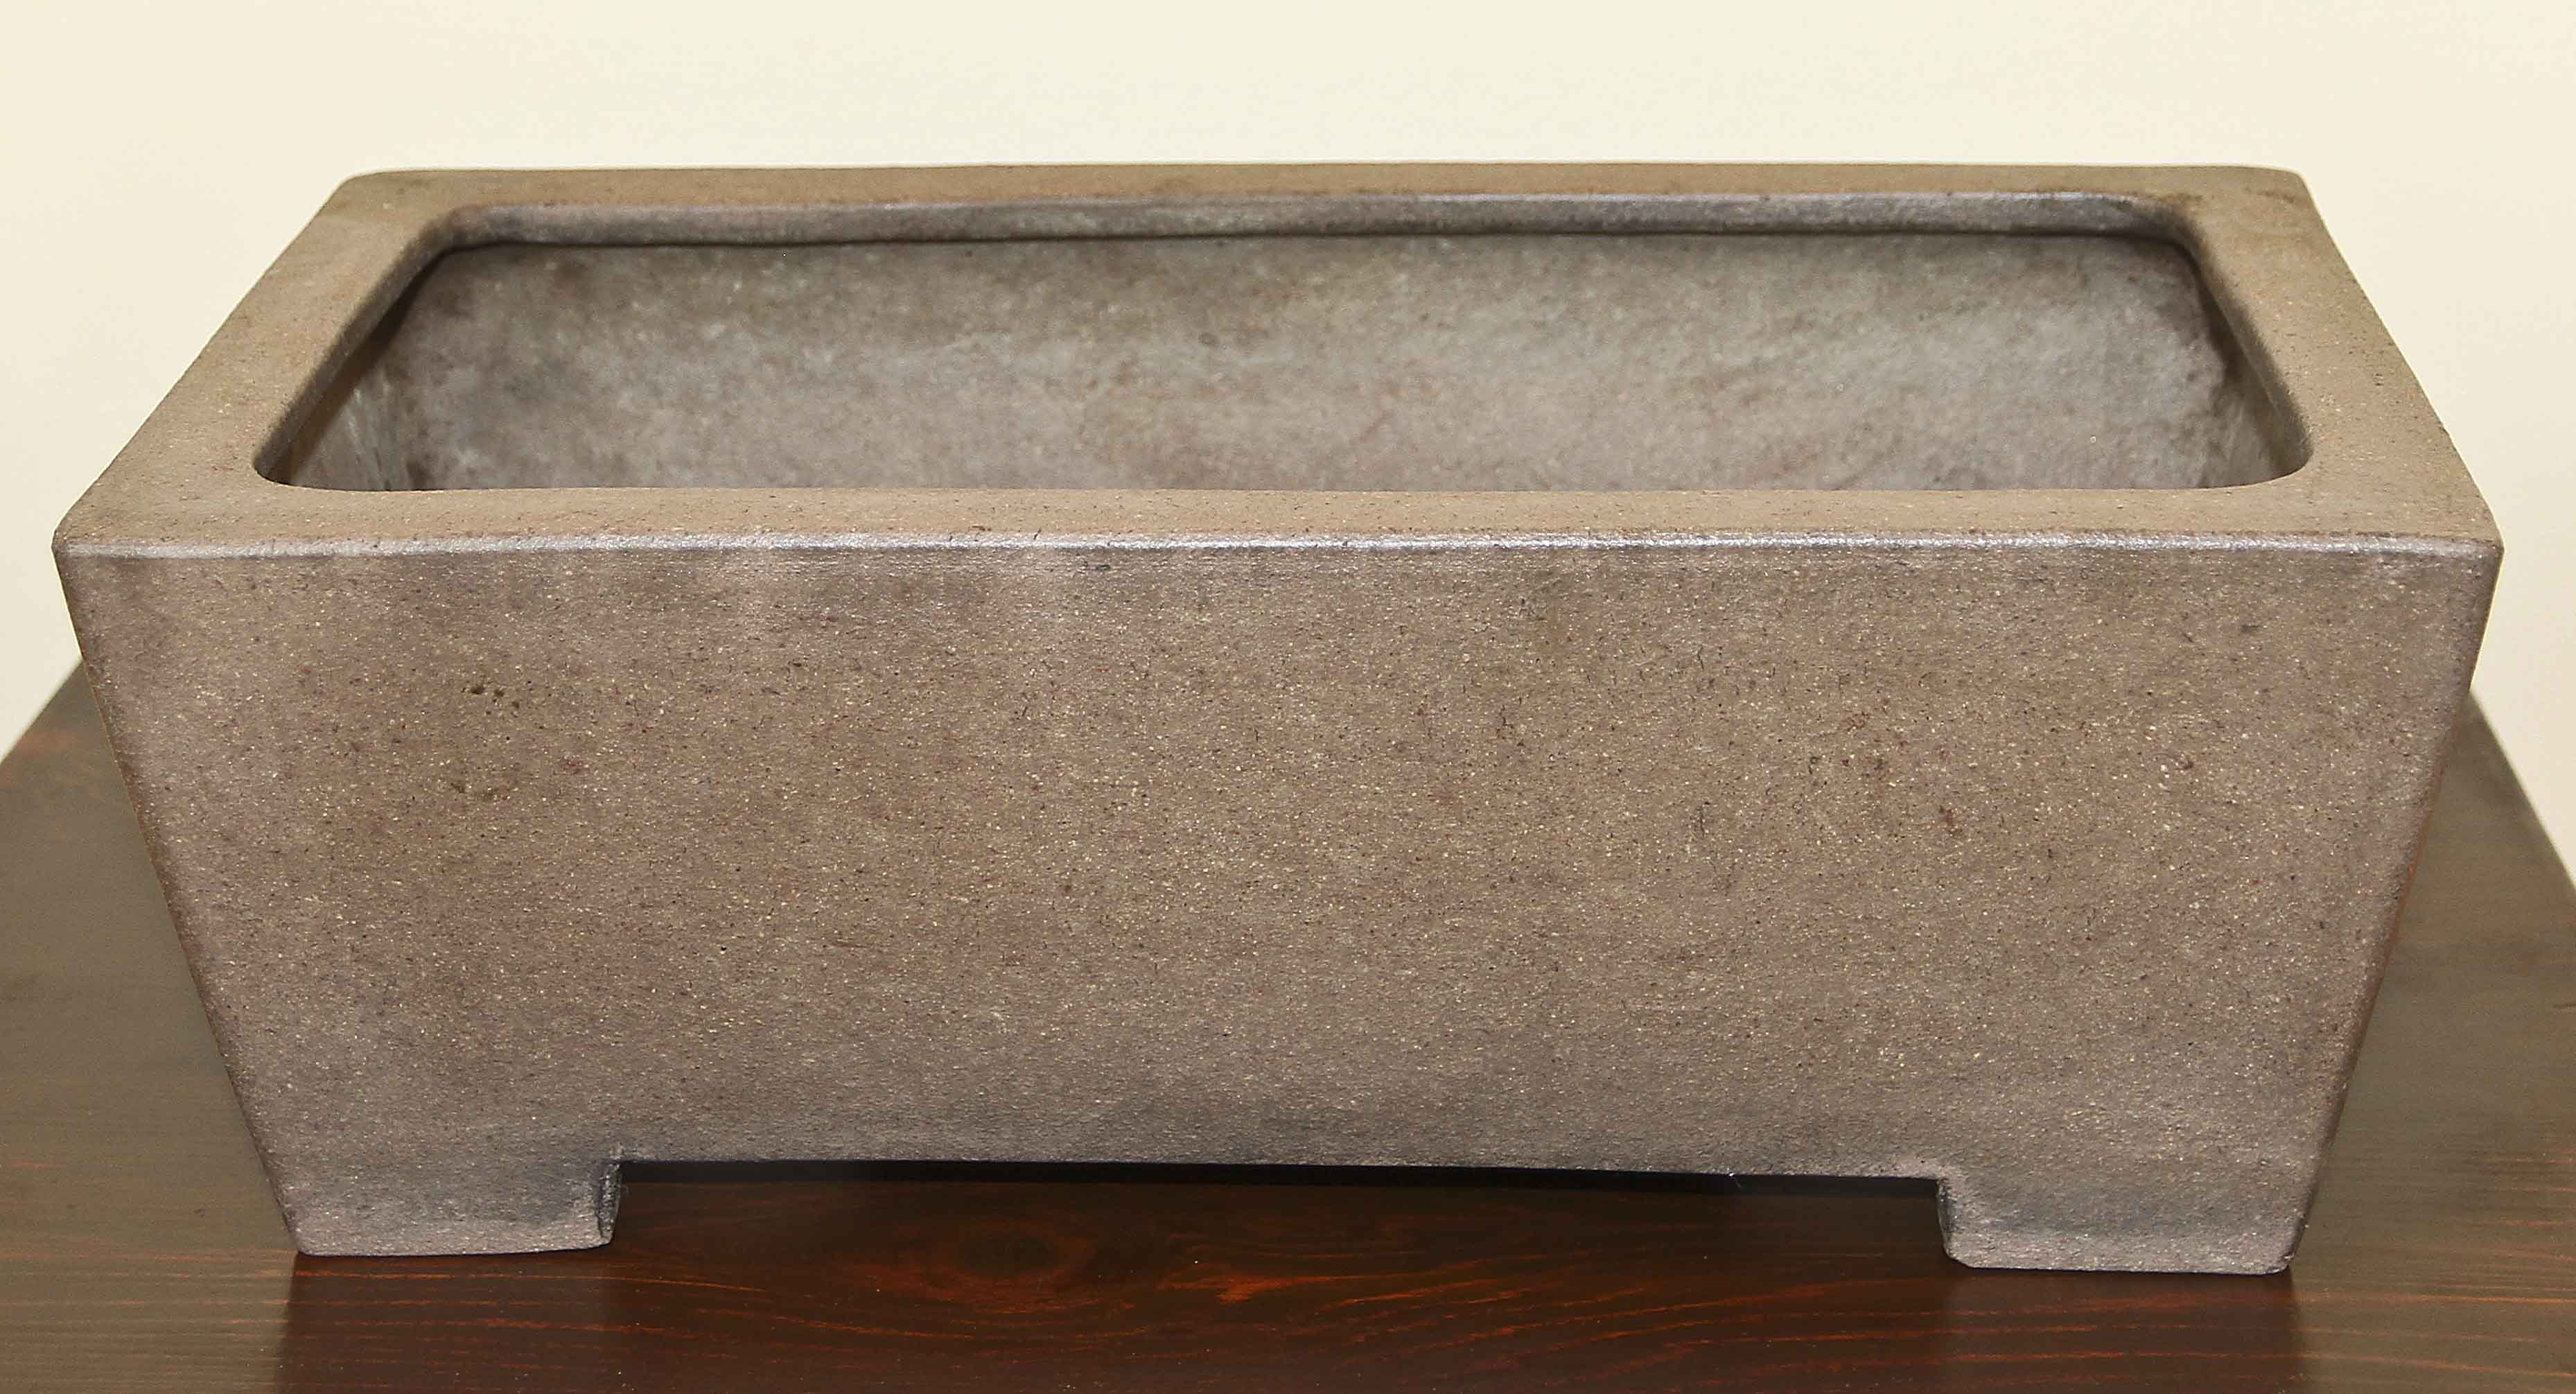
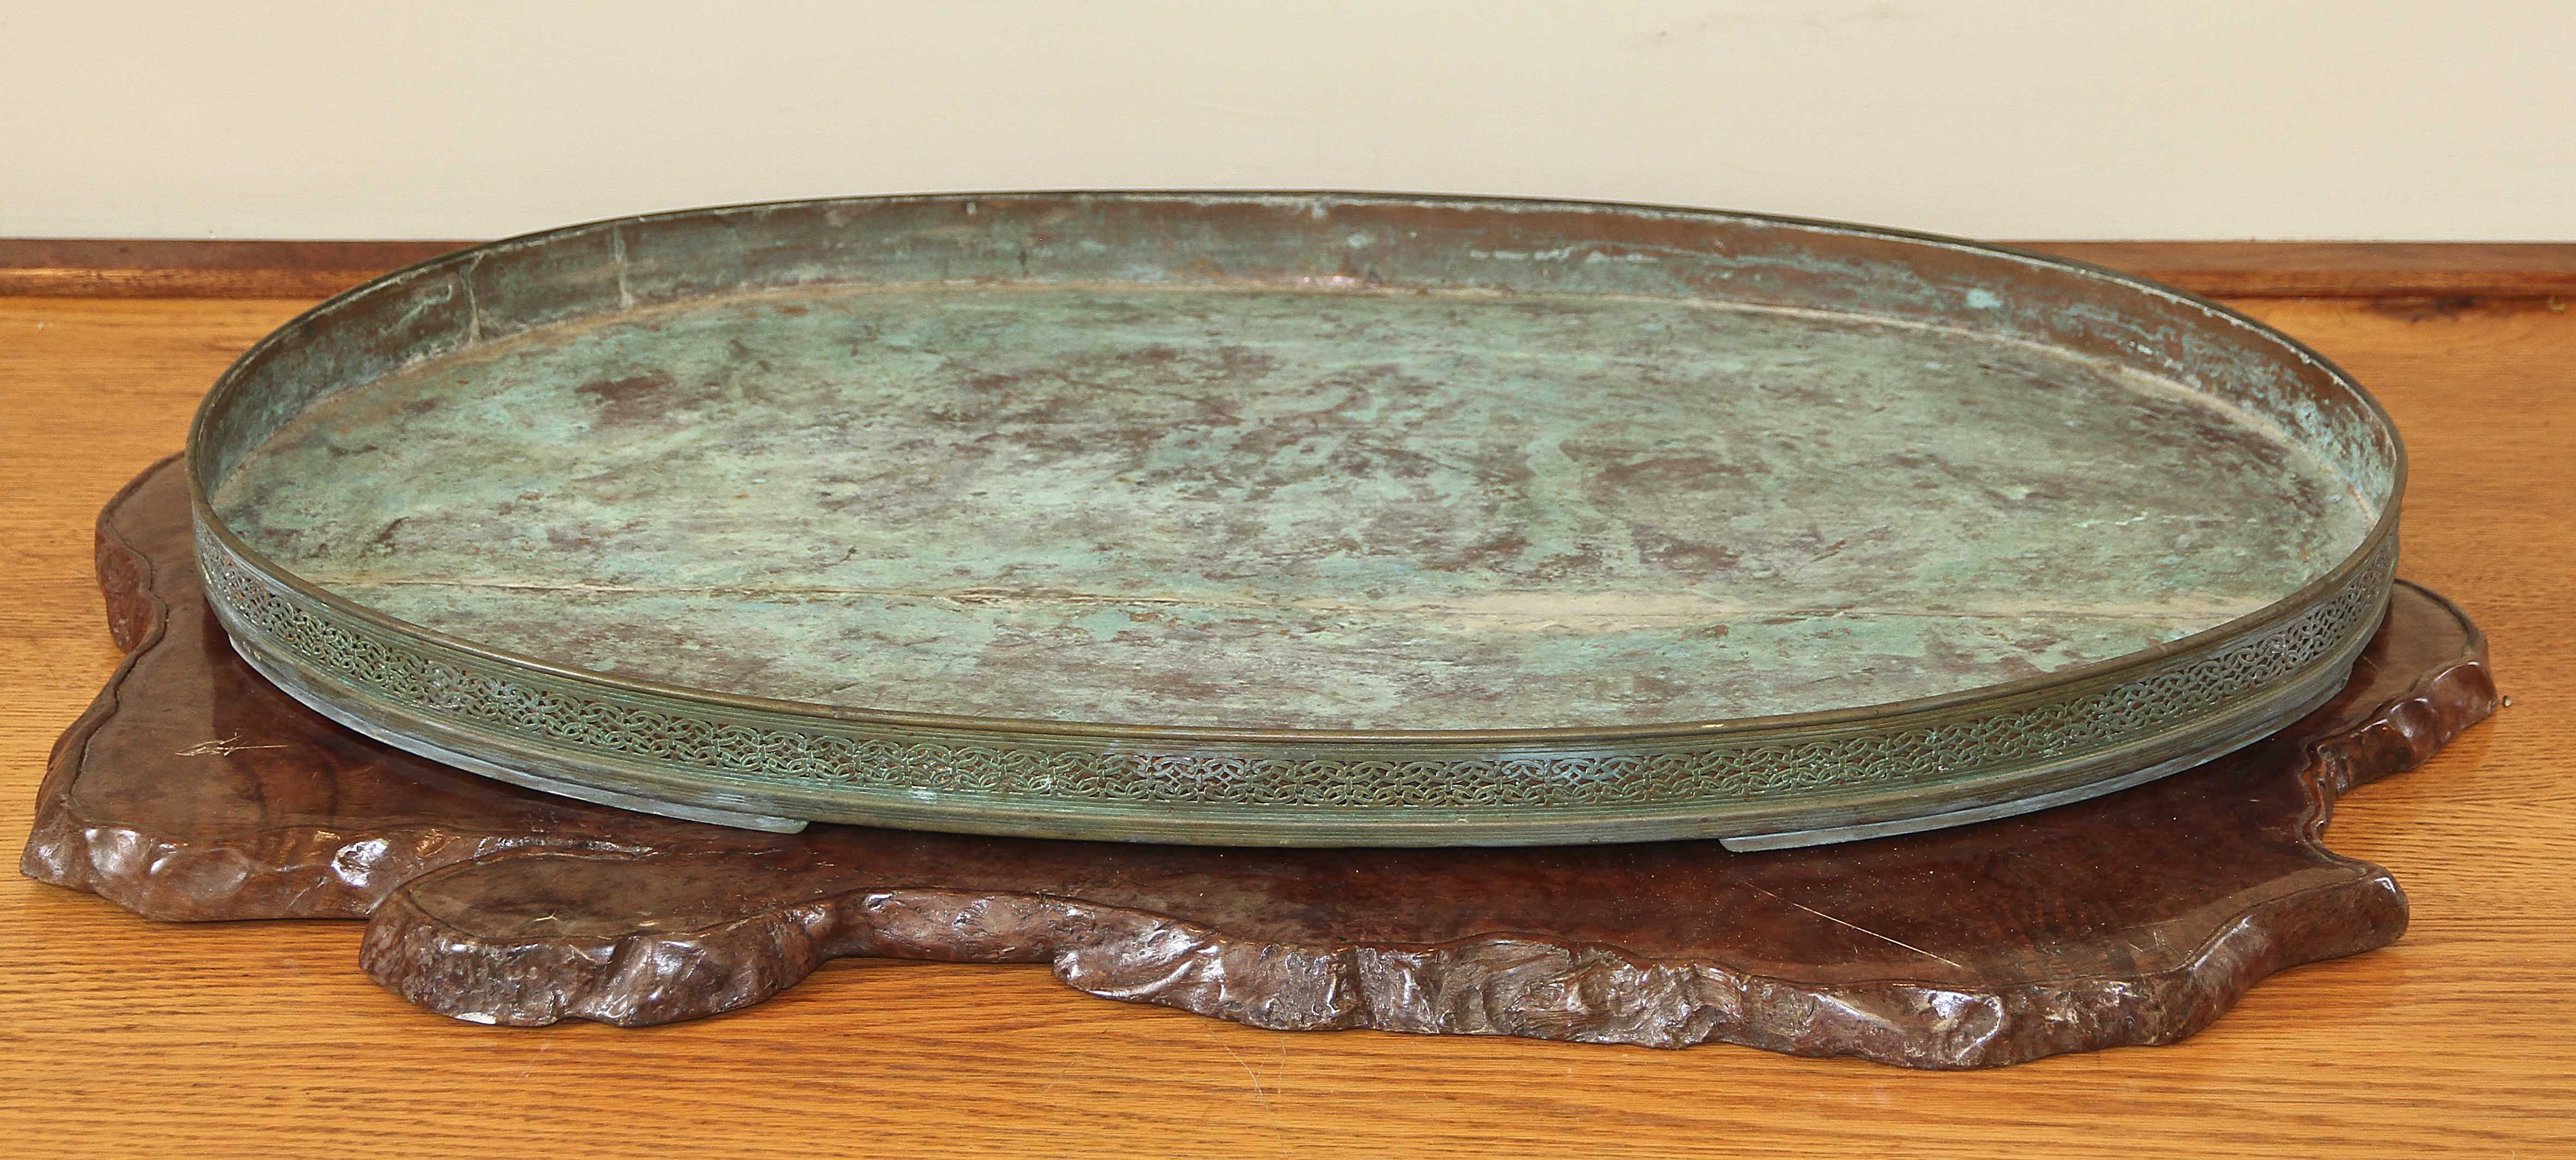
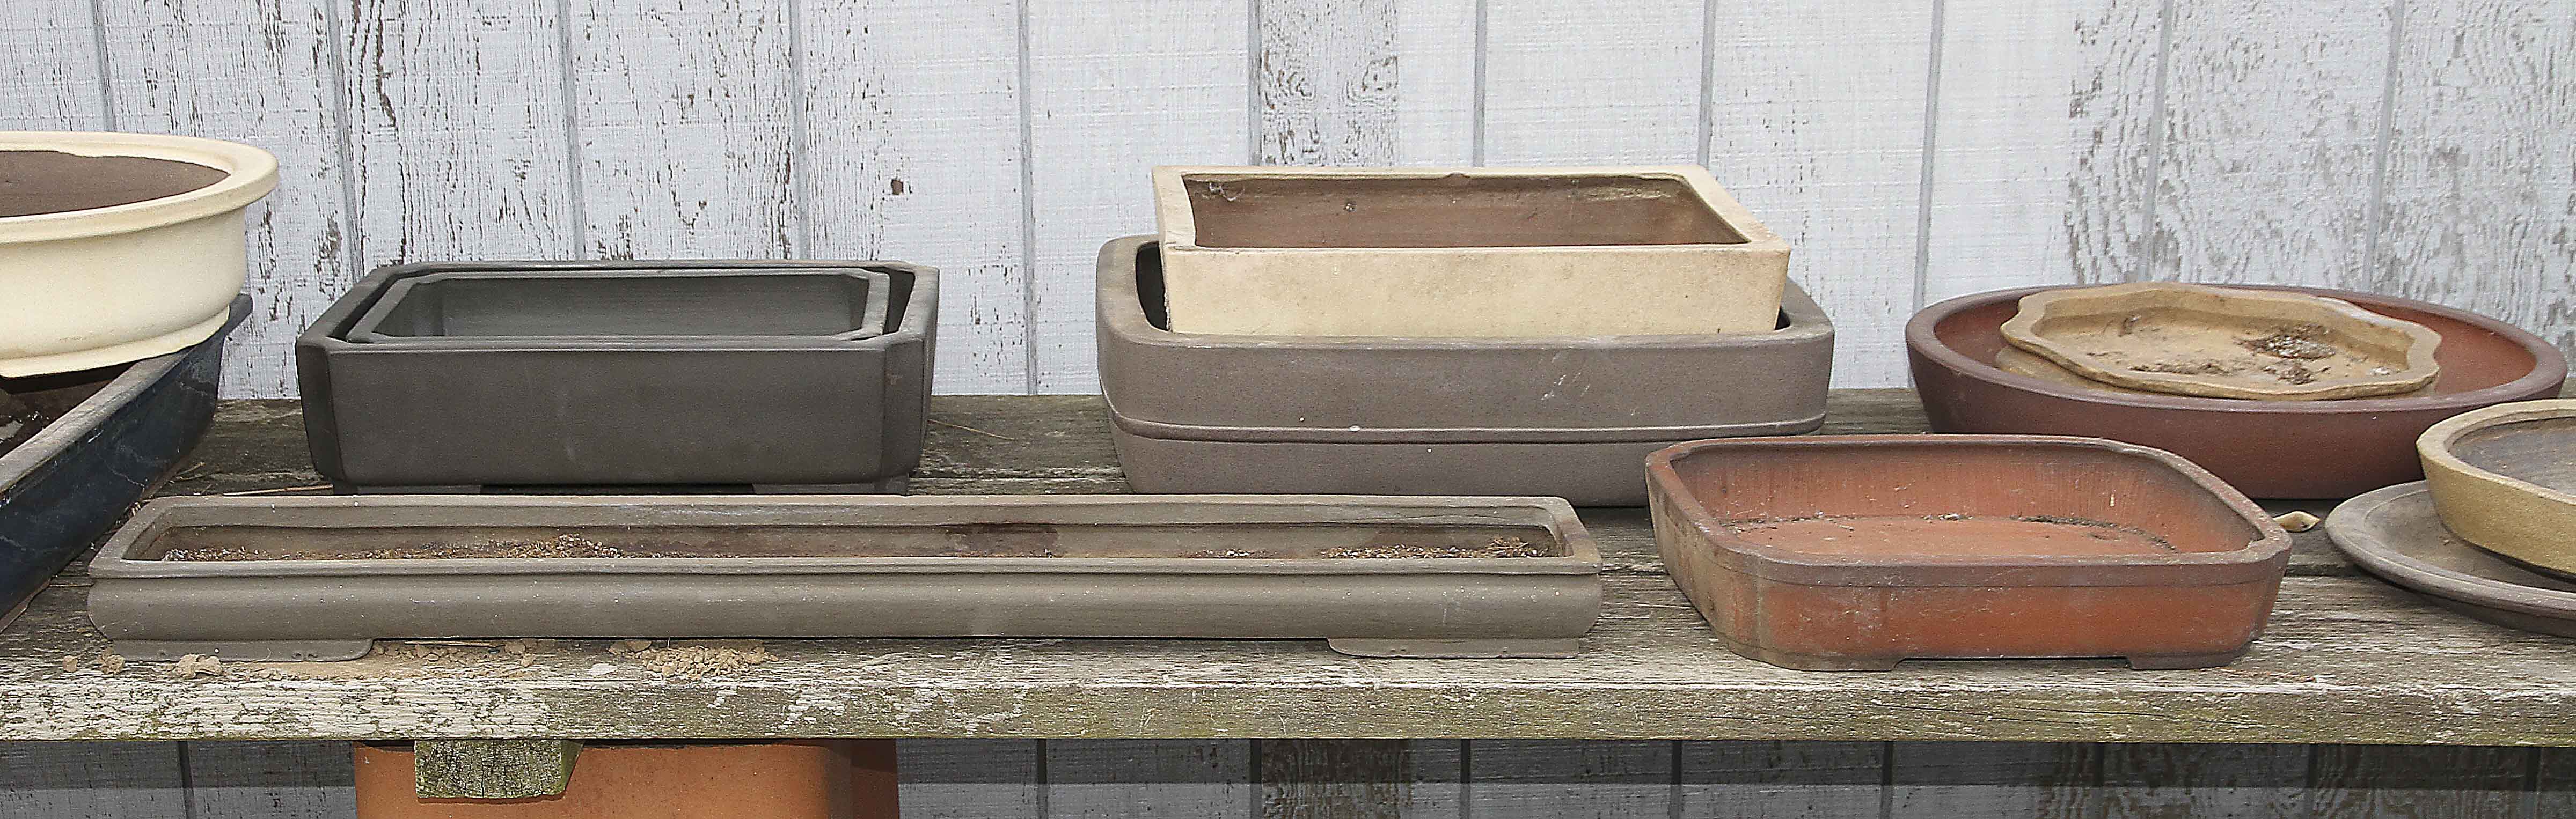
The first step in creating a forest, rock planting or any bonsai is to prepare all the material ahead of time: trees, container, wire, soil, tools and moss. I like oval containers for forest plantings because they do not have difficult corners to aesthetically use. Shallow containers are best without prominent feet. A flat foot is better than cloud feet to provide a solid visual anchor. Beech is a deciduous species and I personally prefer an outer lip because of the flat foliage. Although unglazed containers can be displayed year around, I selected an old Japanese Tokoname-ware container from the Suishoen Heikisui Kiln. This container has been used for several bonsai from my garden during the past 30 years and has history. When selecting the container I was thinking about respect and came up with another interesting article on the topic. Rather than take up the time and space here the topic will be in a forthcoming blog entry, or magazine article.


Image

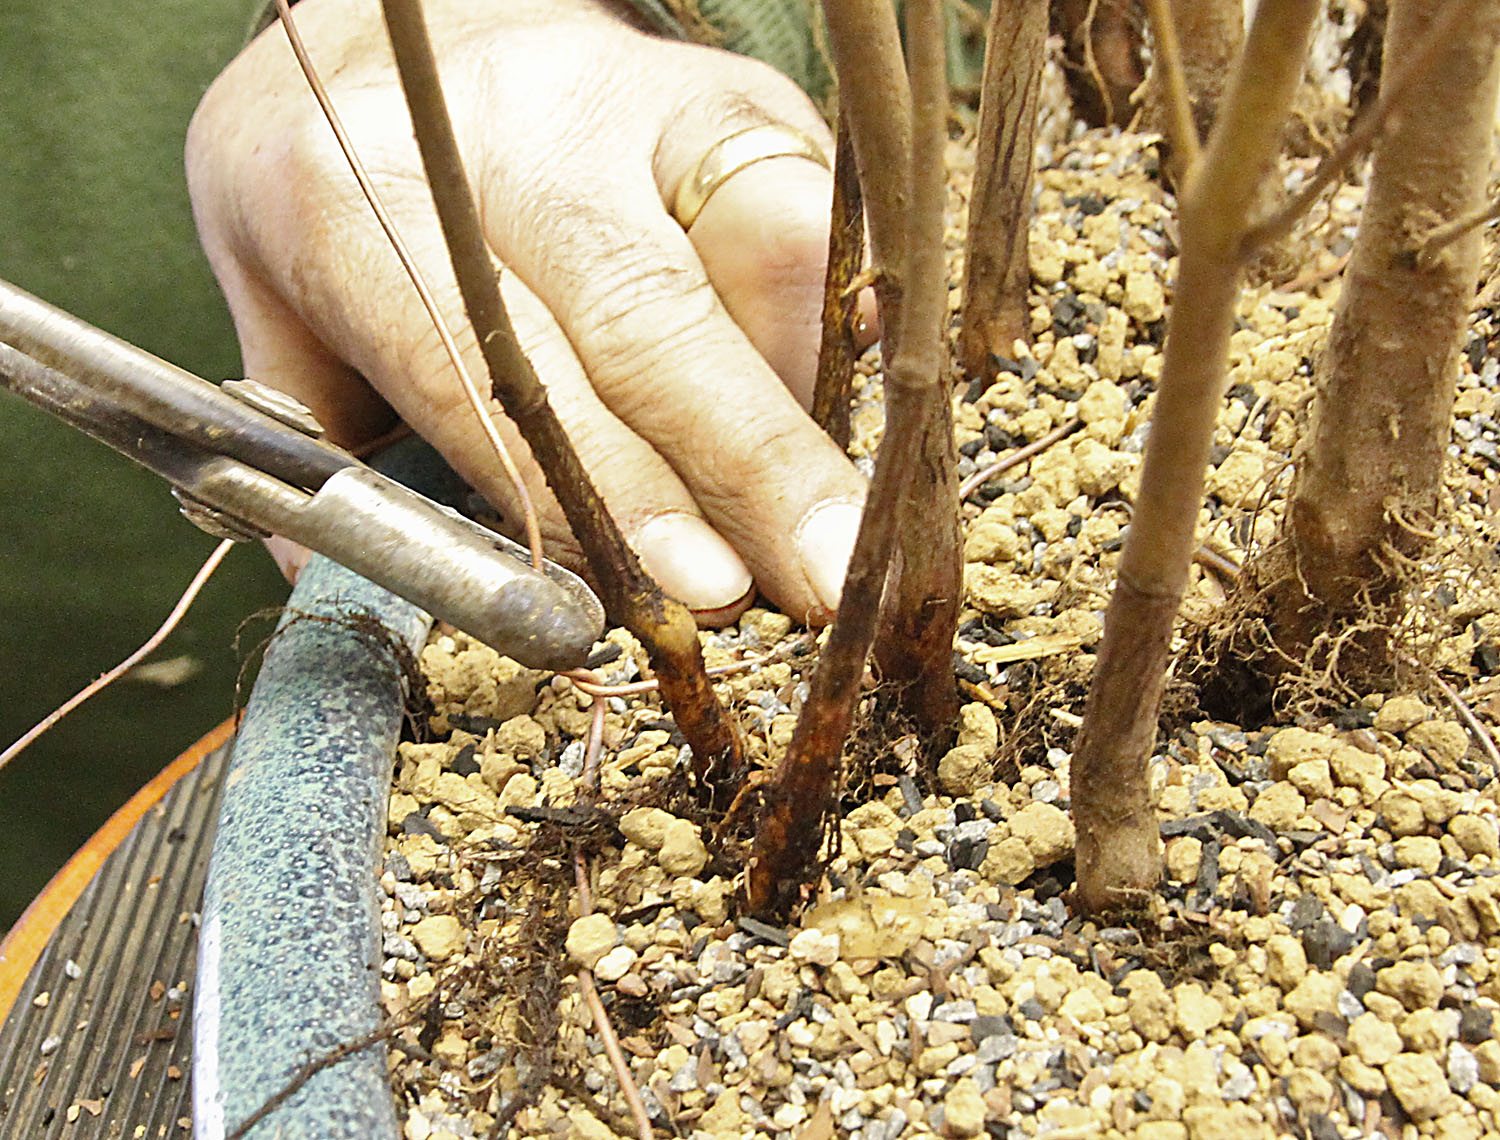
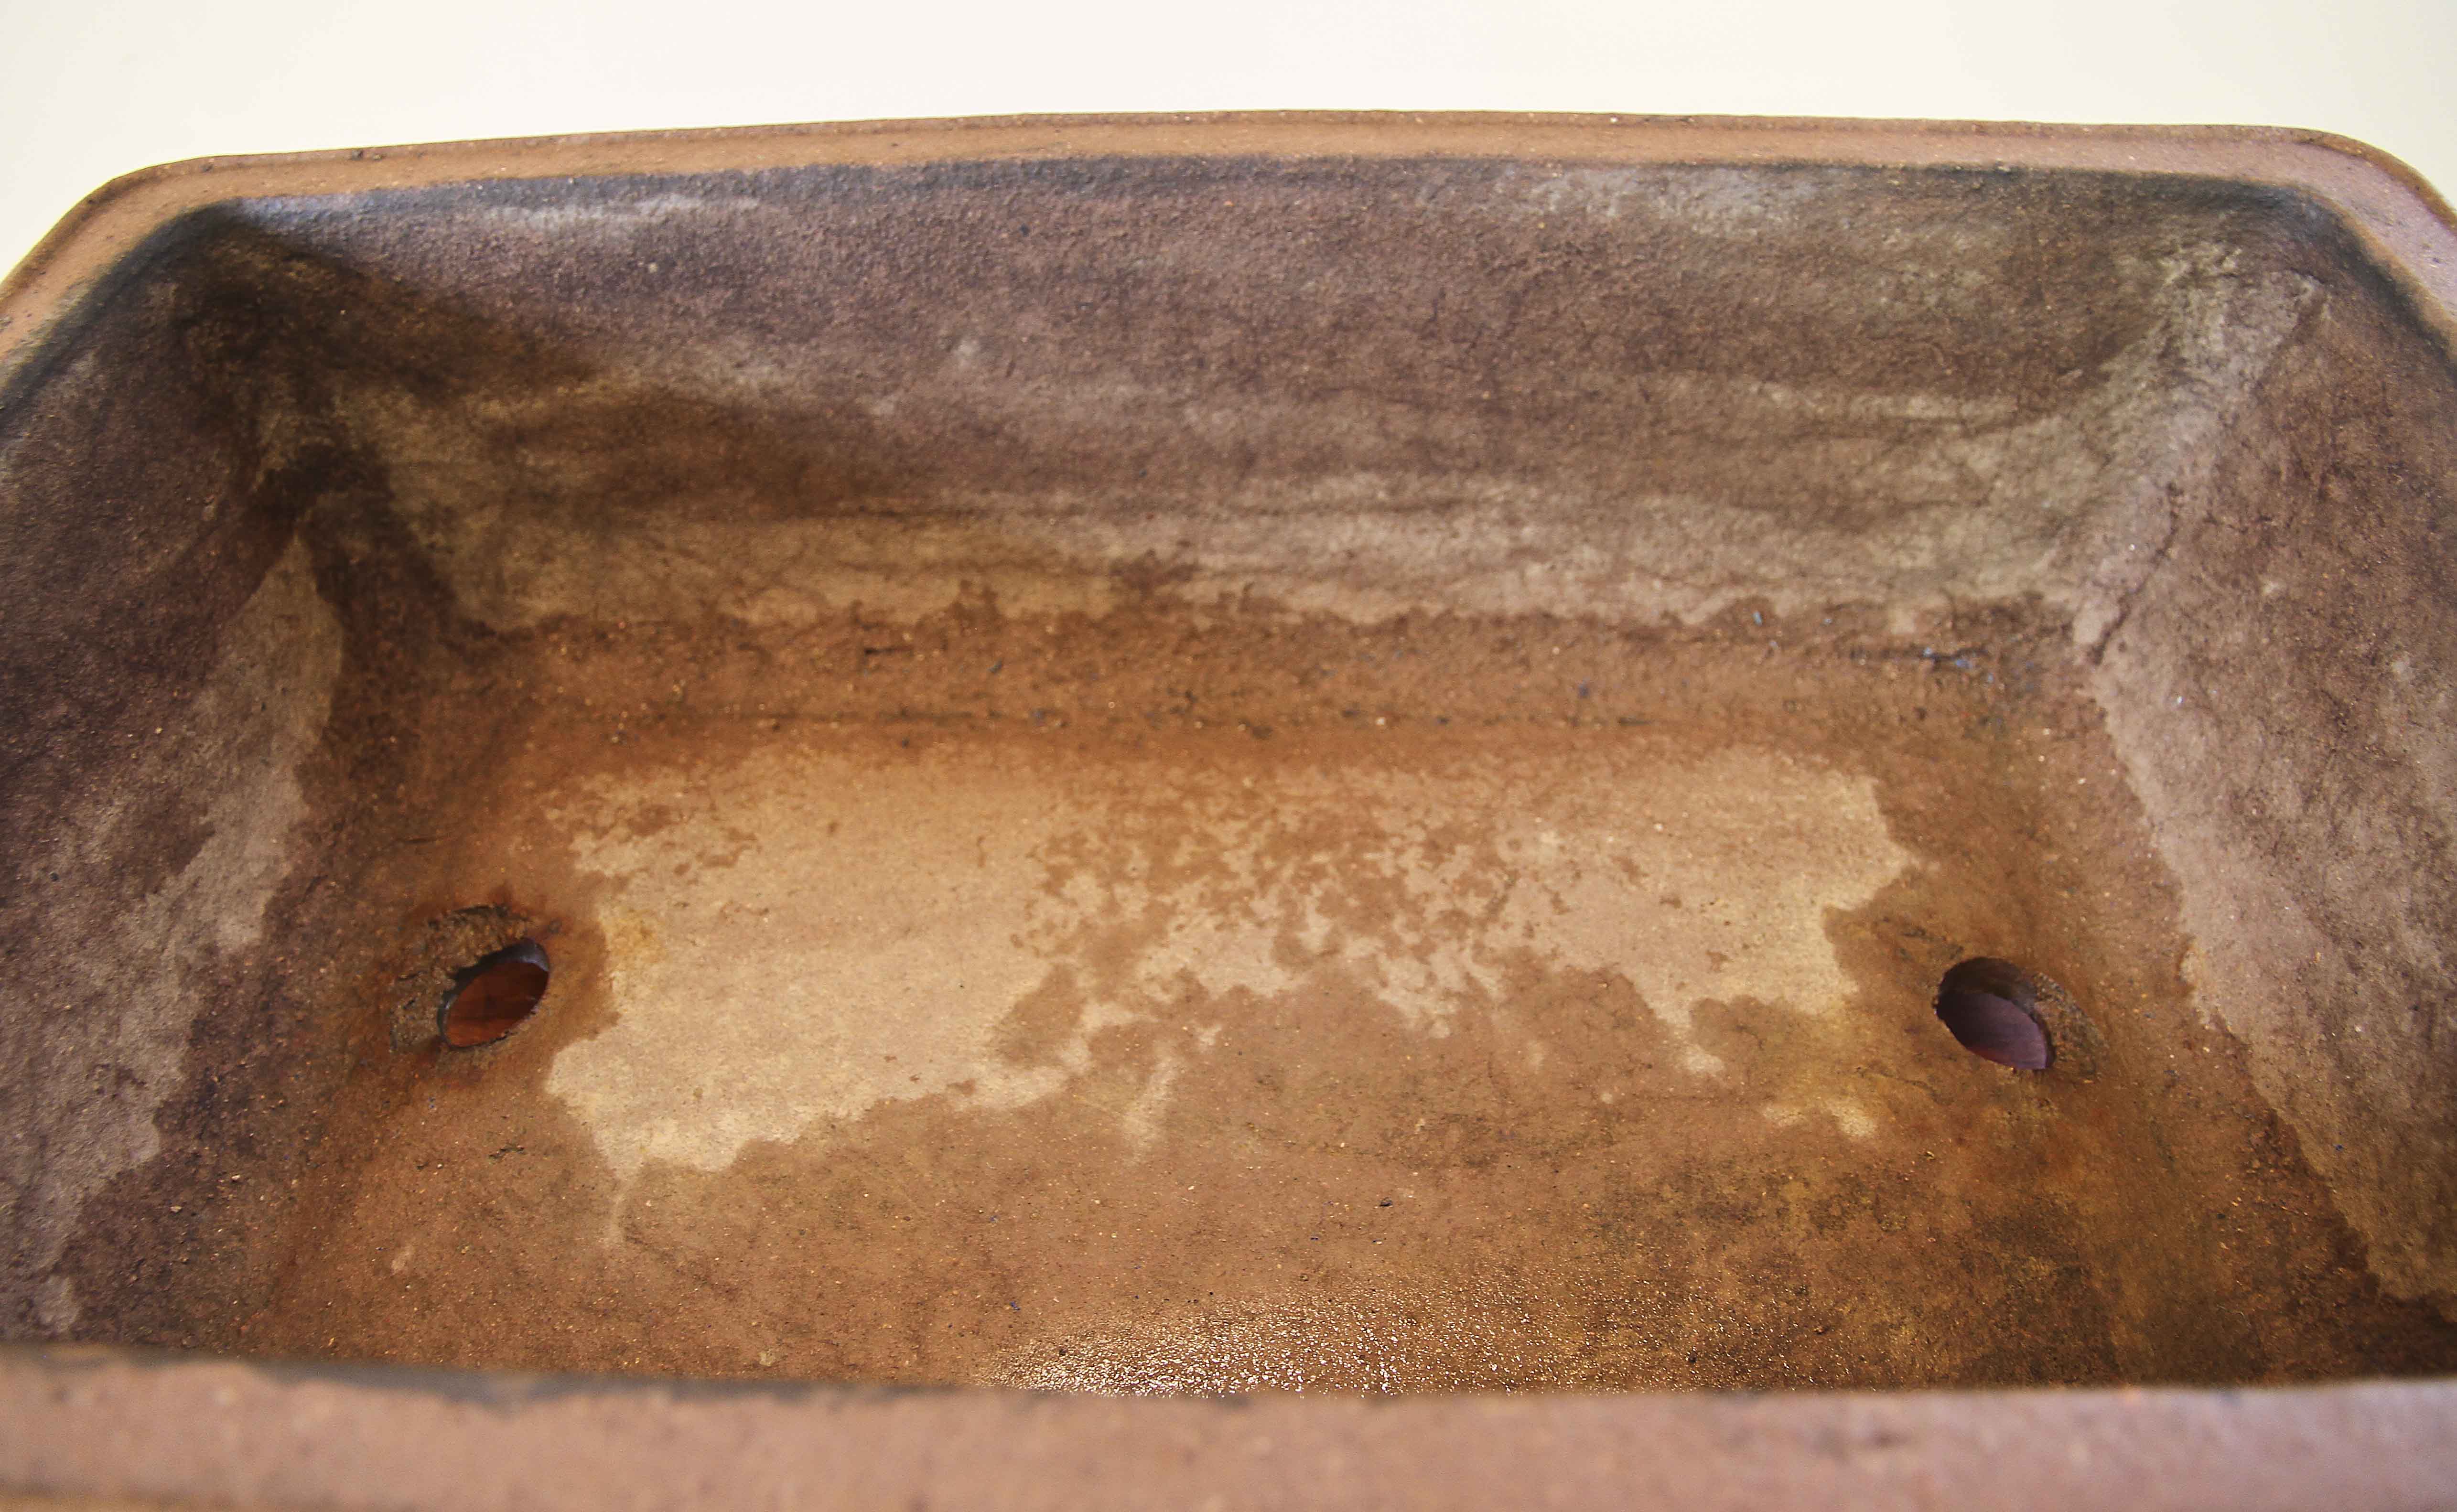
After selecting the container, notice that it has been cleaned inside, but shows antiquity, drainage screen is placed over the holes. Although nearly everyone who grows bonsai takes the time to secure the drainage screen over the holes to prevent movement when potting with pieces of short copper wire, I do not. I have learned through decades of experience that it takes time to make and insert the wire and it’s easier and cheaper for me to simply use a larger piece of drainage screen over the holes. When potting my bonsai, usually most of the holes have copper wire to tie the tree into the pot. If carefully positioned, they will hold the drainage screen from moving. However, for this forest bonsai (mostly for demonstration purposes) in addition to using a larger piece of drainage screen, I added small copper wire clips.

Copper wire for holding the trees into the container were used, lots of them. It’s better to have too many wires than not enough, although extra wire can be always added to secure stubborn trees that want to move around. A small layer of coarse bottom soil was placed into the container, which was set aside until later.


Image

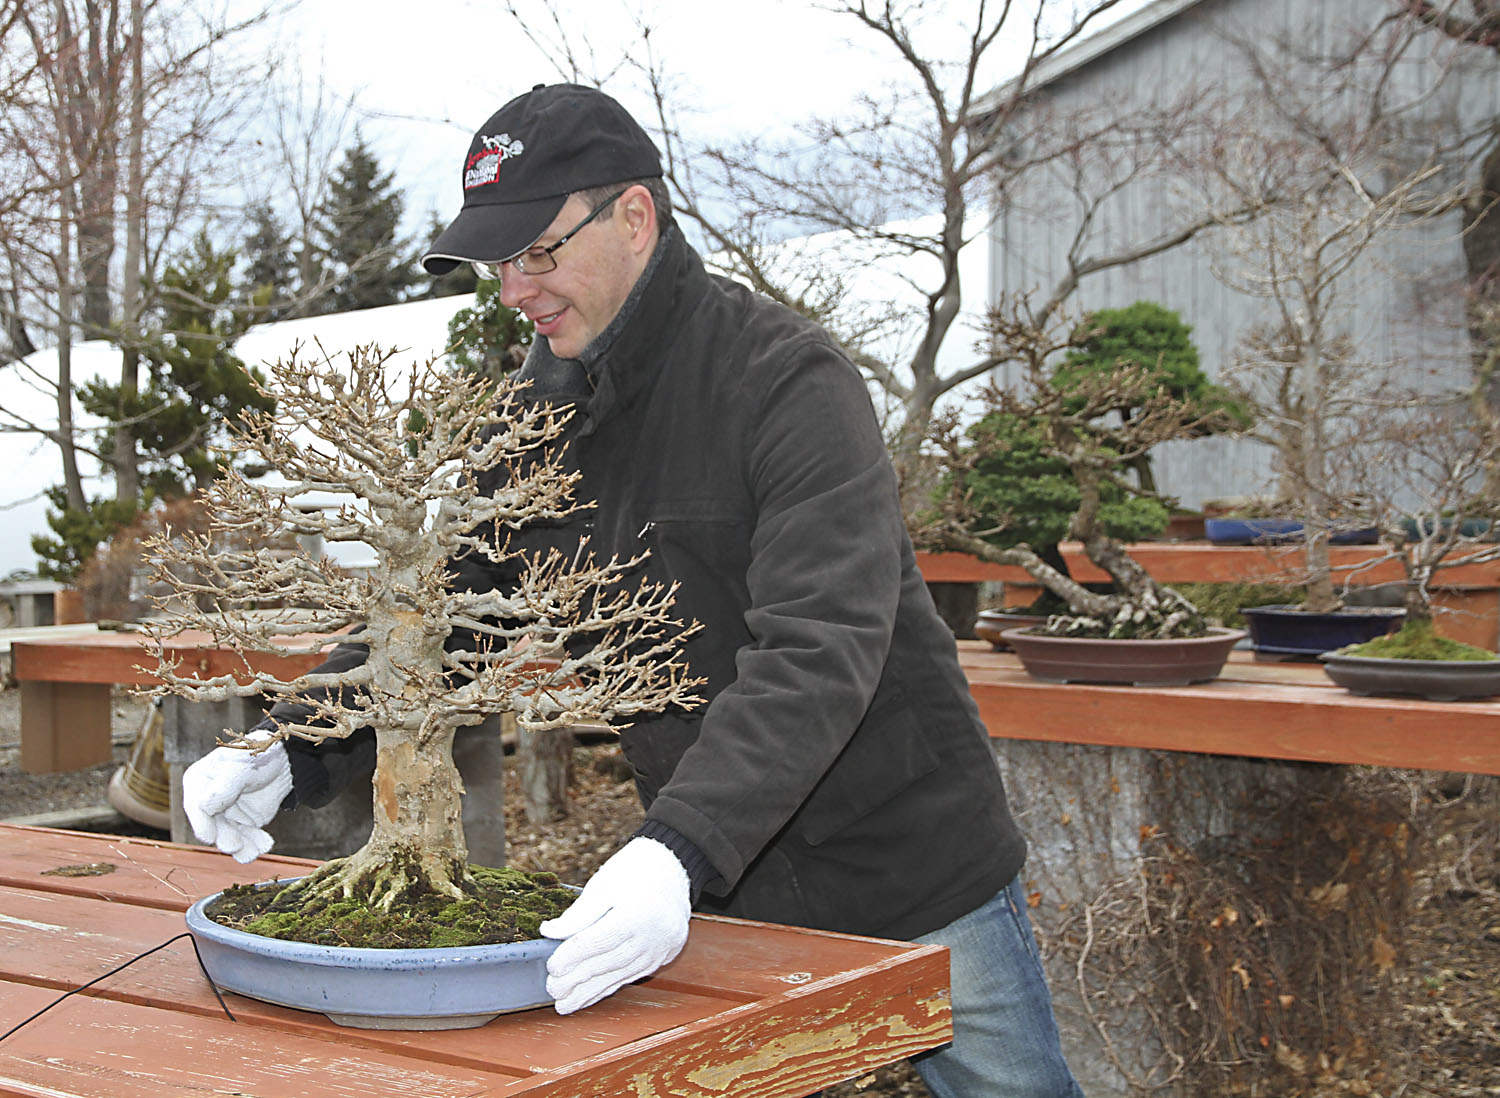
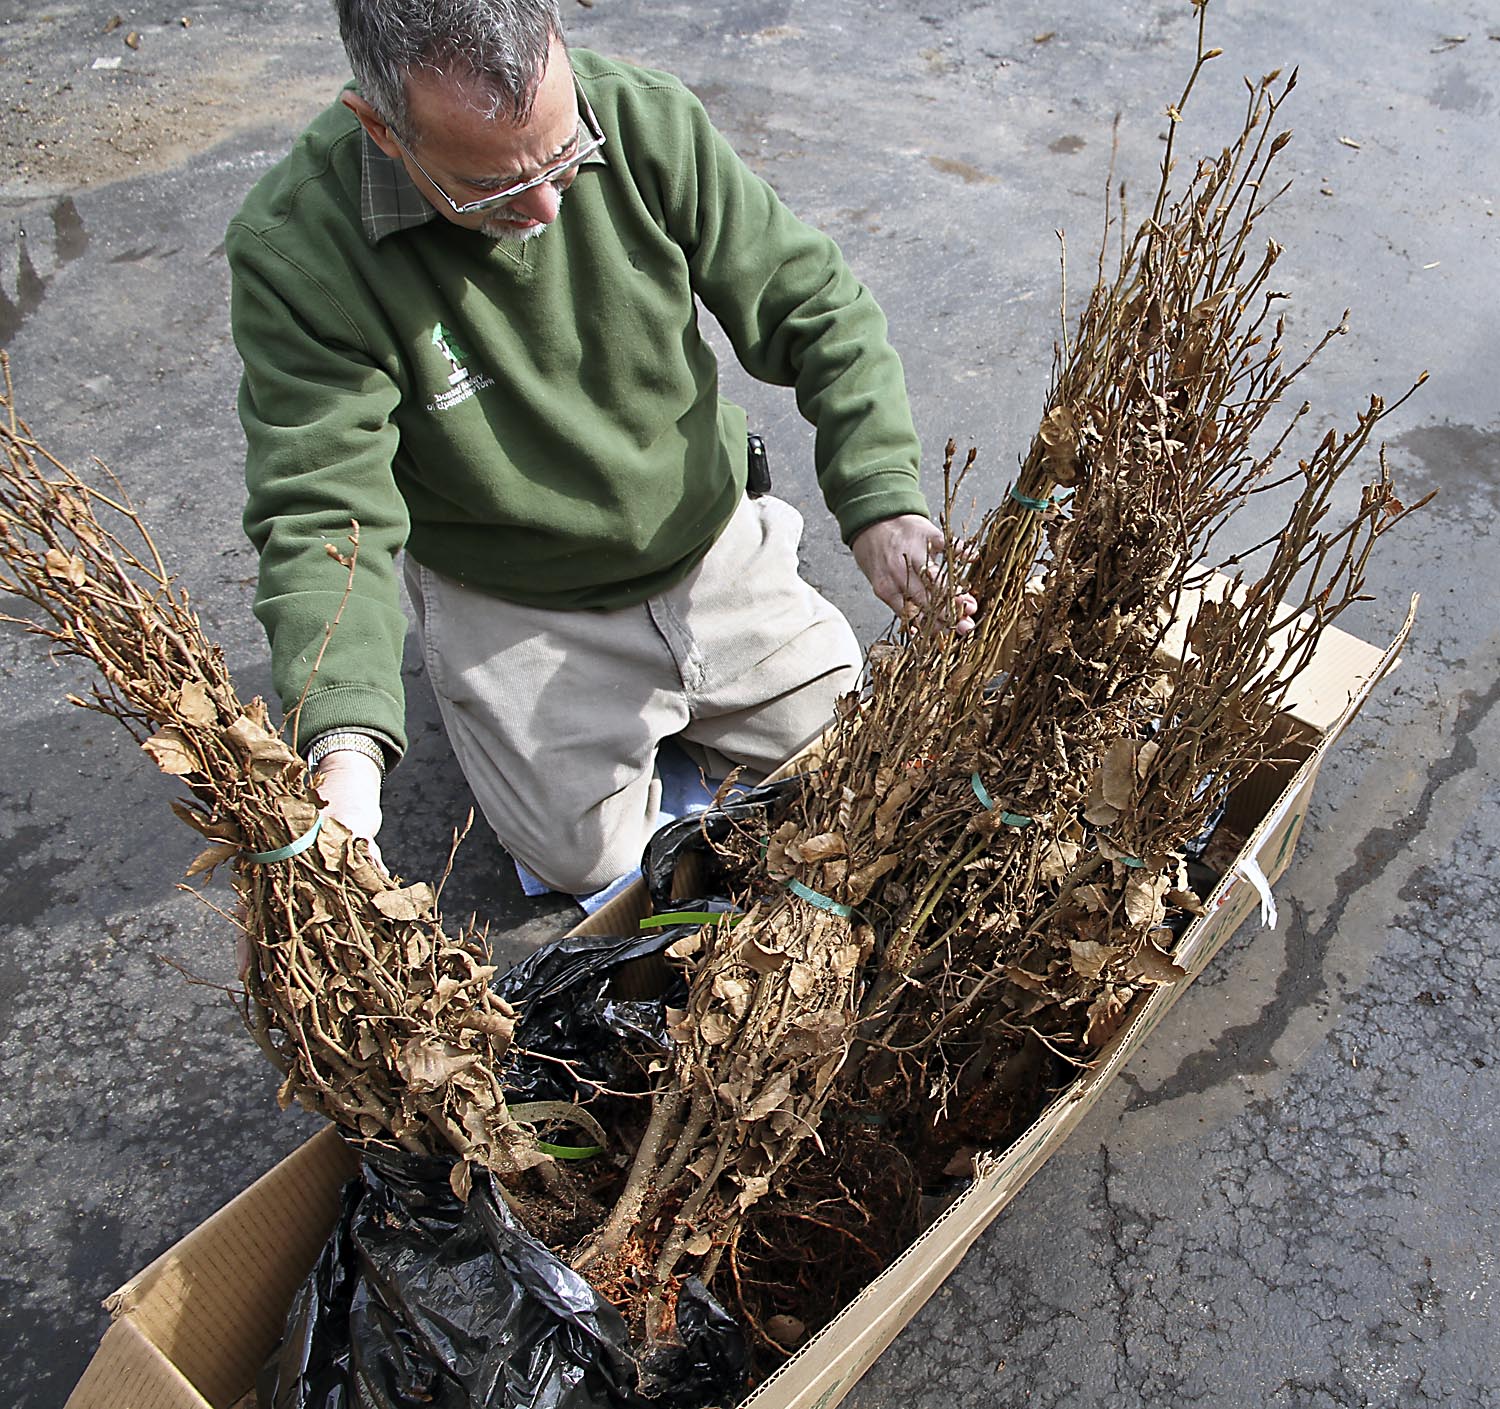
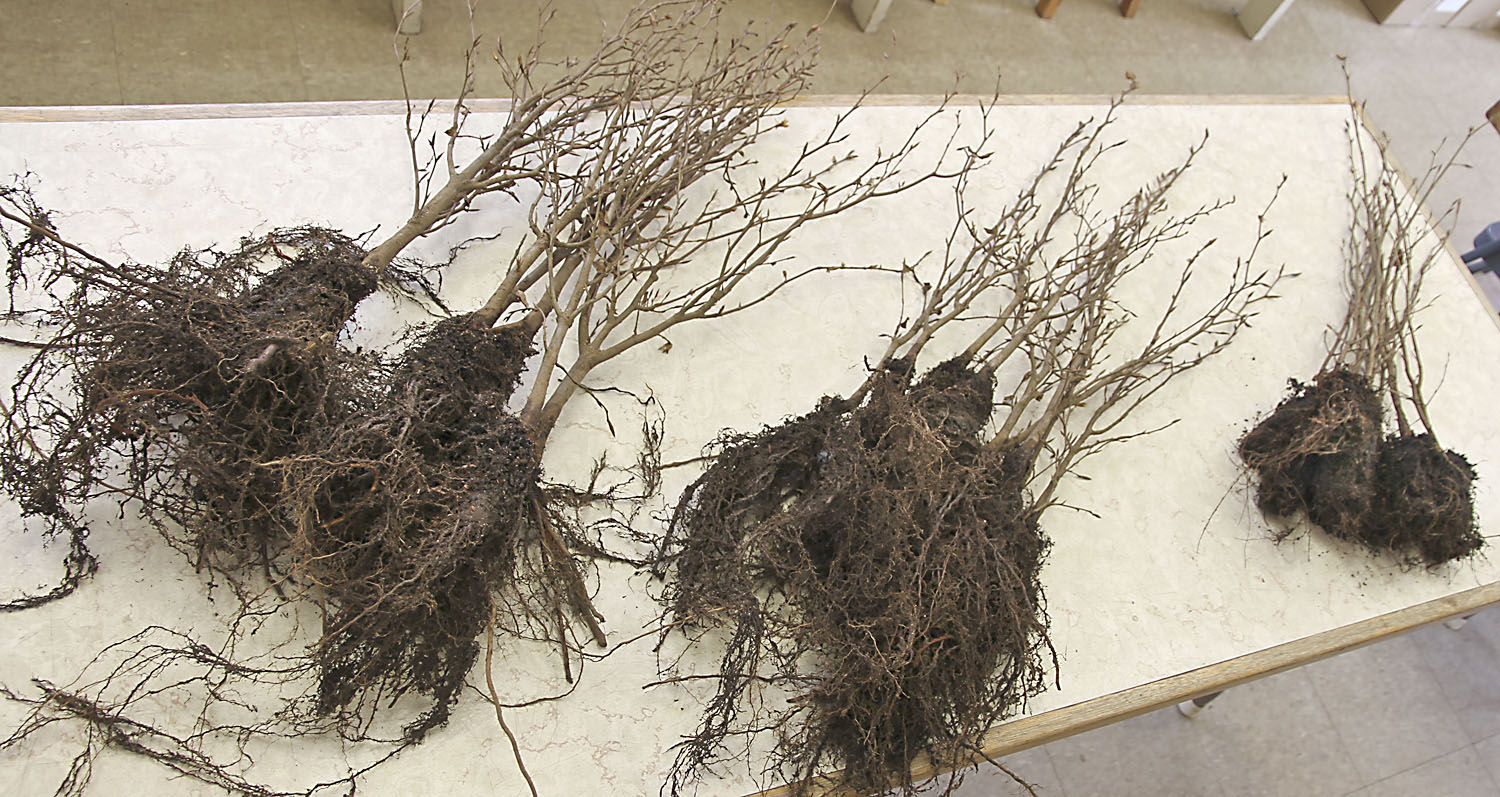
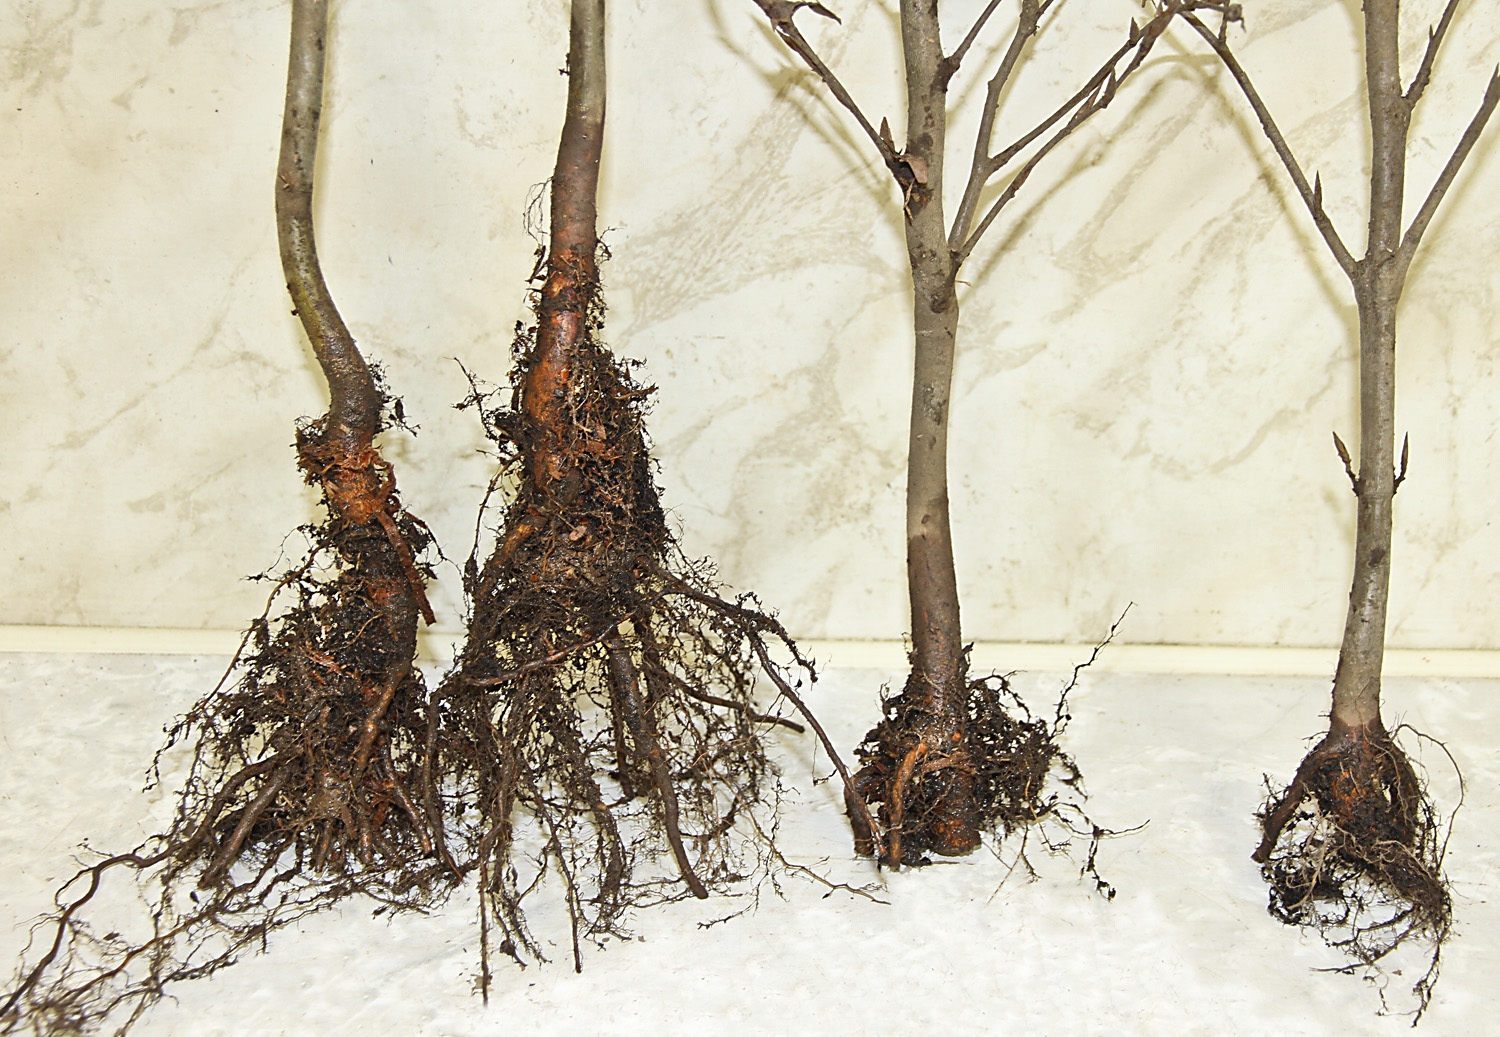
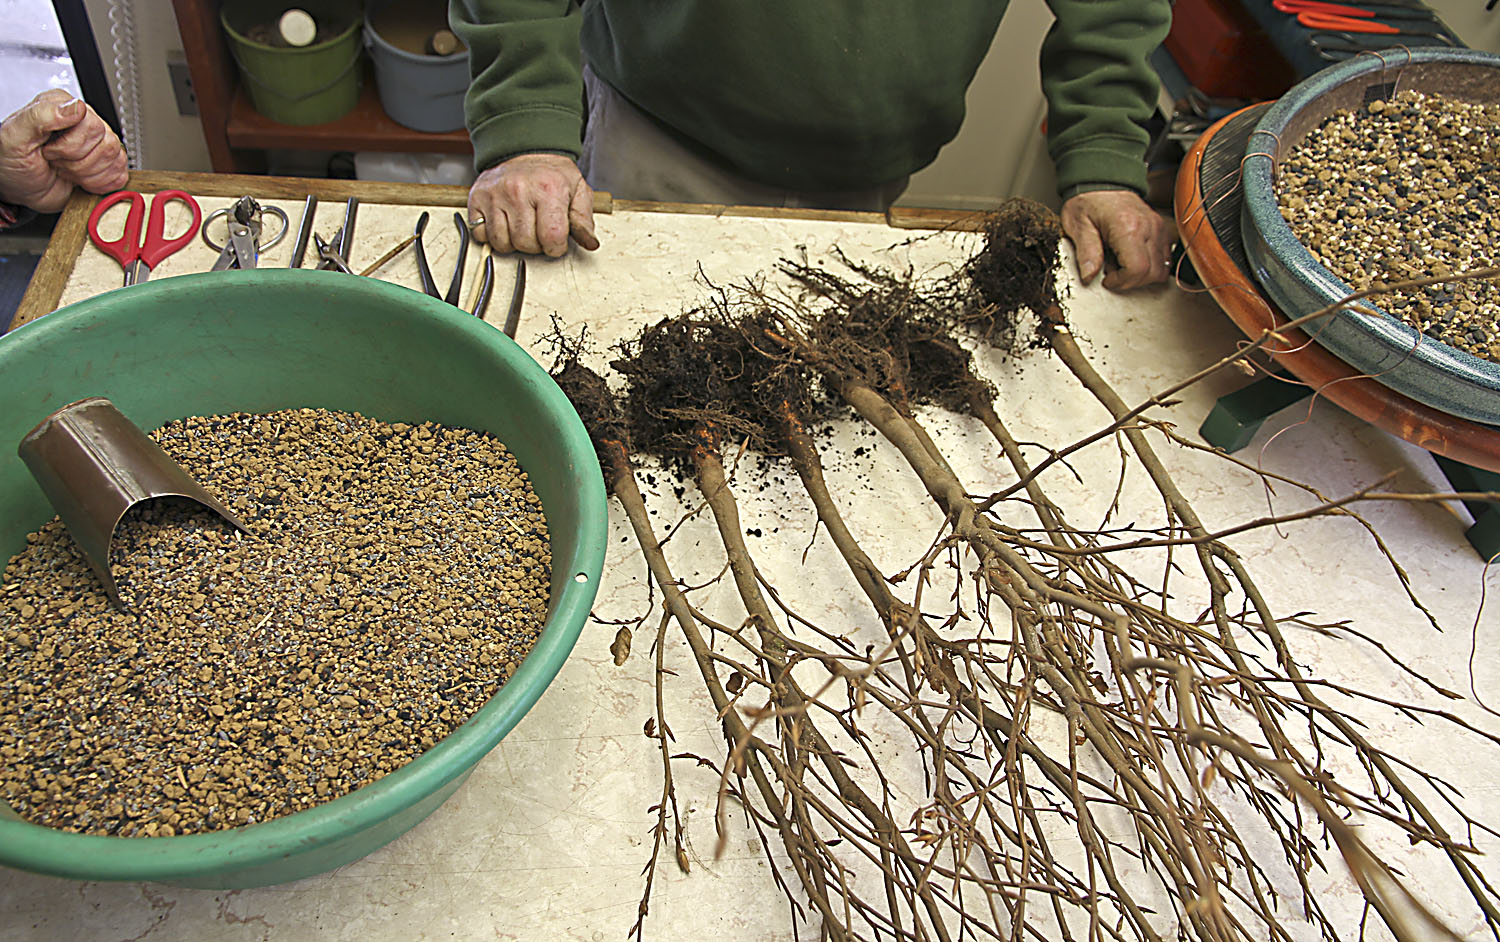
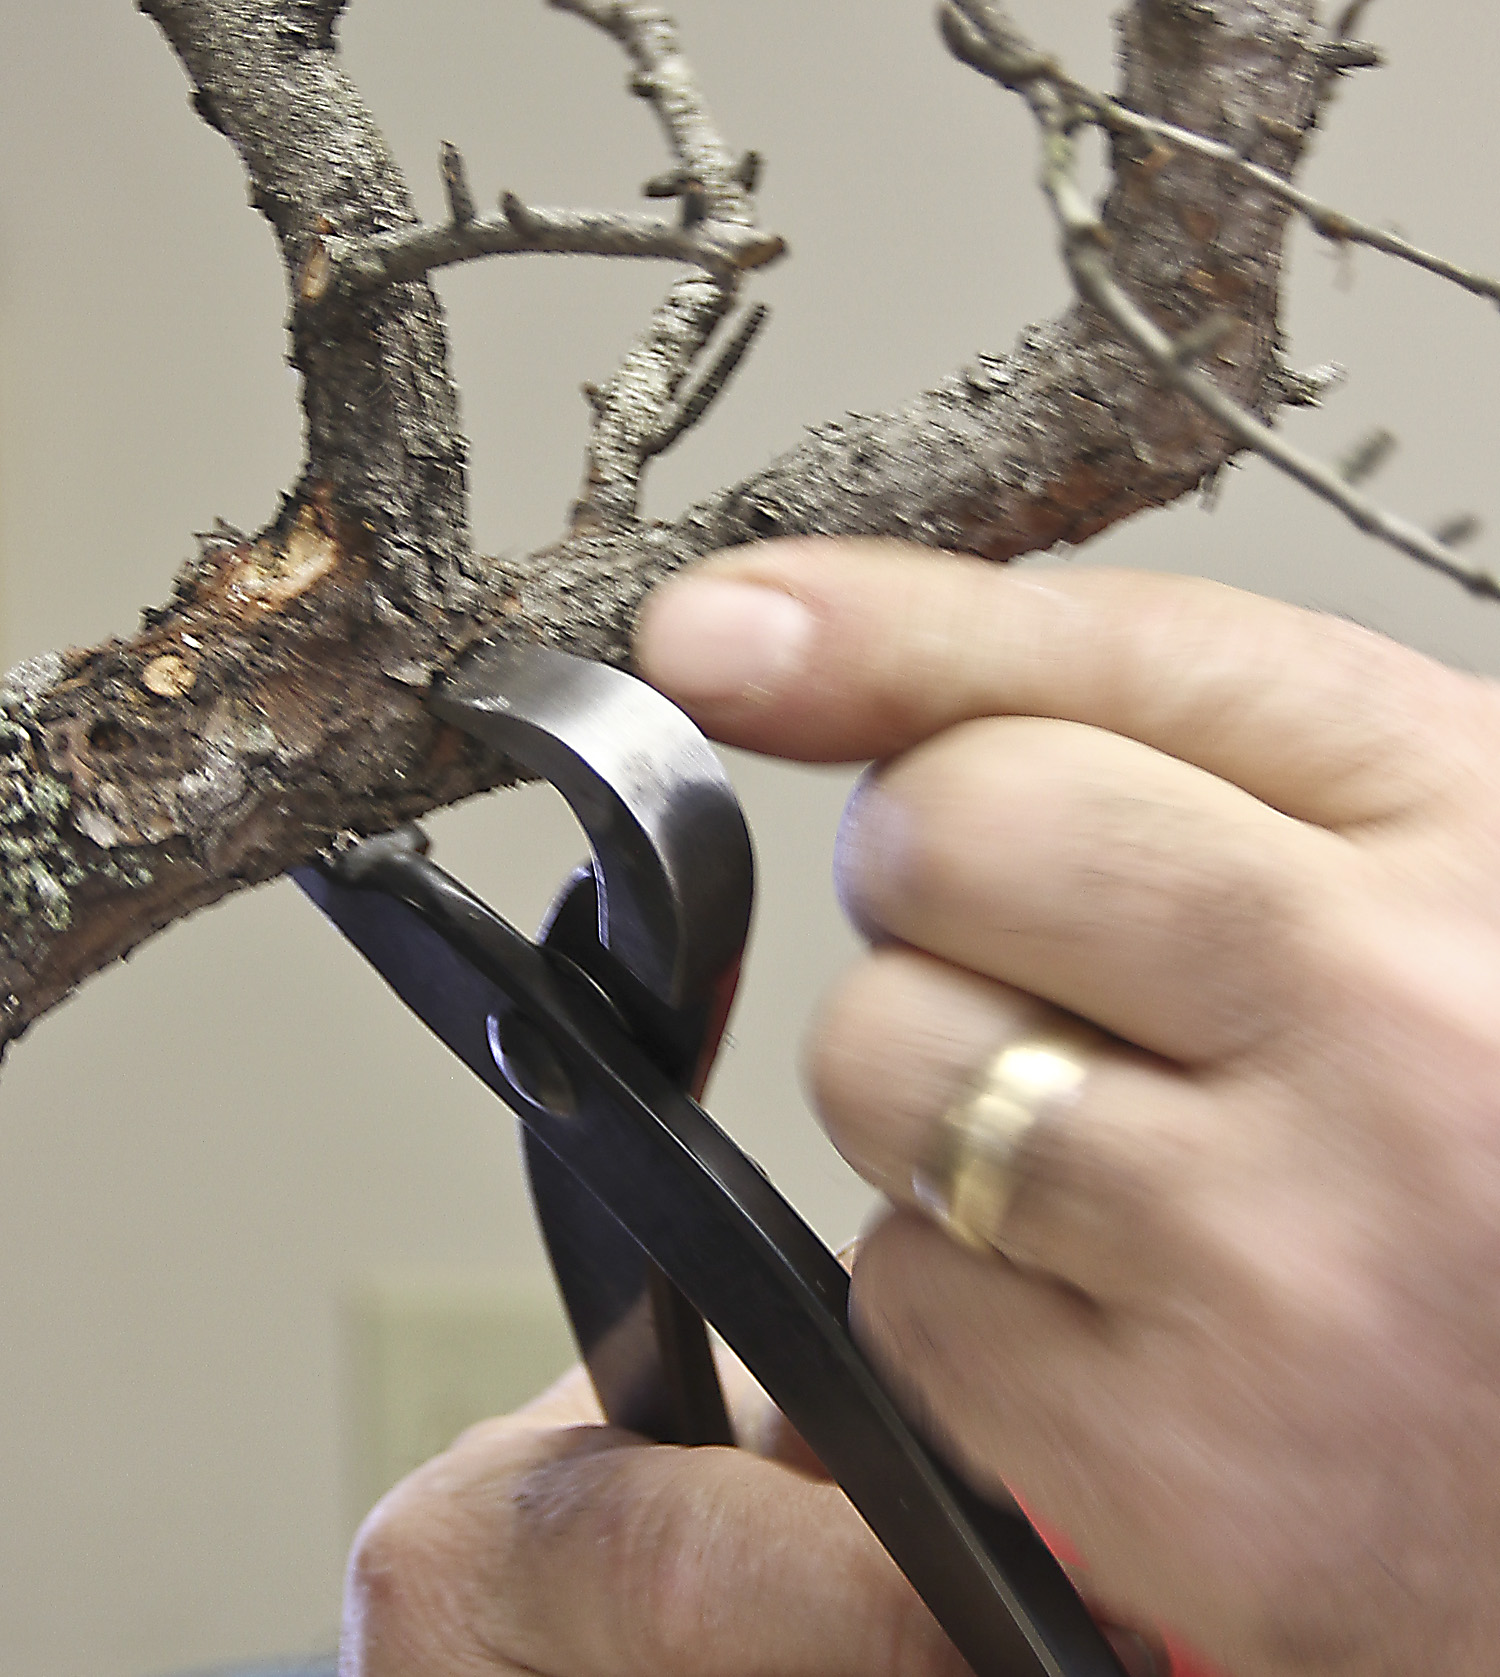
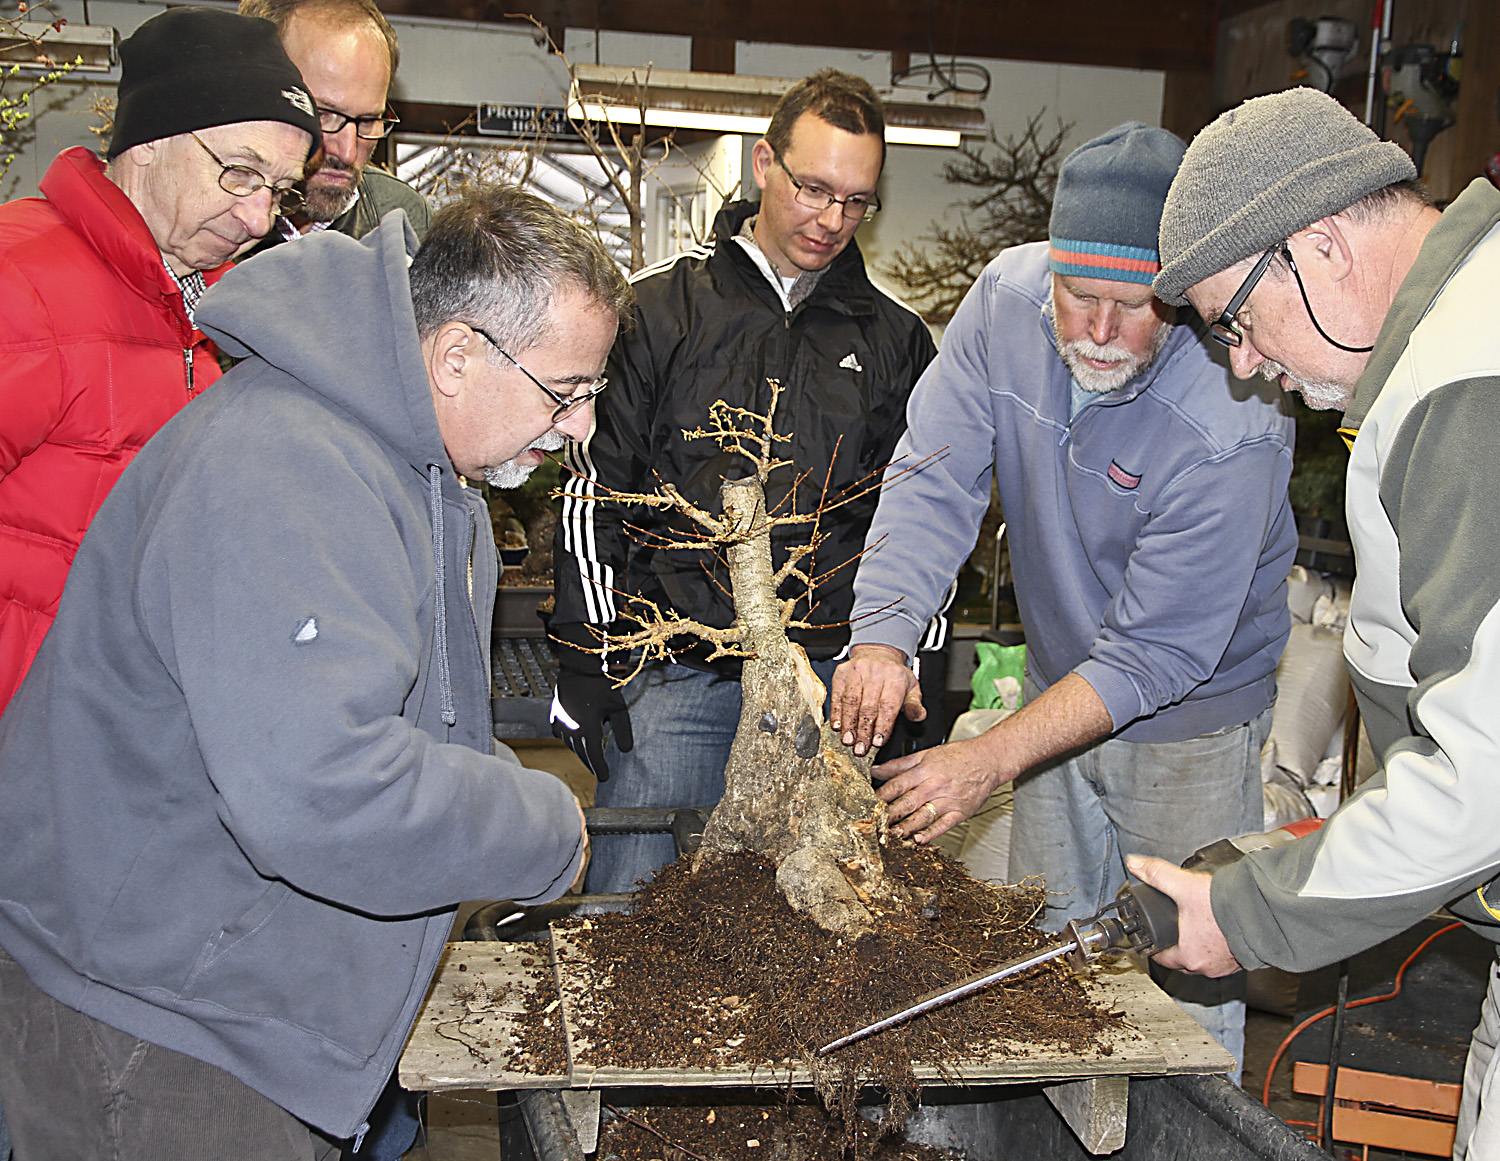
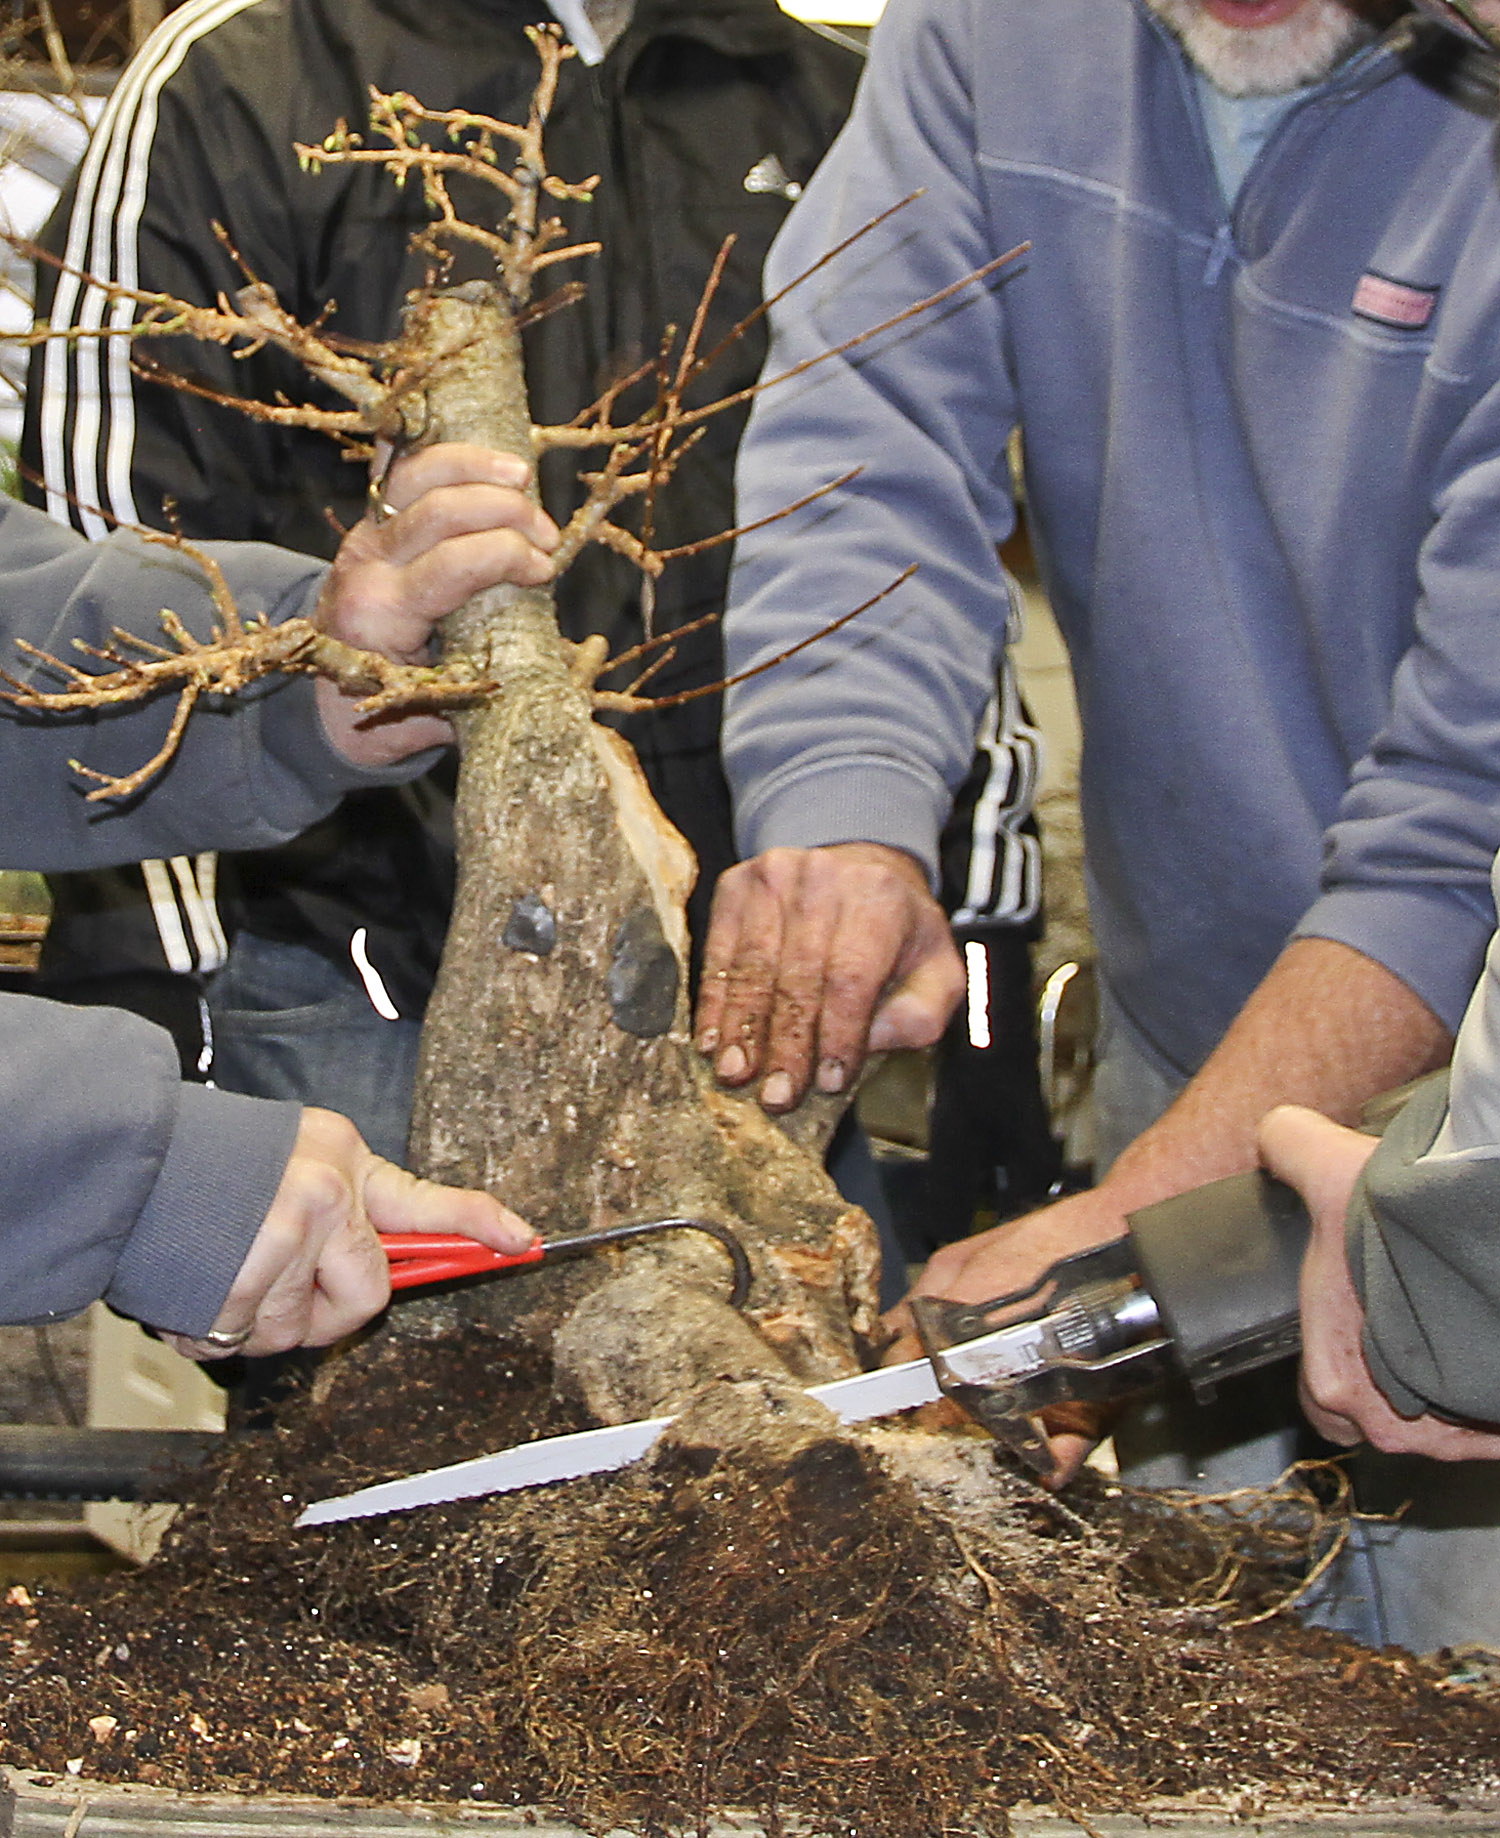
The shipping box of the seedling transplants was then opened outside where the sunlight was bright, a rarity in Rochester this year. Each bundle of ten trees was cut open and every tree was studied. Again a few more specimens had suitable shapes for individual bonsai, while the others were graded into large, medium and small sizes. They were graded by trunk diameters, not heights, because they can easily be trimmed down or grown tall, but the trunks thicknesses are more difficult to change.

Image


Image


Image


Image

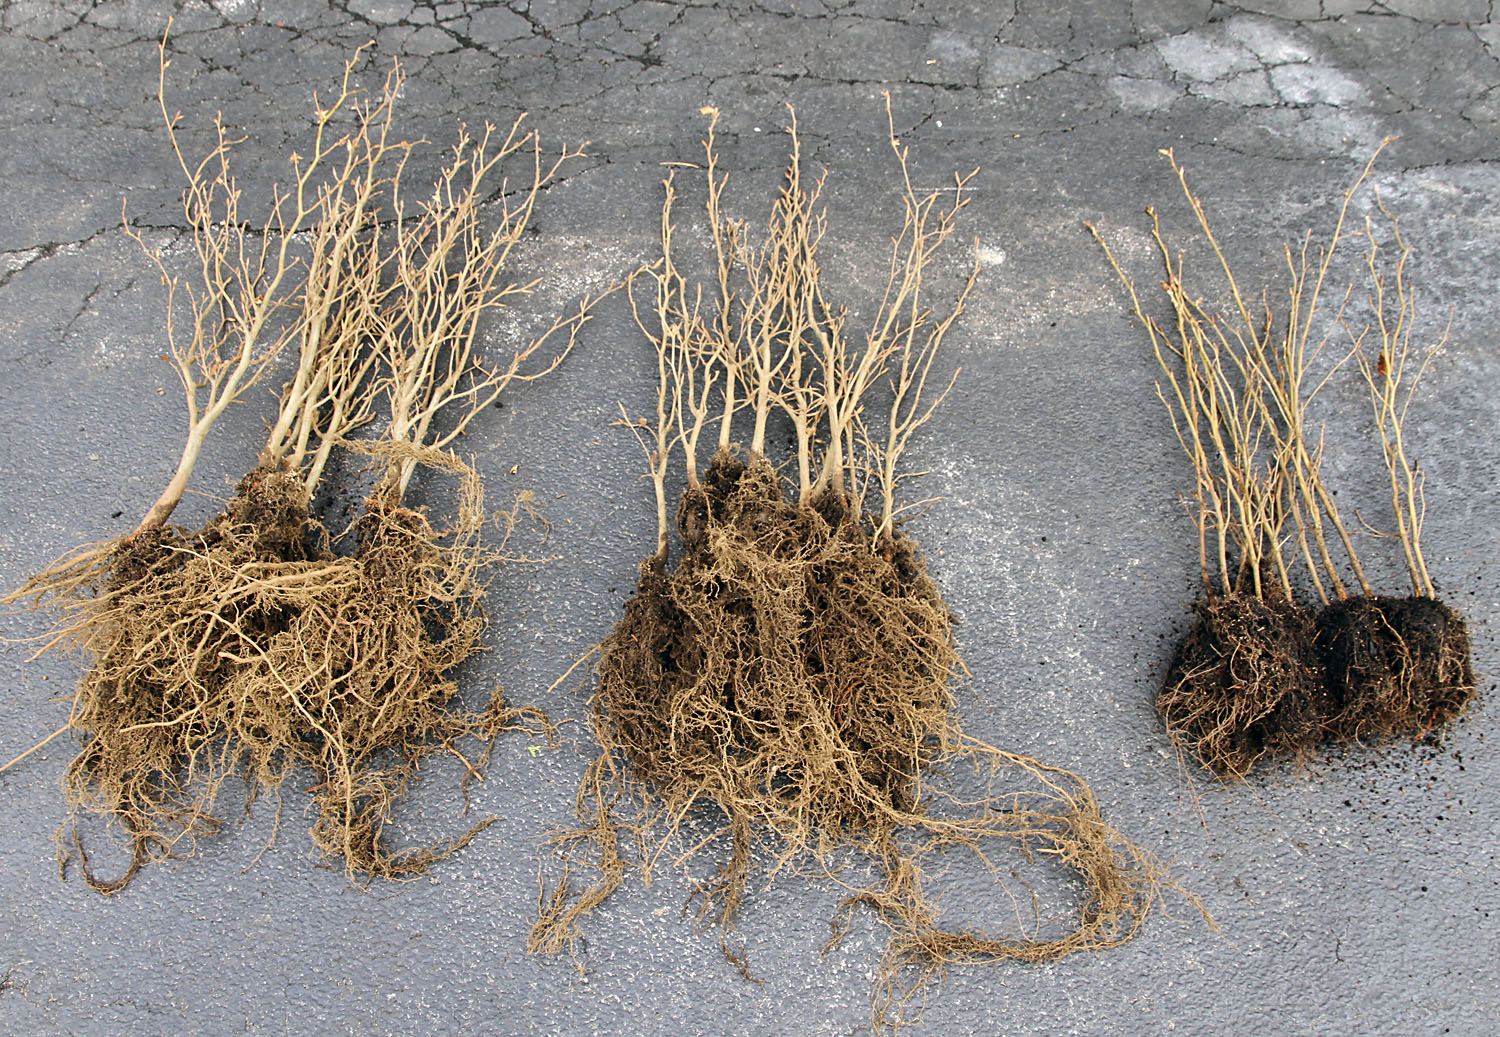
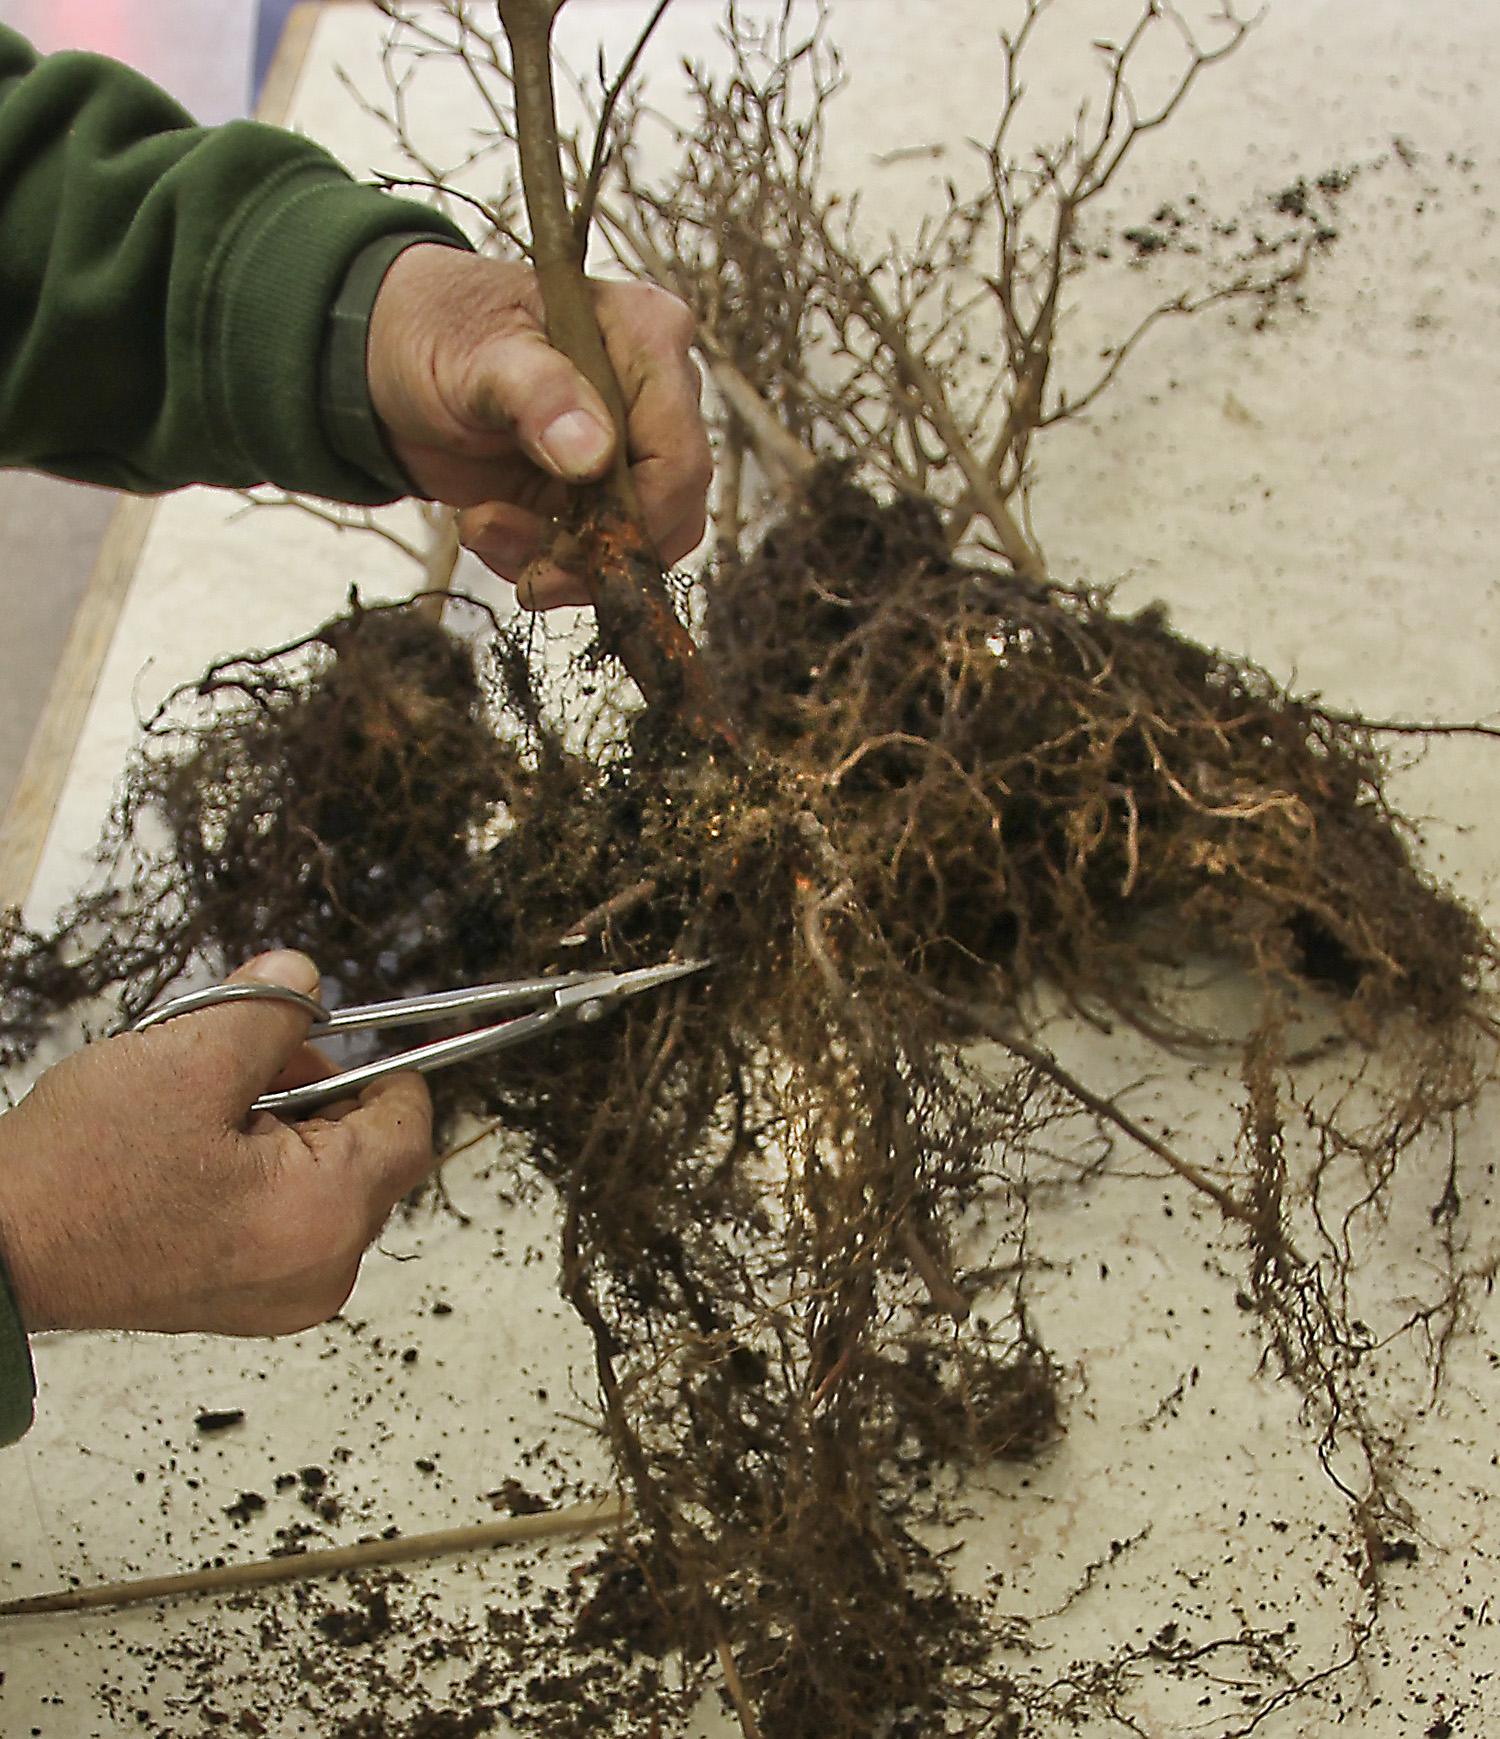
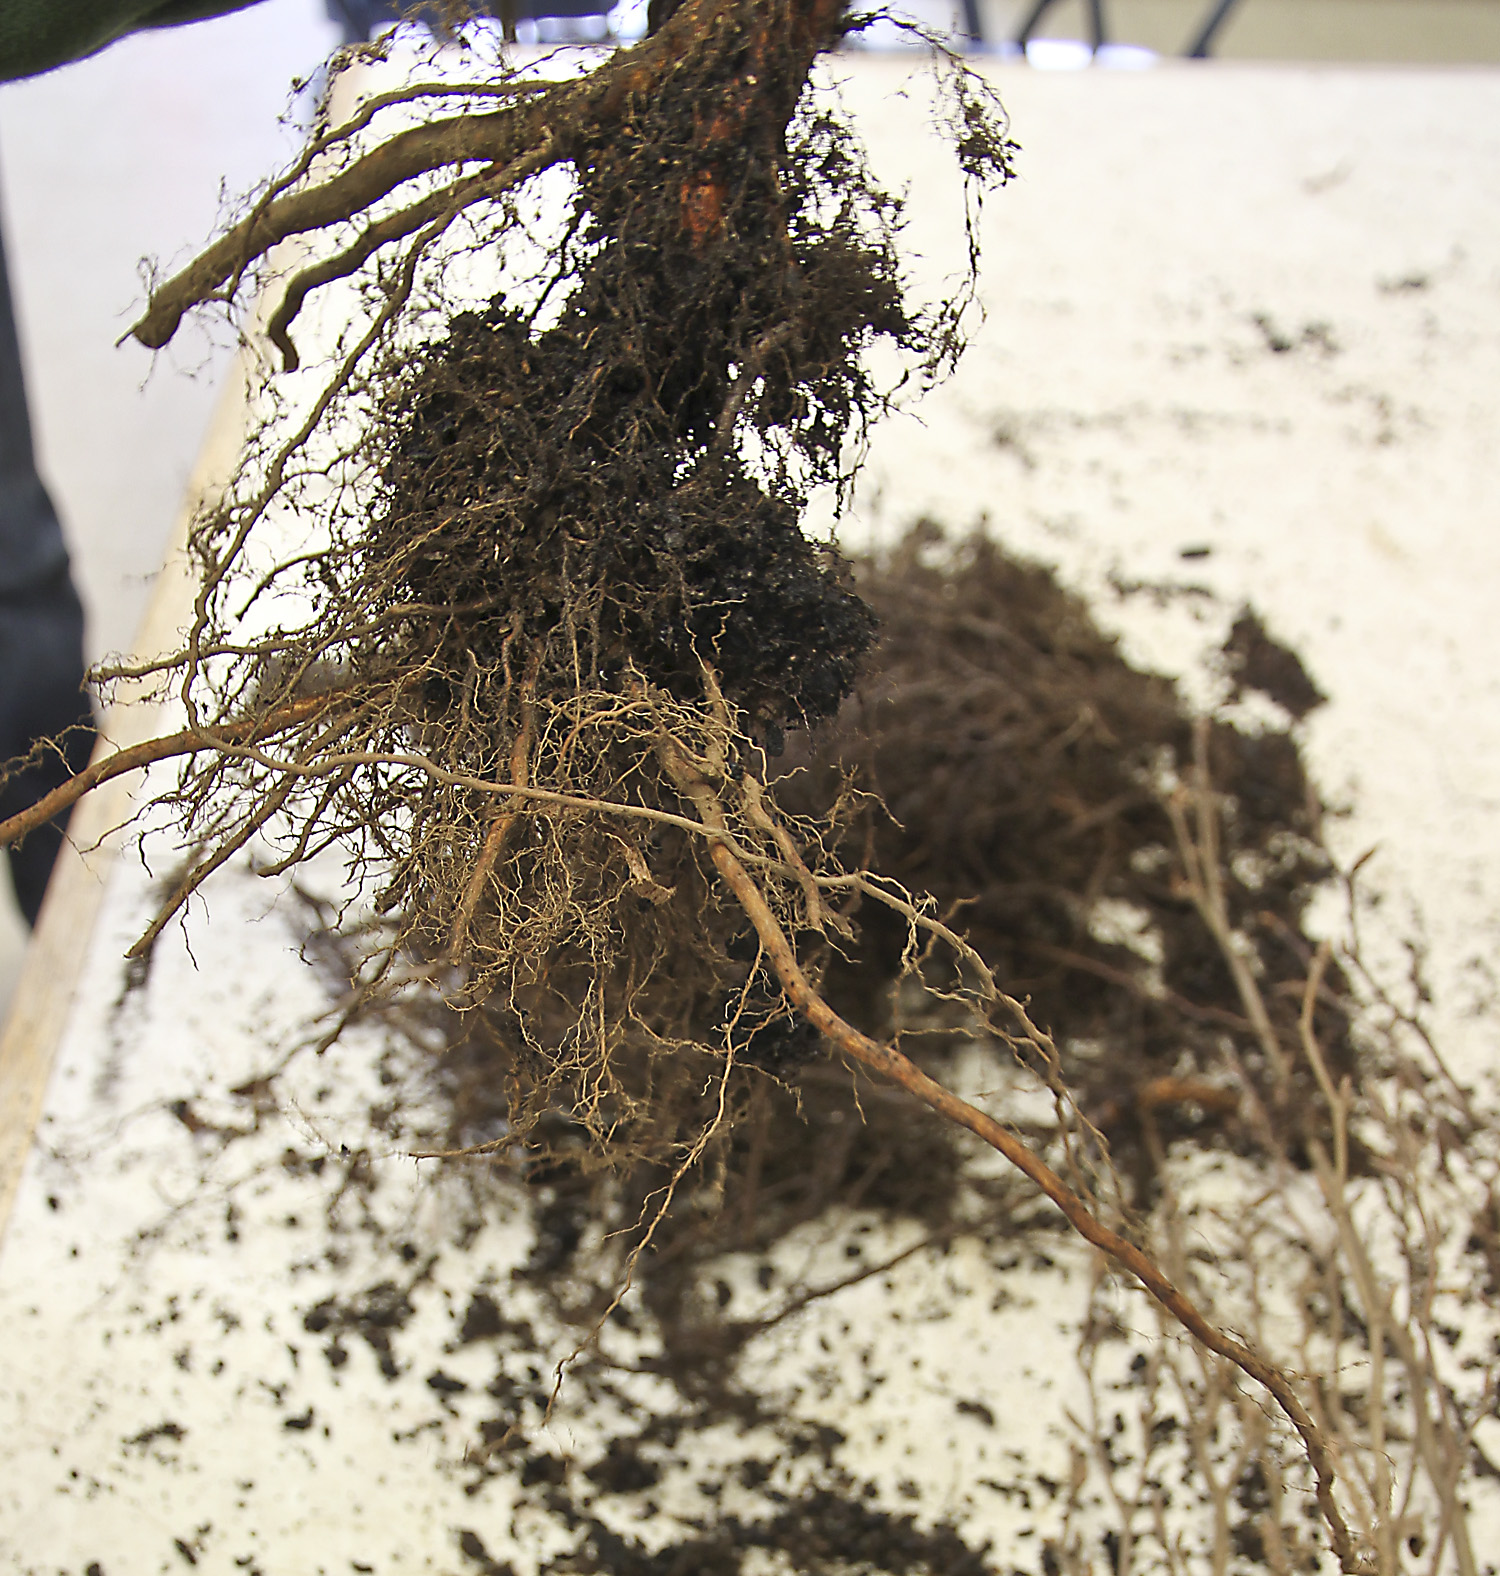
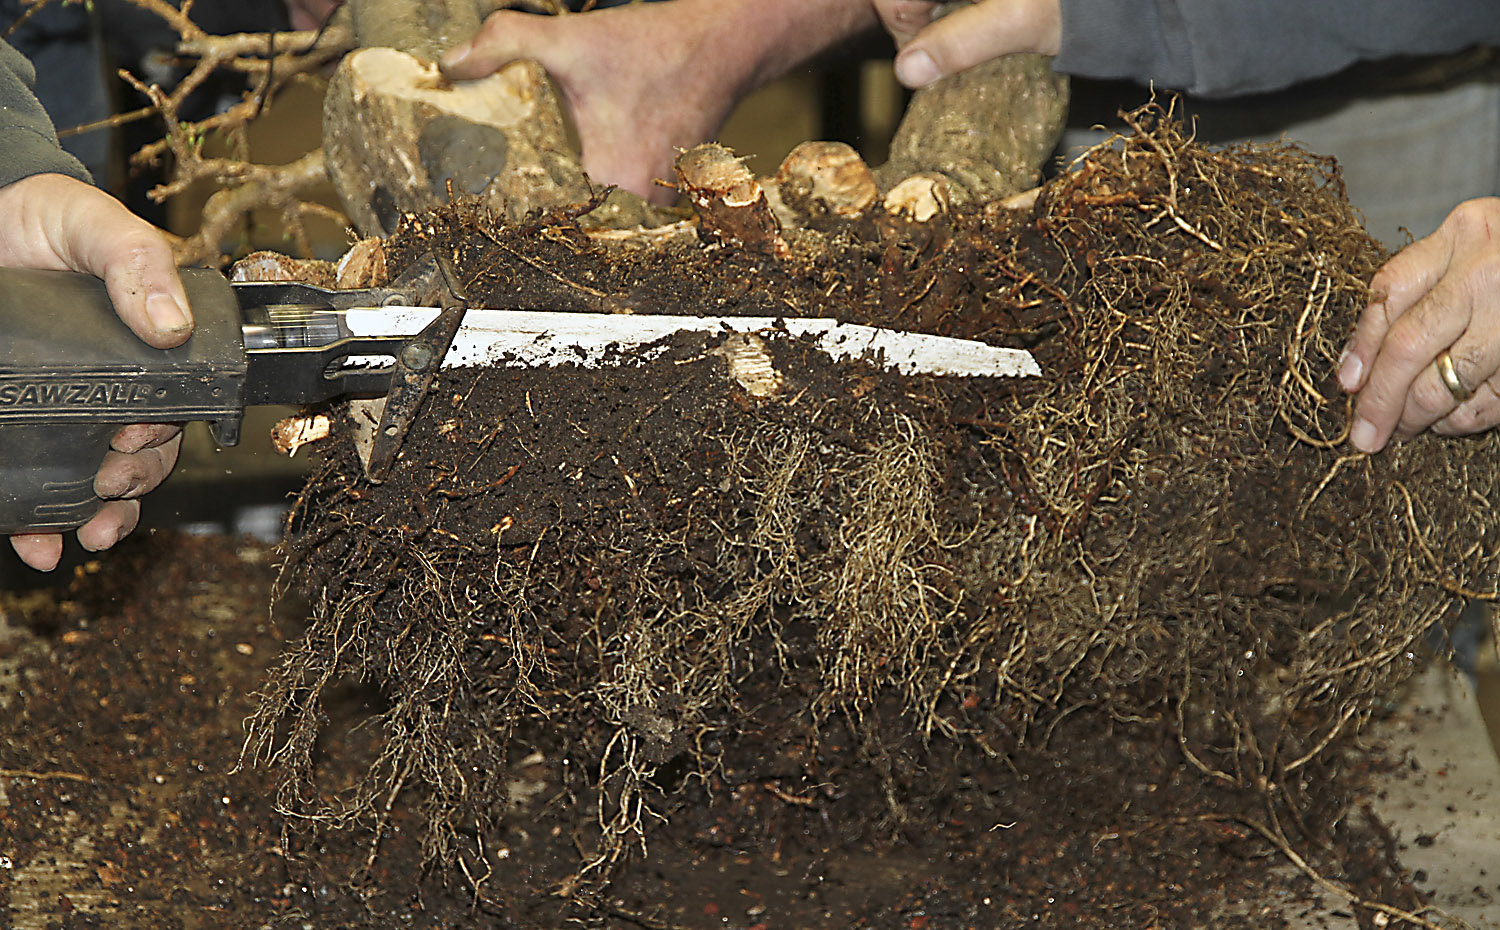
The graded seedlings were brought into the studio and root pruned. Long and heavy roots were immediately pruned short. Sometimes seedlings will develop two root systems and the lower one is often removed. But, it’s important to study all the roots, sometimes the upper roots are removed because the lower level root system has better distribution or finer roots. These are young deciduous seedlings that are vigorous, especially at this time of the year. They do not need a large number of roots at this stage. Most of the top growth will be shortened after positioning. One of the advantages of using young deciduous seedlings is that they can be positioned closer together than potted specimens with a larger root system. Again, after root pruning, the trees were graded and placed into three groups: large, medium and small.


Image


Image


Image


Image


Image


Image


Image

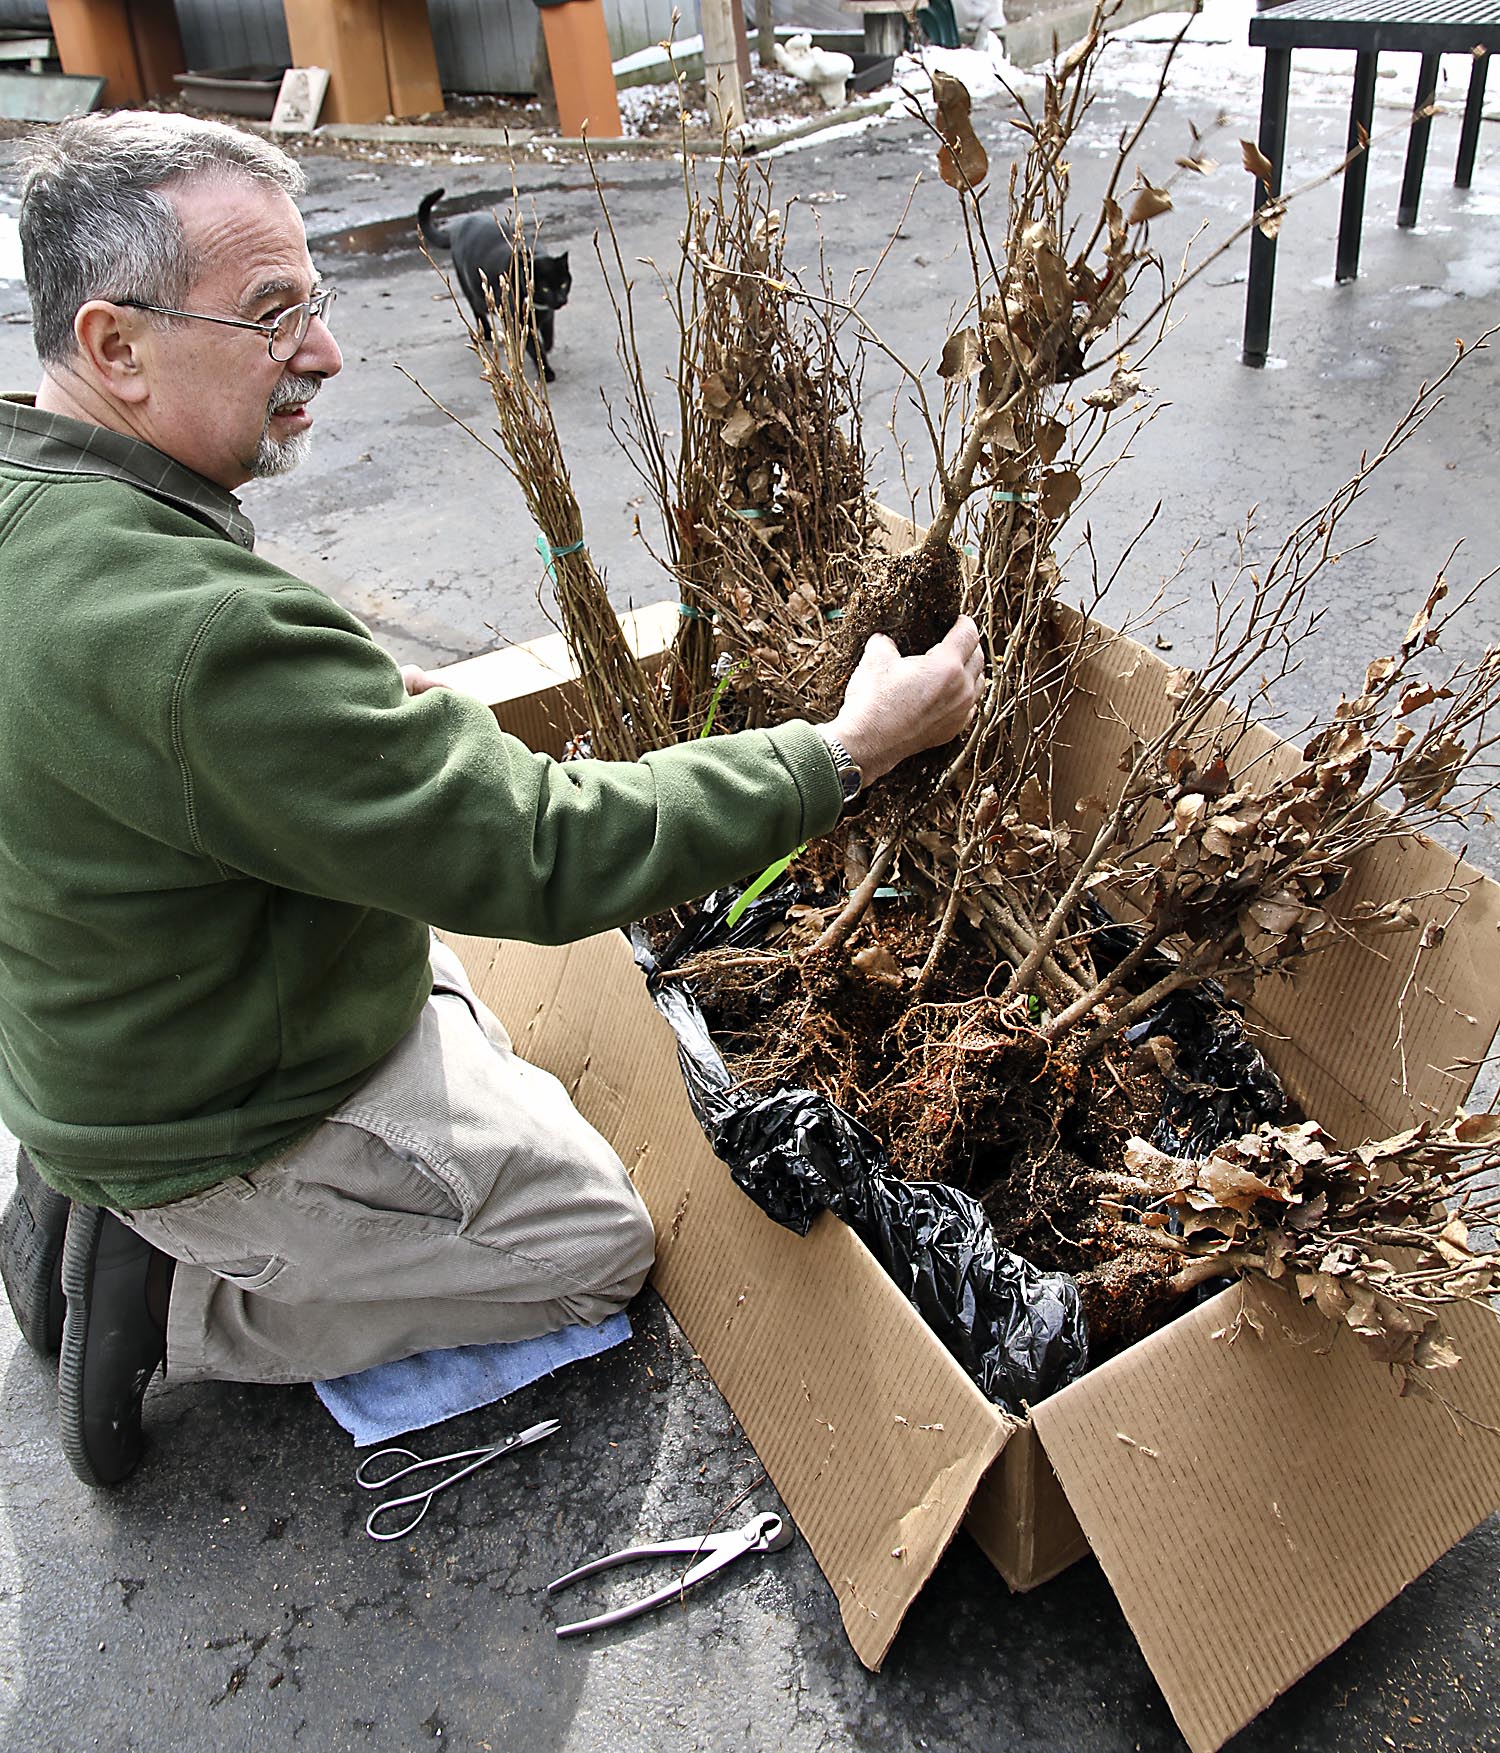
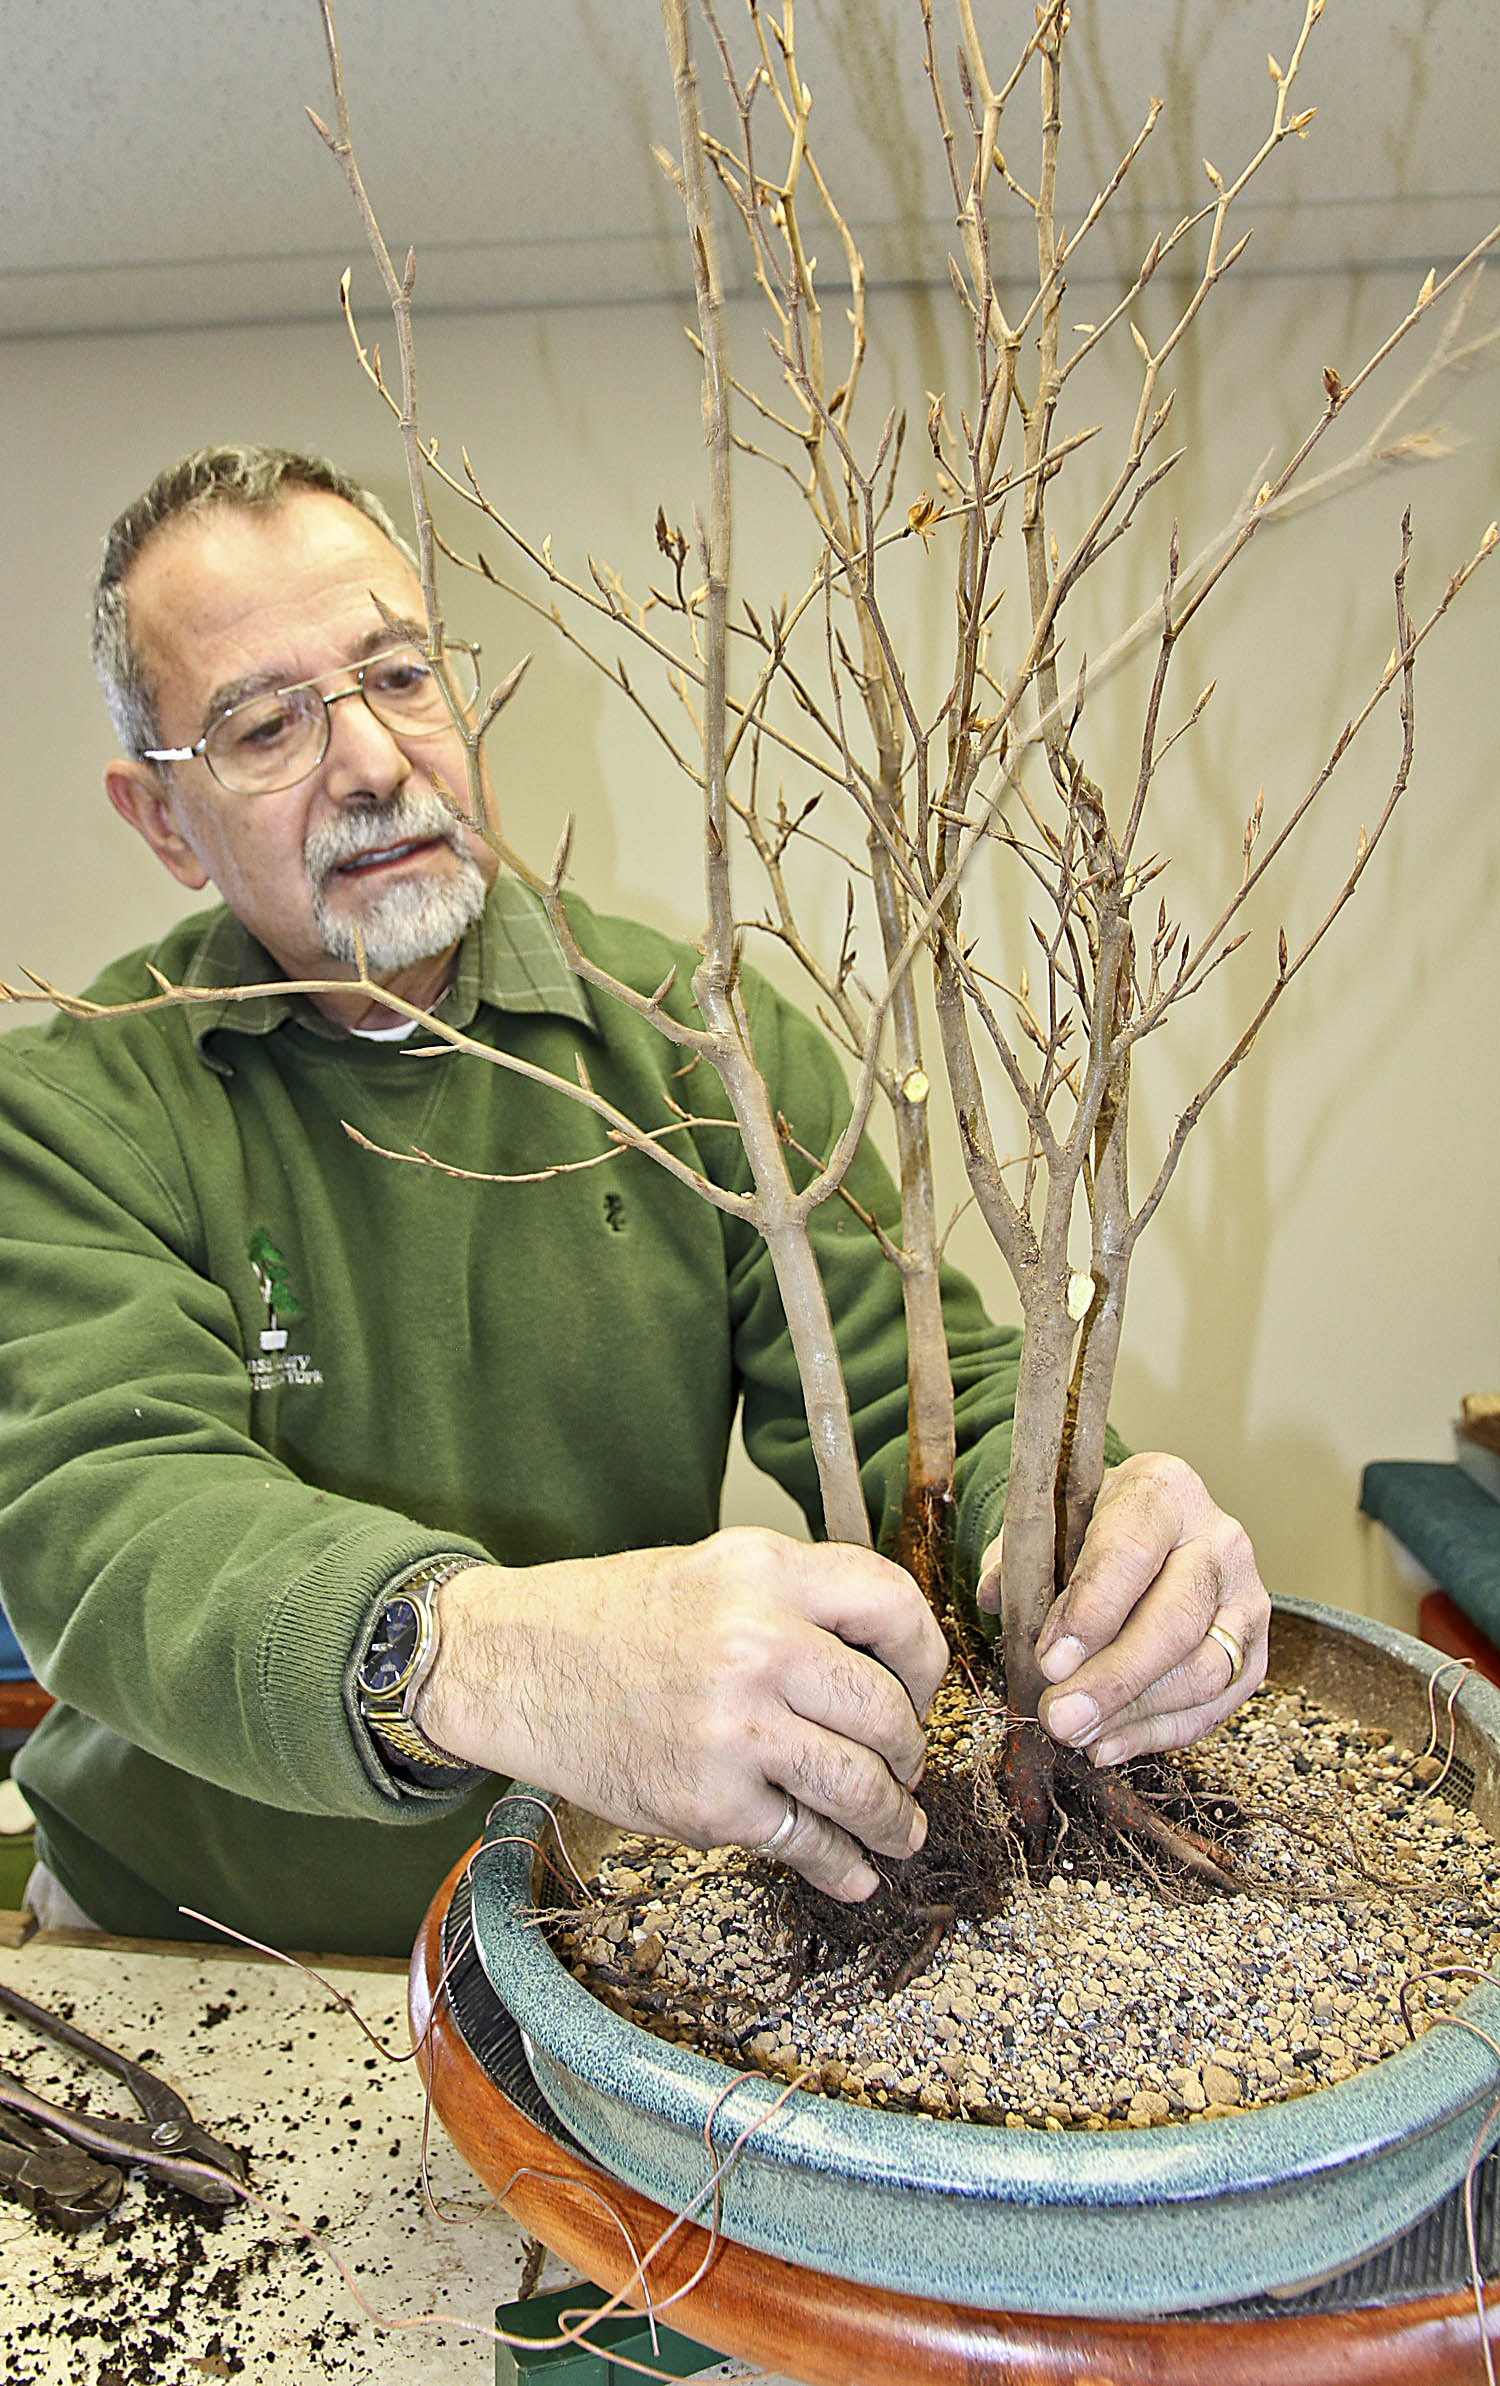
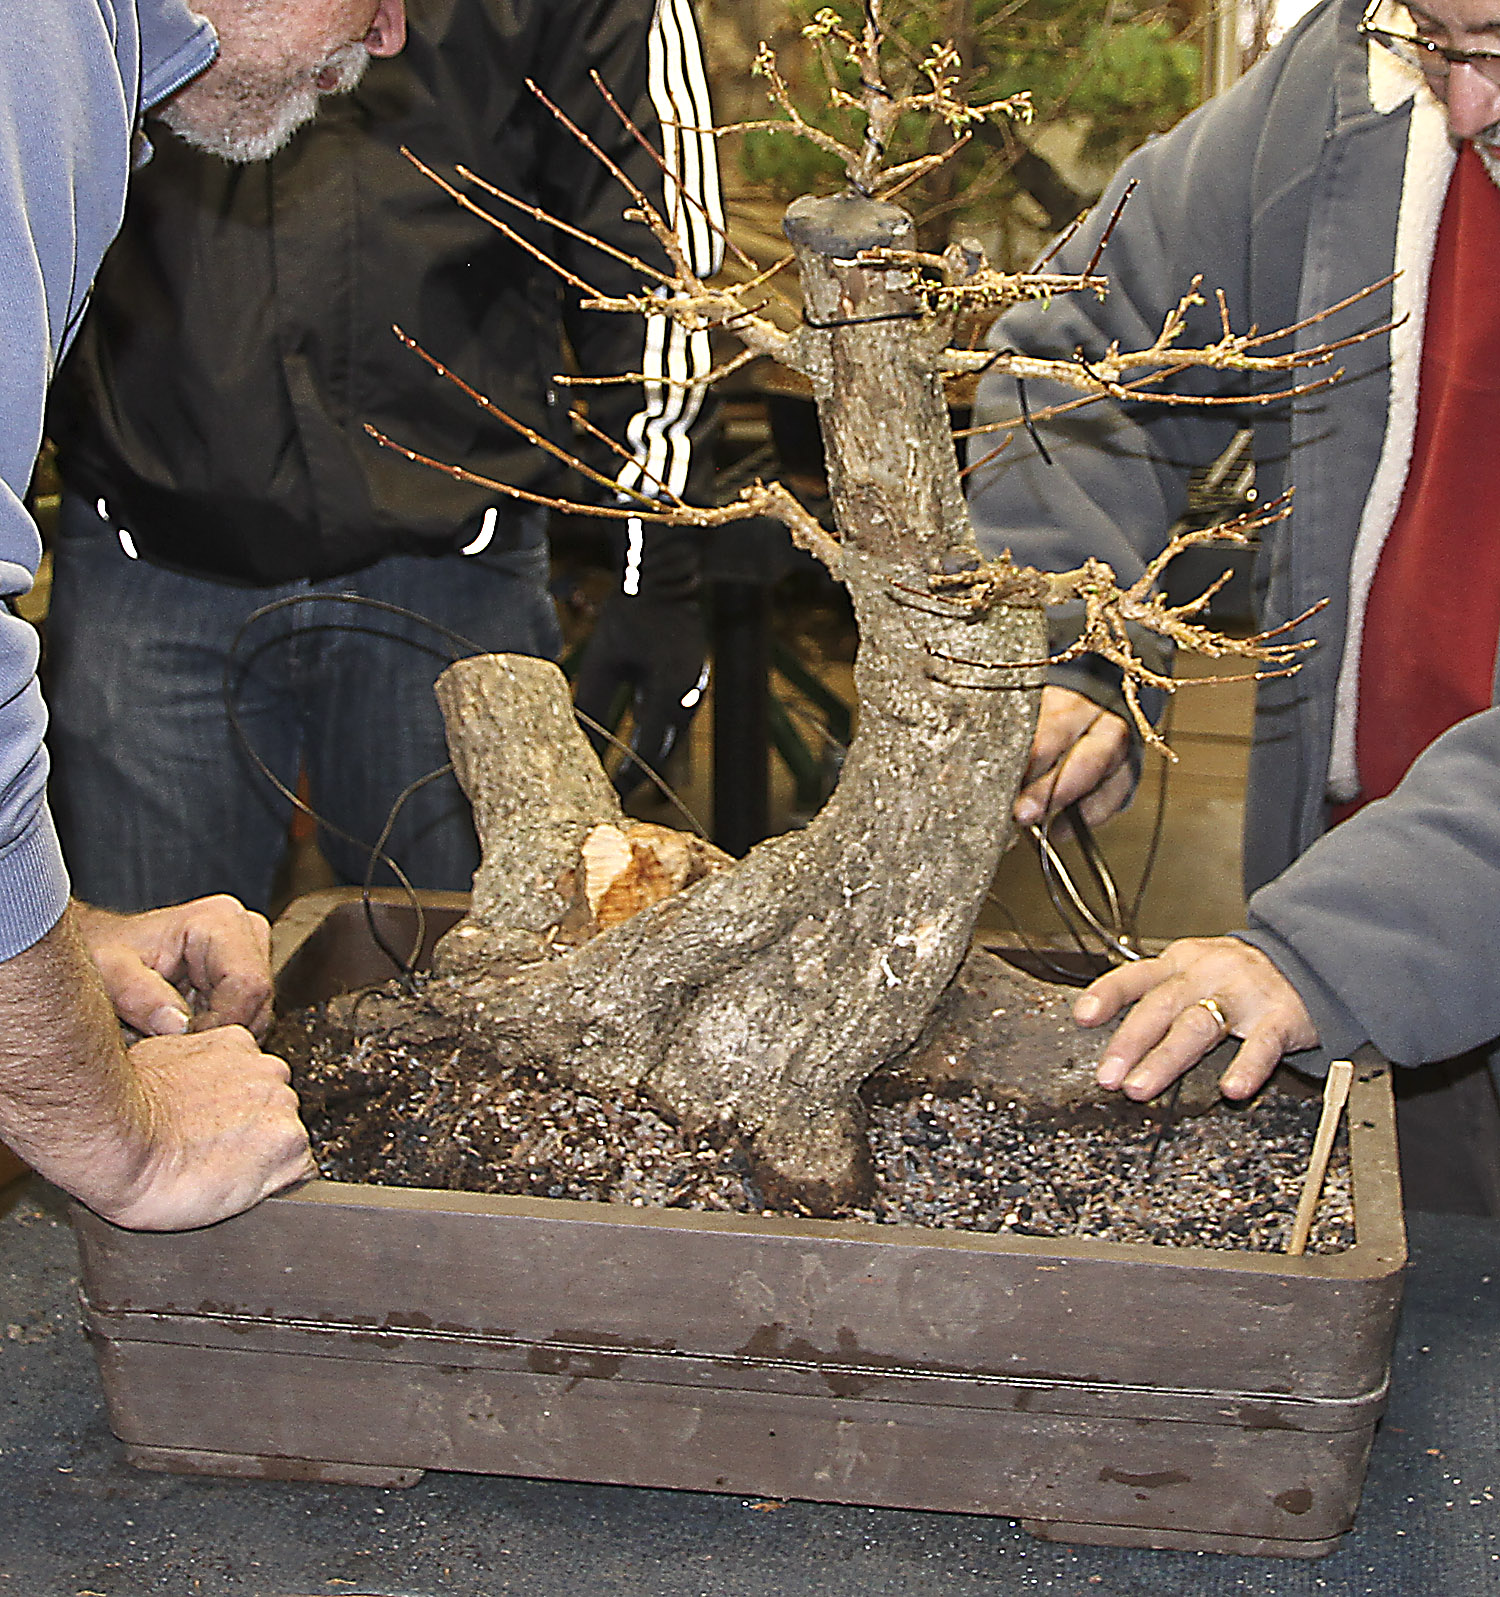
The basic design of a forest bonsai is actually created by the position of the main larger trees. If a larger tree is not available, two trees can be planted close together to appear as one large specimen or the tree can be planted a bit higher in the container. After carefully placing the trees into the container, soil was added around the roots to keep the trunks from falling over, remember, they do not have many roots. A small amount of water from a hand sprayer will add weight to the soil to help stabilize the trees. Also, often times two or more trees are tied together at the base of the trunks. And temporary wire is usually used in the upper sections of the trees to keep the trees from moving.


Image


Image

Additional medium size trees are then used around the larger specimens working toward the container rim. First position the trees for similar trunk movement, keeping in mind any small branching the trunks might have. Ideally the branches should be positioned so they grow towards the outside of the forest, not inside. I do not usually prune the heights or remove inner branching until after the forest is completed. Please note that the trunks were not wired at this time. If necessary, they can be wired or refined during the summer or even best next year. I have learned, the hard way, that if you only wire one or two trees, they will look so good that you continue on and eventually wire all the trunks. So, either wire all or none of the trunks at this time.


Image


Image

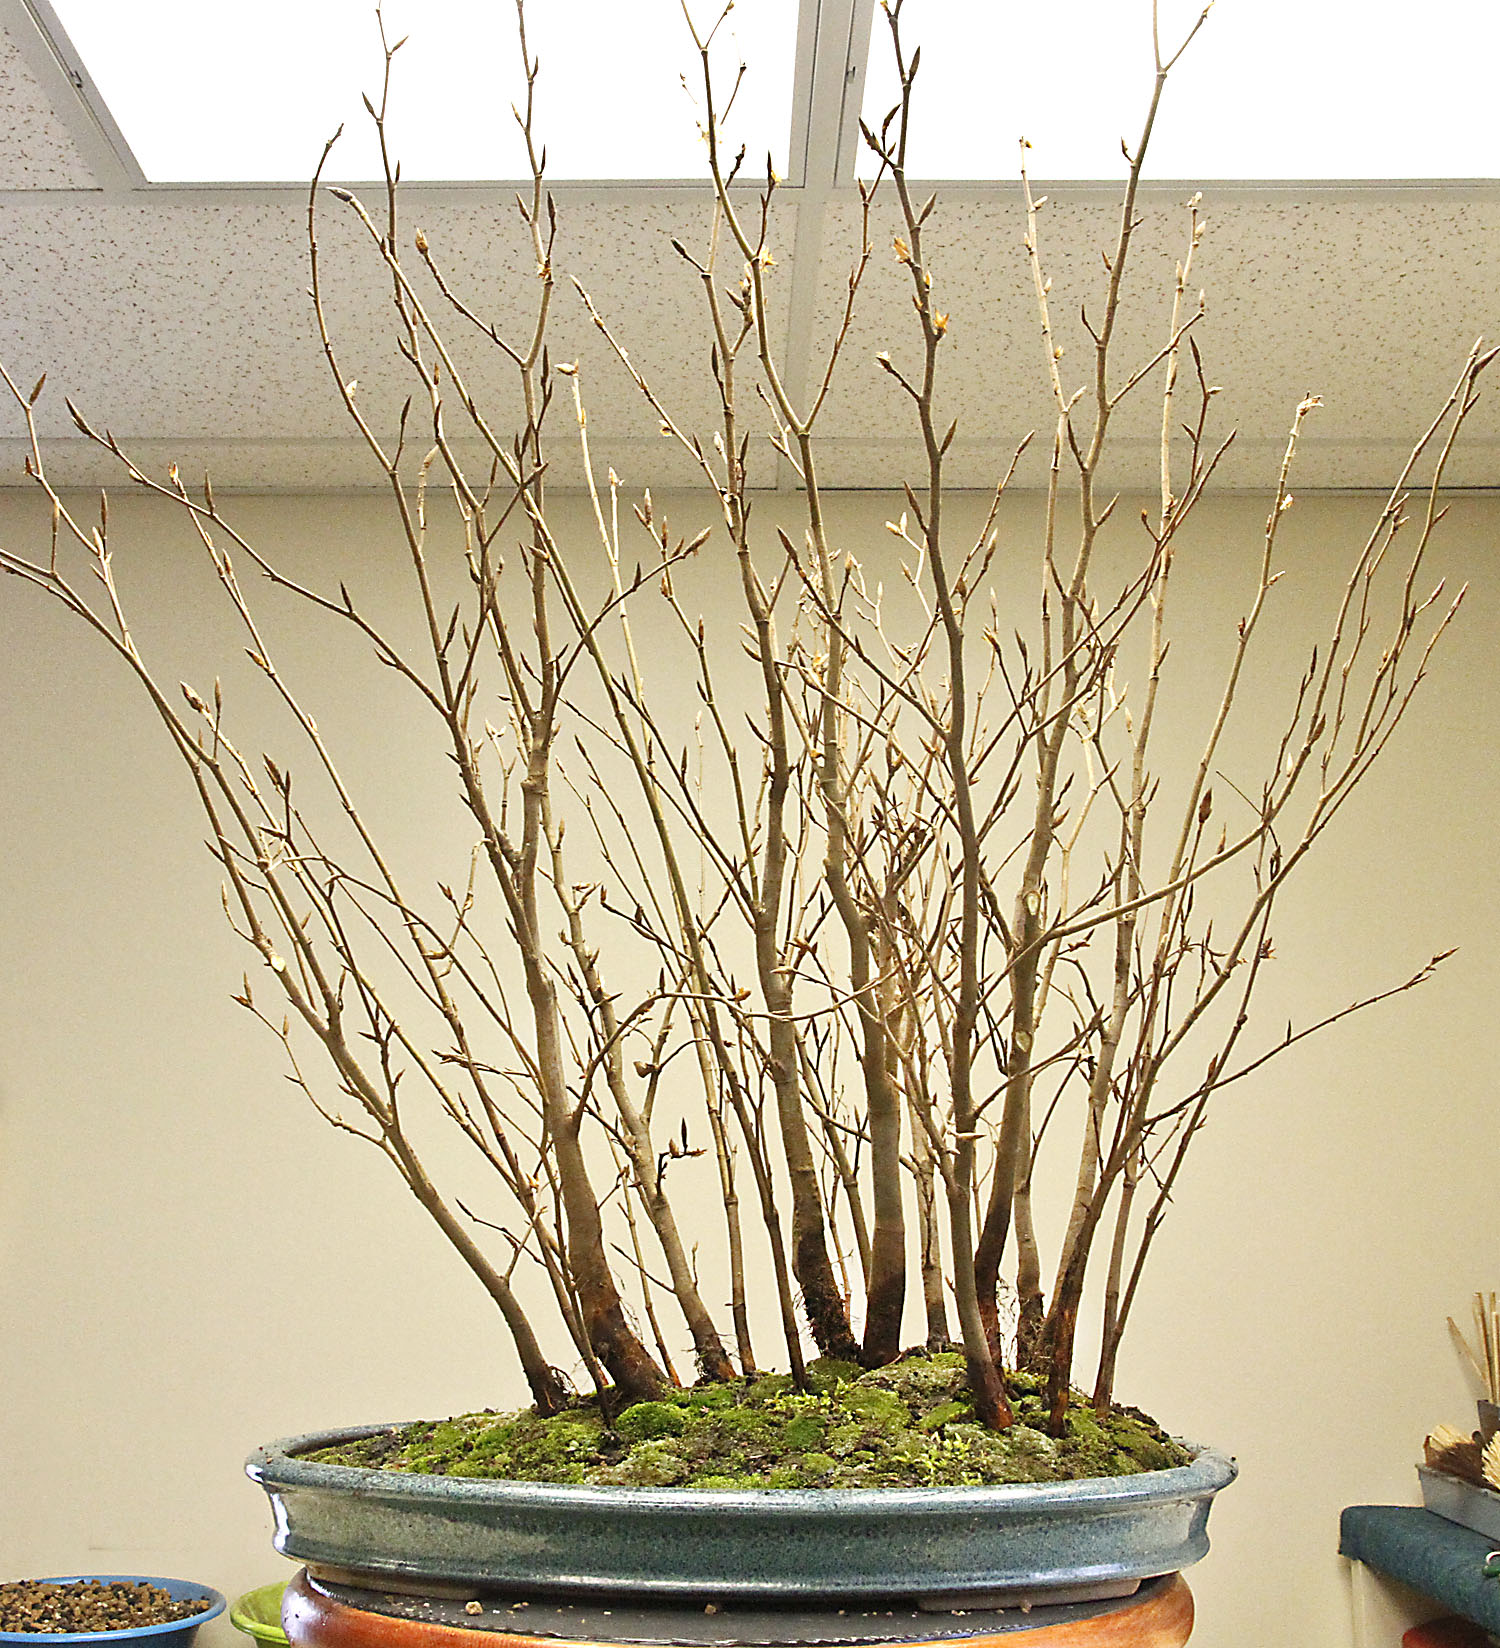
A distant view design will be used for this forest bonsai because of all the lovely similar seedlings. The main tree is positioned towards the center of the composition and the beauty of the bonsai lies with the delicate branching the trees will develop.


Image

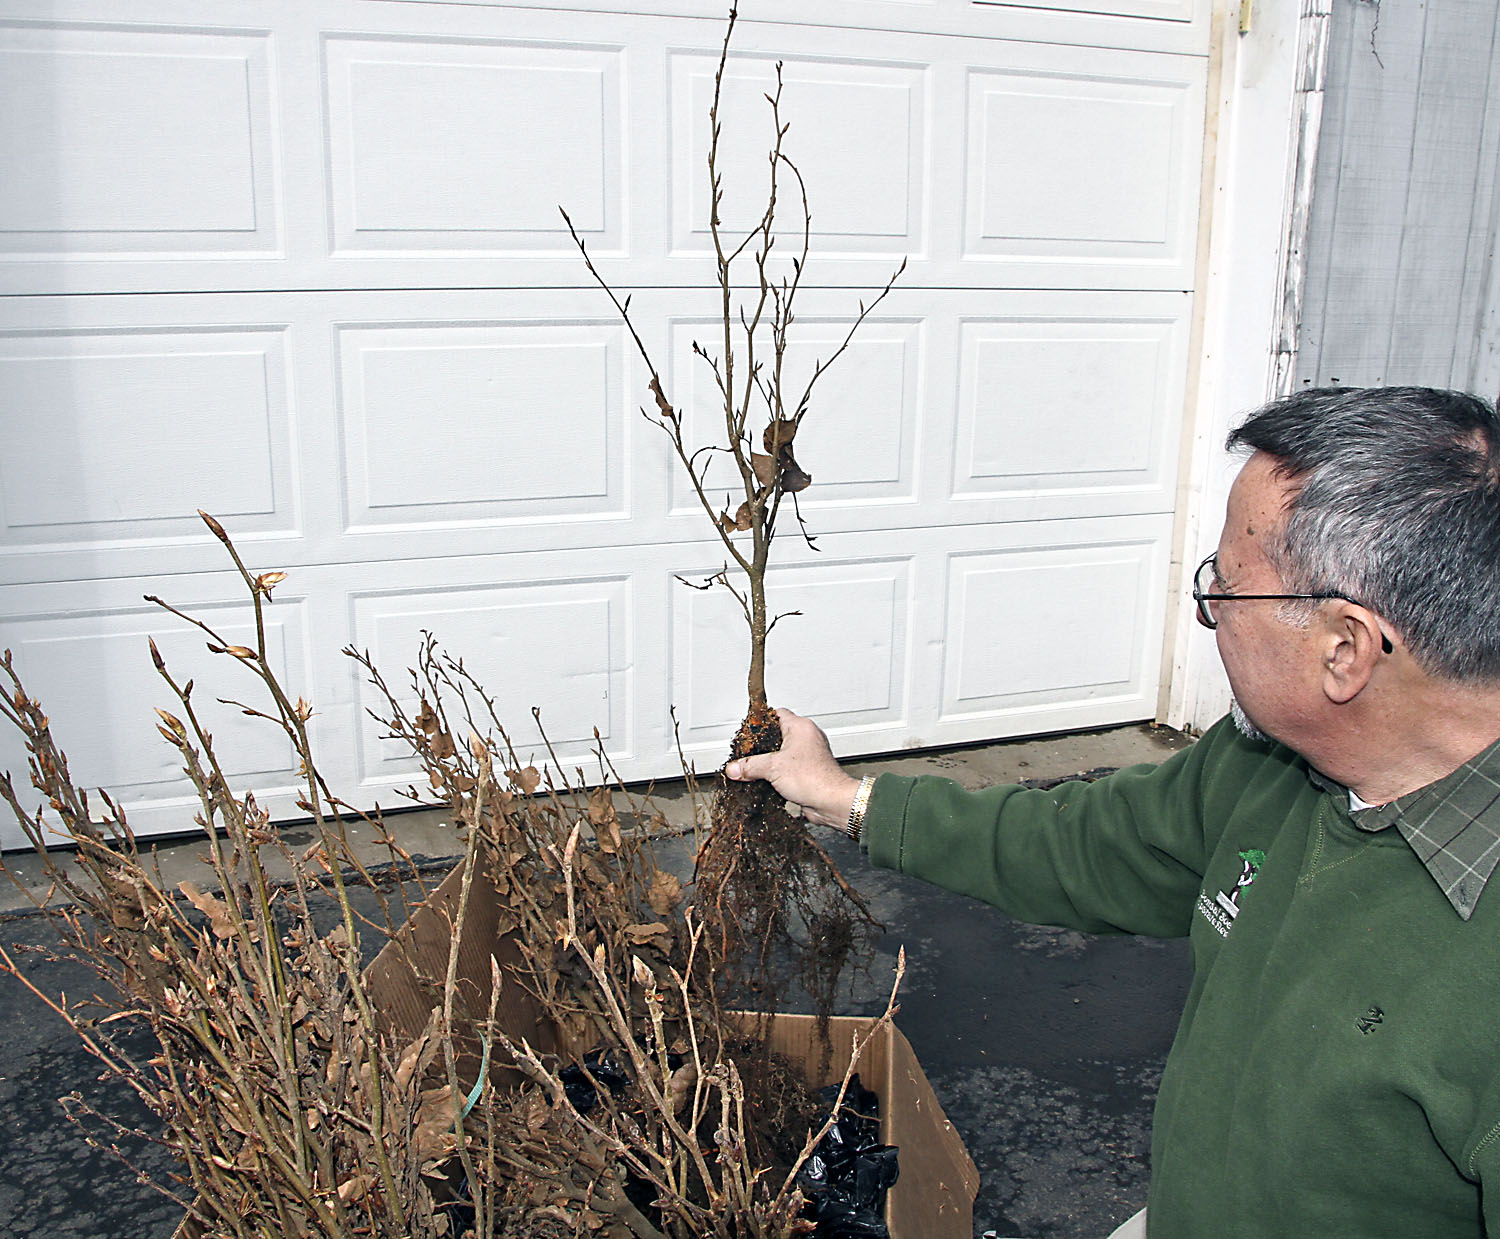
Finally the smaller trees are added to the group. I also looked through a few of the European beech seedling bundles we mail order for even smaller trees. This forest actually had four different sizes of seedlings to present a wider range of trunk calibers and heights.


Image


Image


Image


Image


Image

After enough trees were added to present a pleasing forest they were secured using the copper wires inserted through the drainage holes. I never counted the number of individual trees in this forest. The actual number is not important because the normal human eye can’t easily count more than eight trees at a time in a forest planting. Basically, what I was aiming for is to have most of the larger trunks around the main tree on the right and positioning them closer together than the other trees near the smaller trunk trees on the left.


Image

The wires run through the planting and are tied with a wire pliers making certain that both ends of the wire are twisted together at the same time. The ends are not trimmed until the end, because they are often handy for tying to each other for additional support. Soil is then added and carefully placed around the roots.


Image


Image

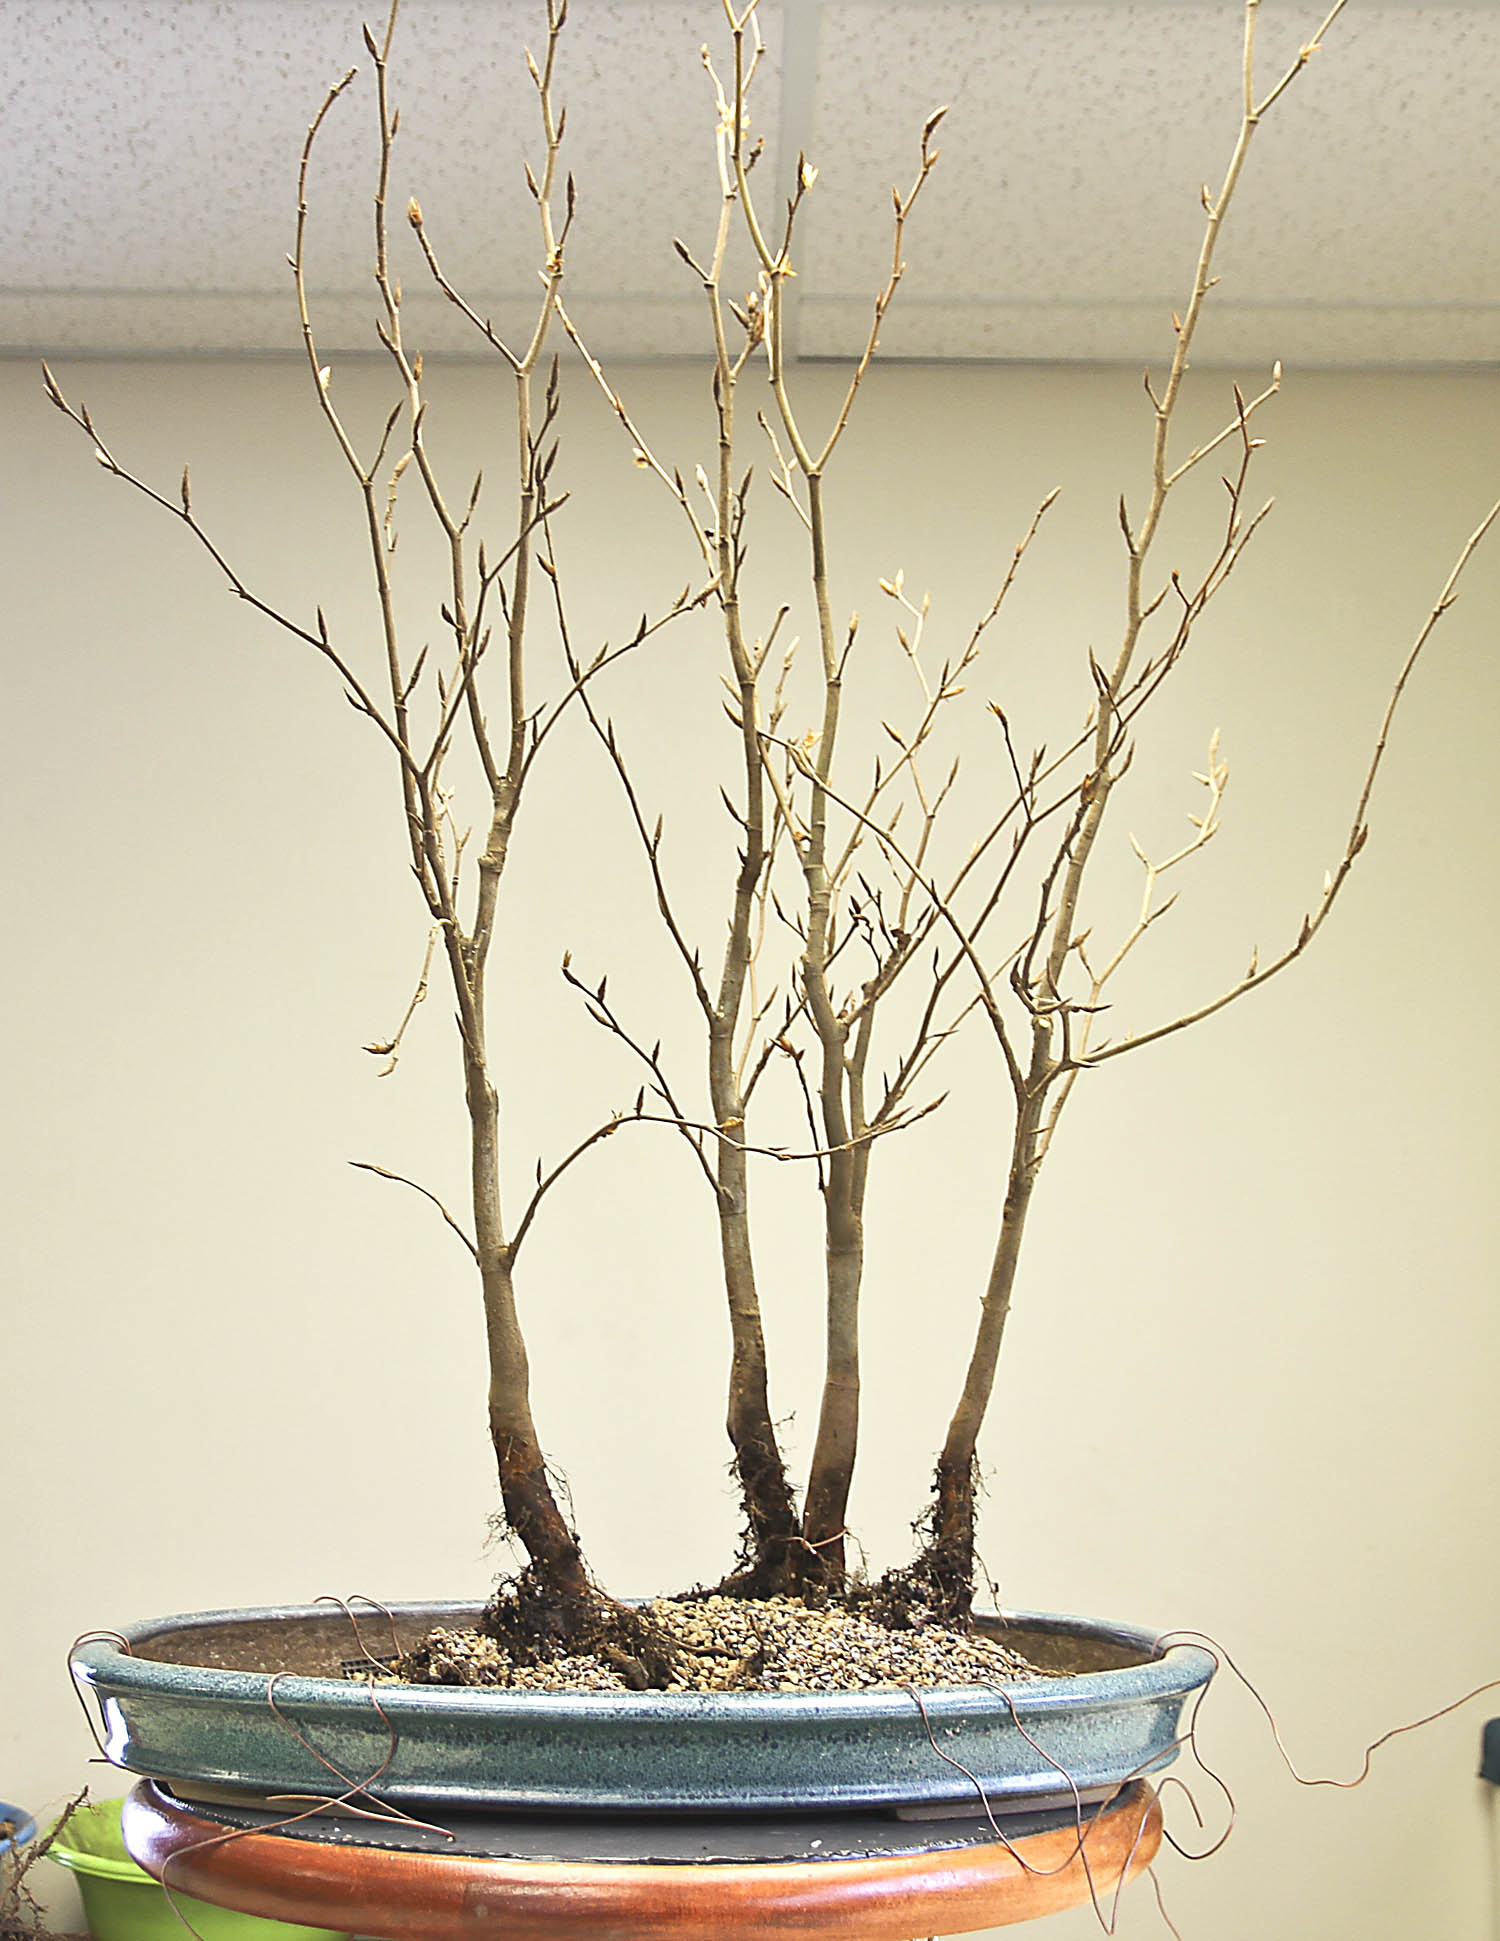
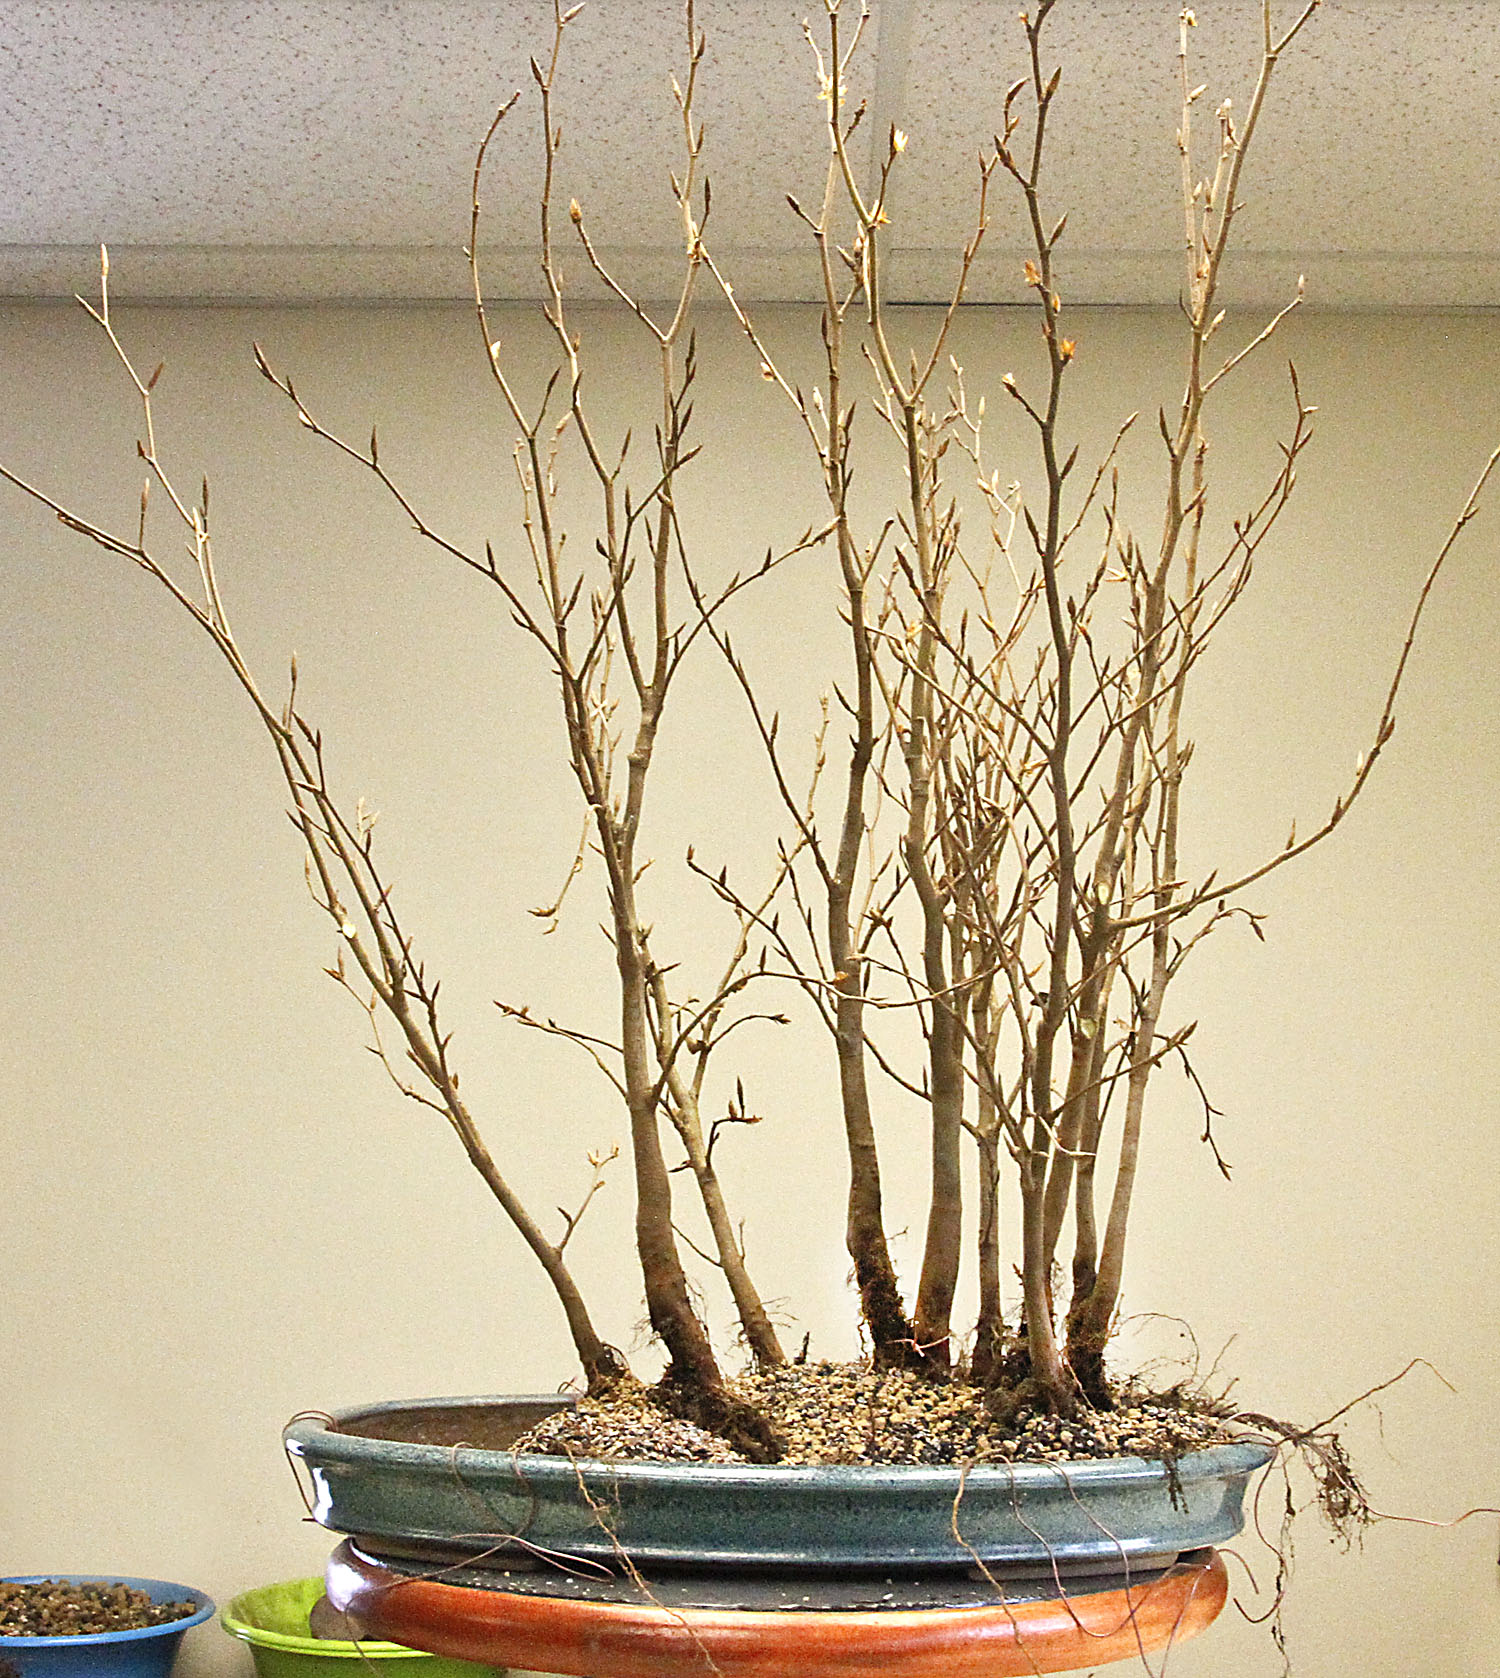
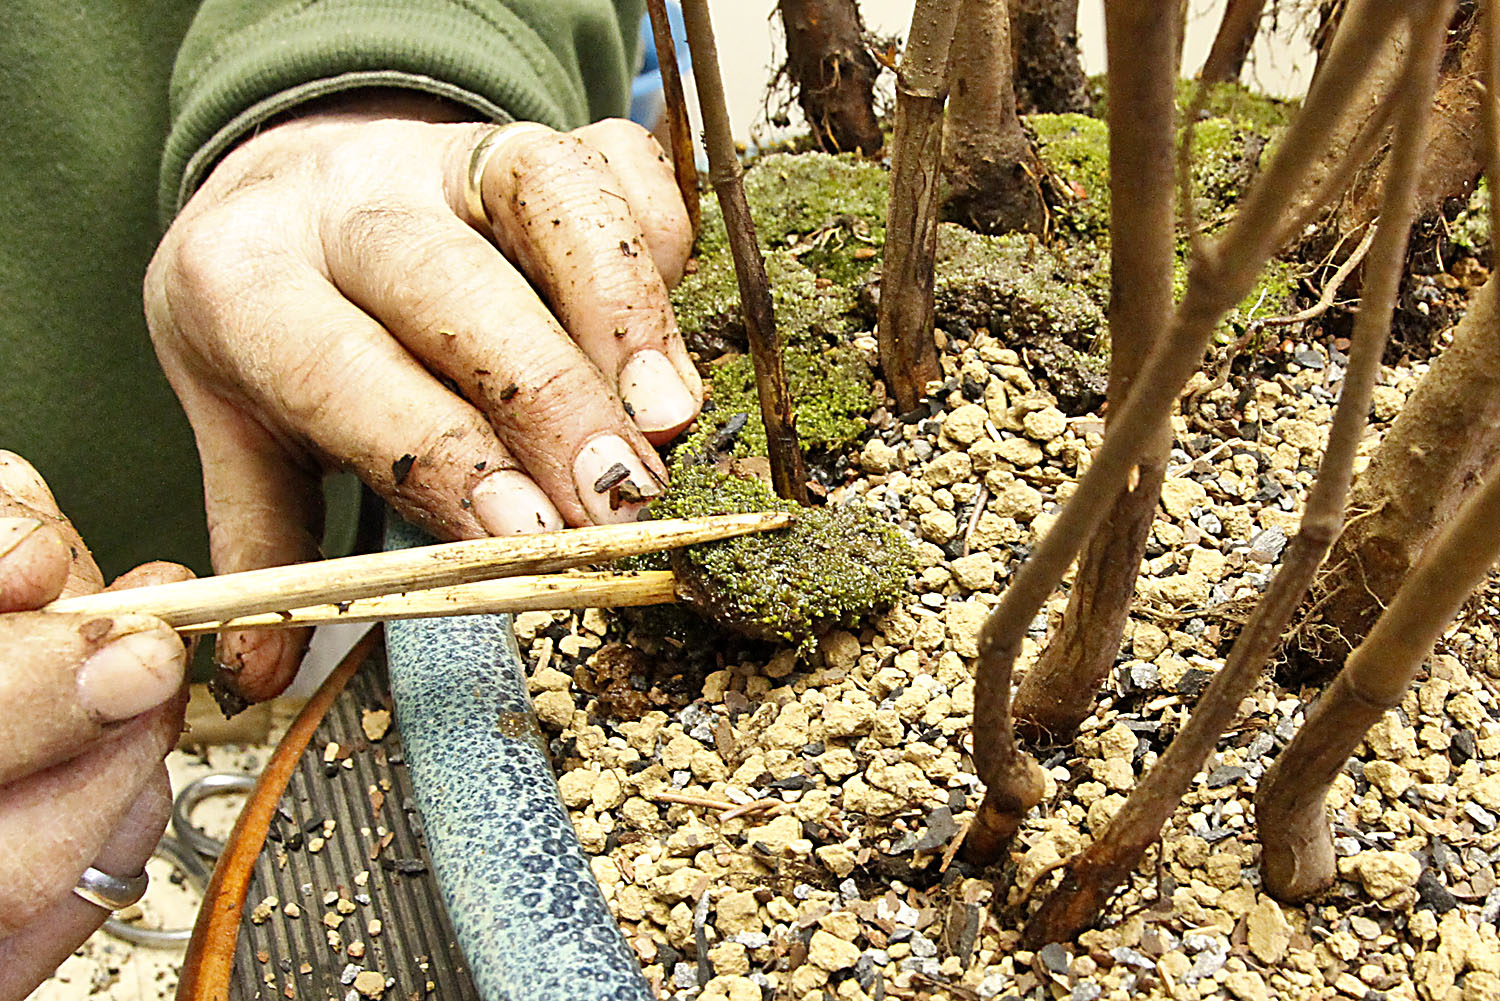
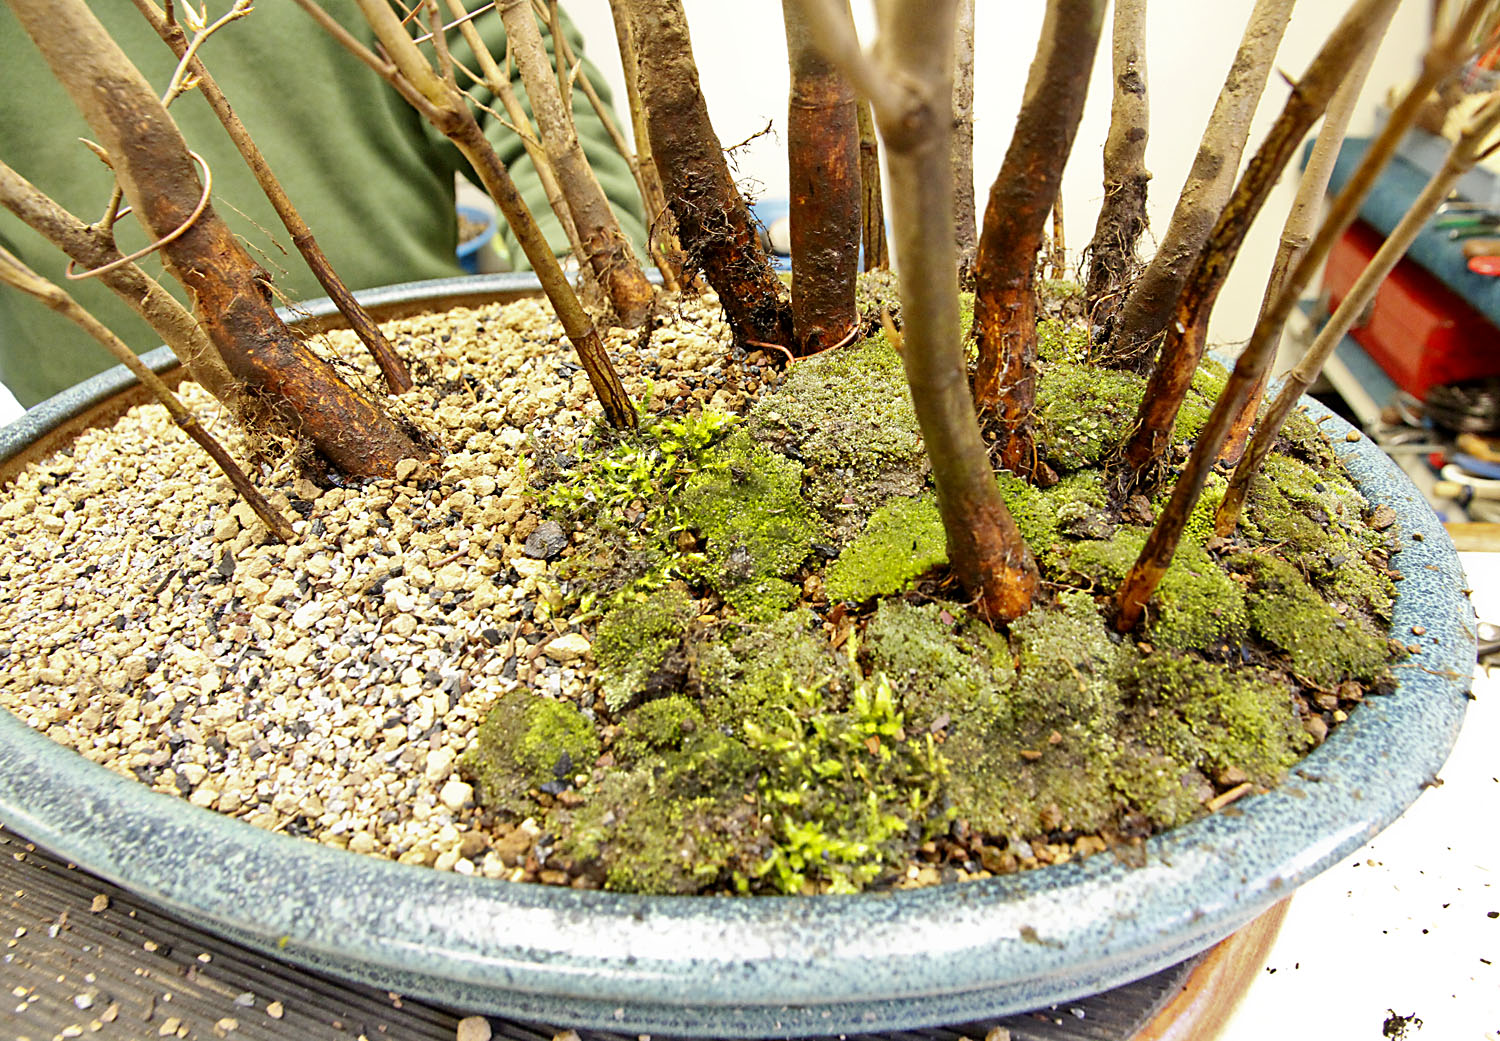
Next moist green moss is applied in small pieces first around each trunk base. It is gently pressed into the dry soil to secure the trunk positioning. While doing this, each trunk is again adjusted and can even be rotated for better viewing from the front. All the moss is placed next to each other without gaps to hold the trees in position.


Image

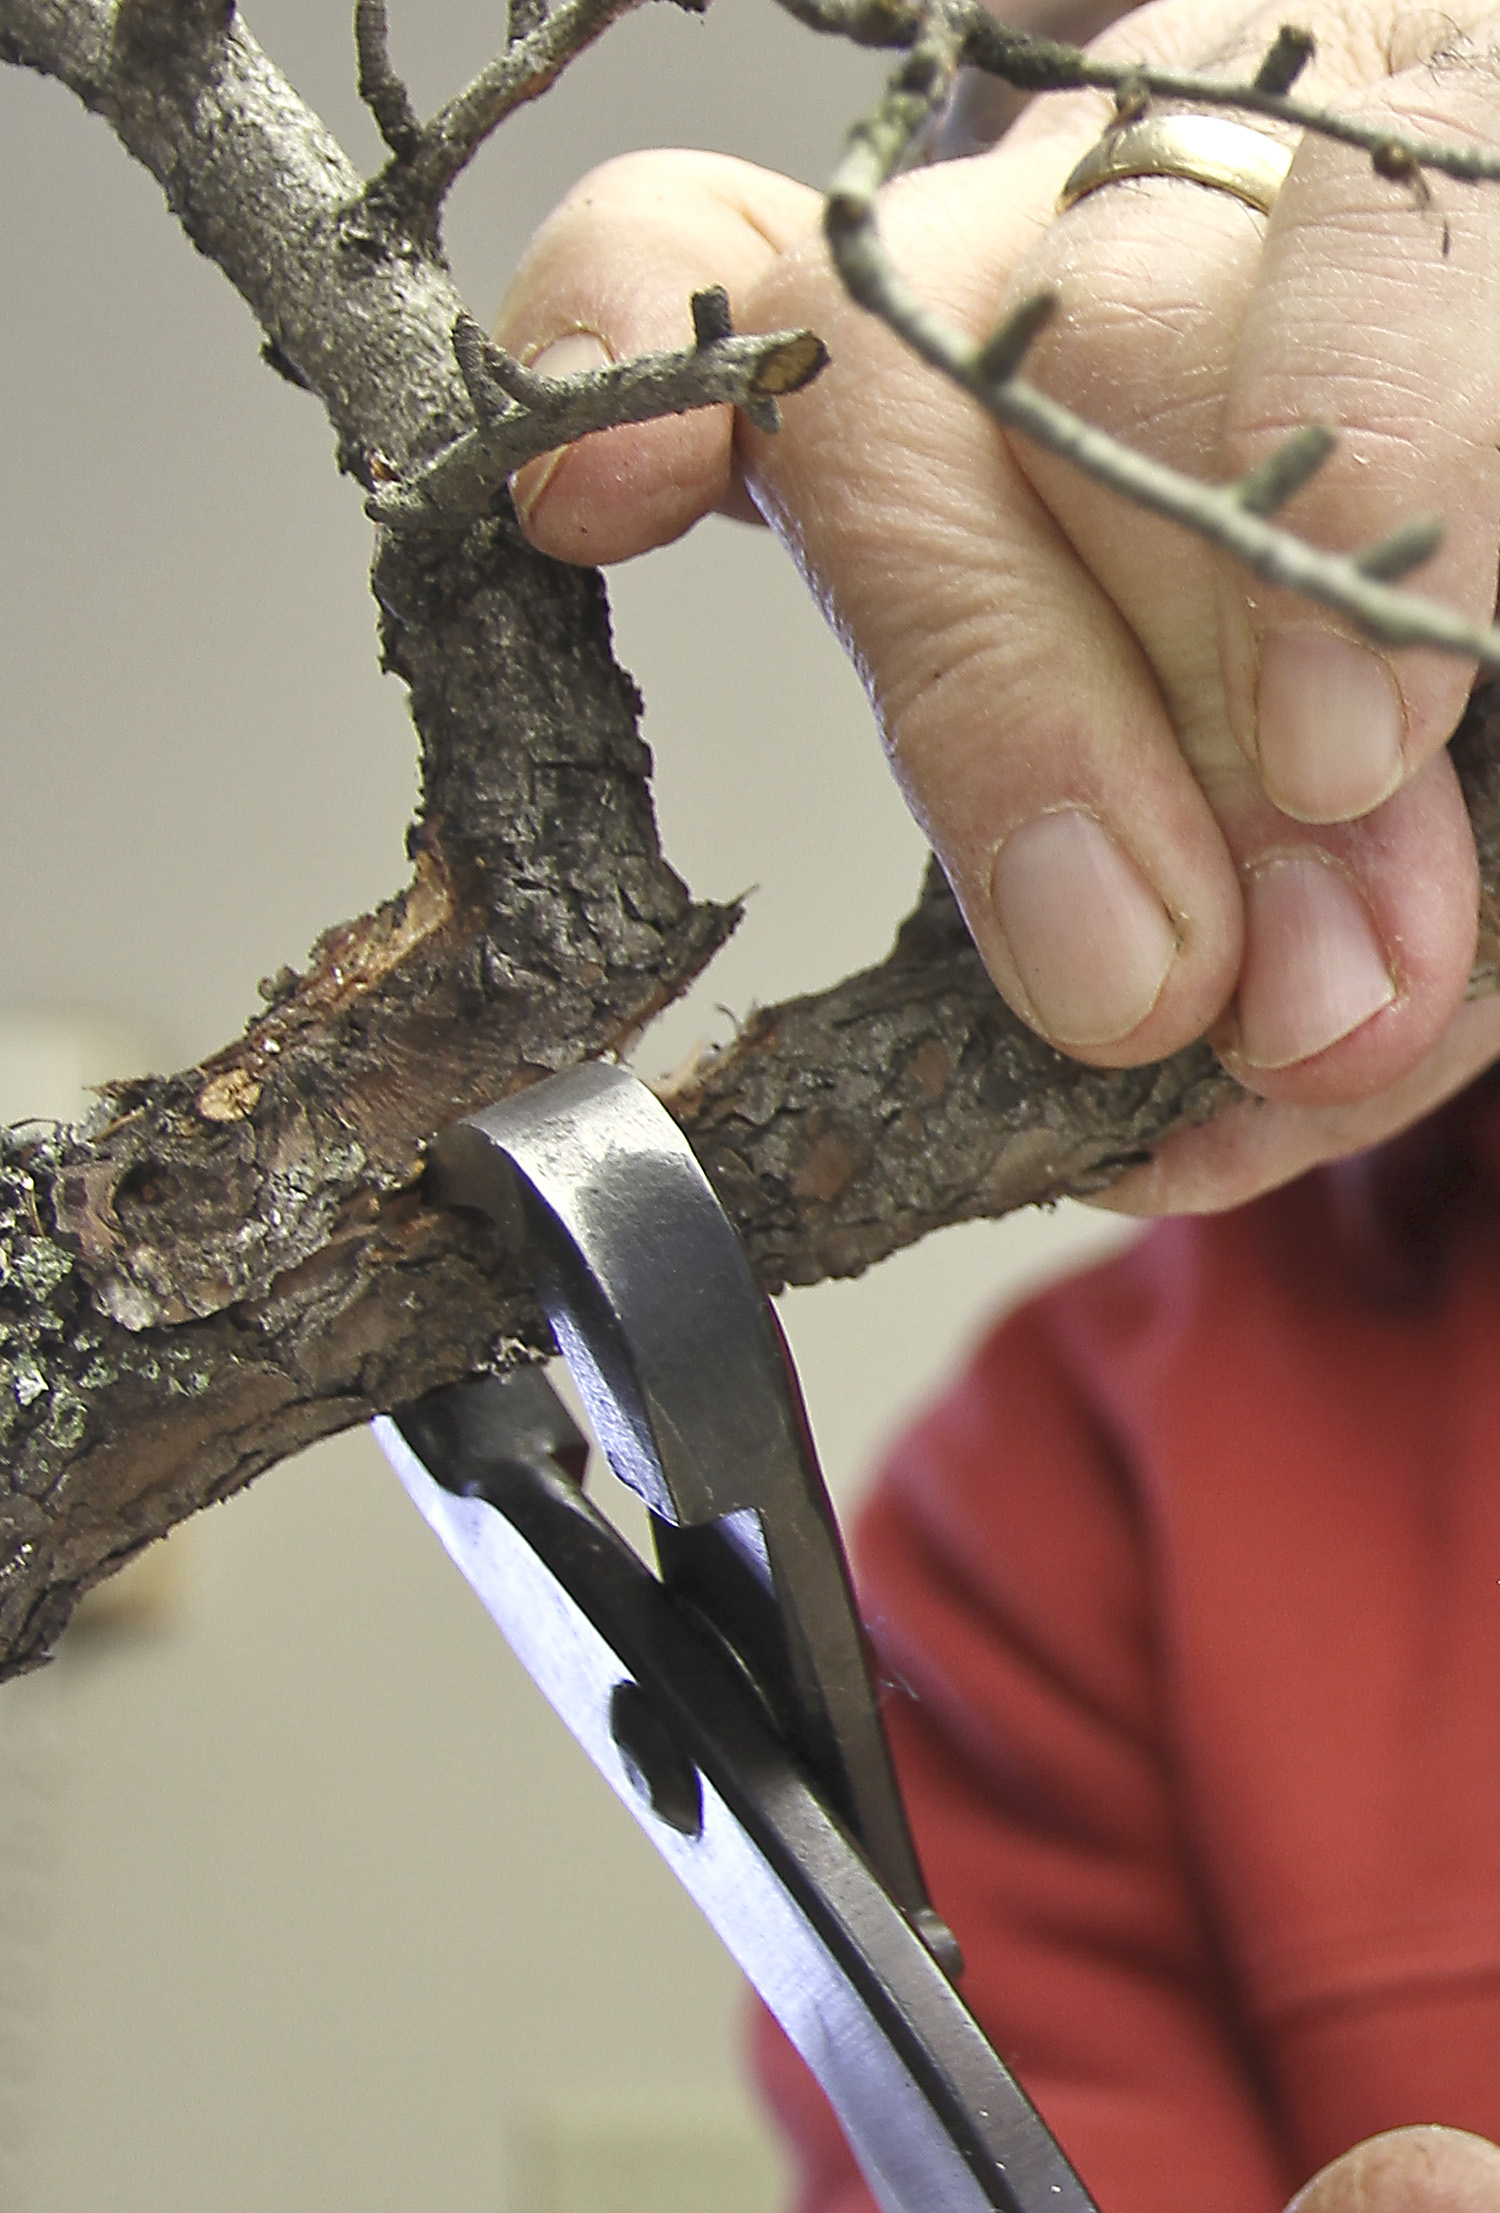
Once the moss has been completely planted the trees are trimmed. First the height of the forest bonsai is established as well as the sides. Then all the other trees are trimmed to different heights, keeping in mind the heavier trunks ideally should be taller than the skinny trunks. As adjusting the tree heights inner growing branches are removed. Trees can still be slightly positioned at this stage of development. It’s important to remember that when the planting is completely planted it is only the beginning of its development for a future forest bonsai.


Image

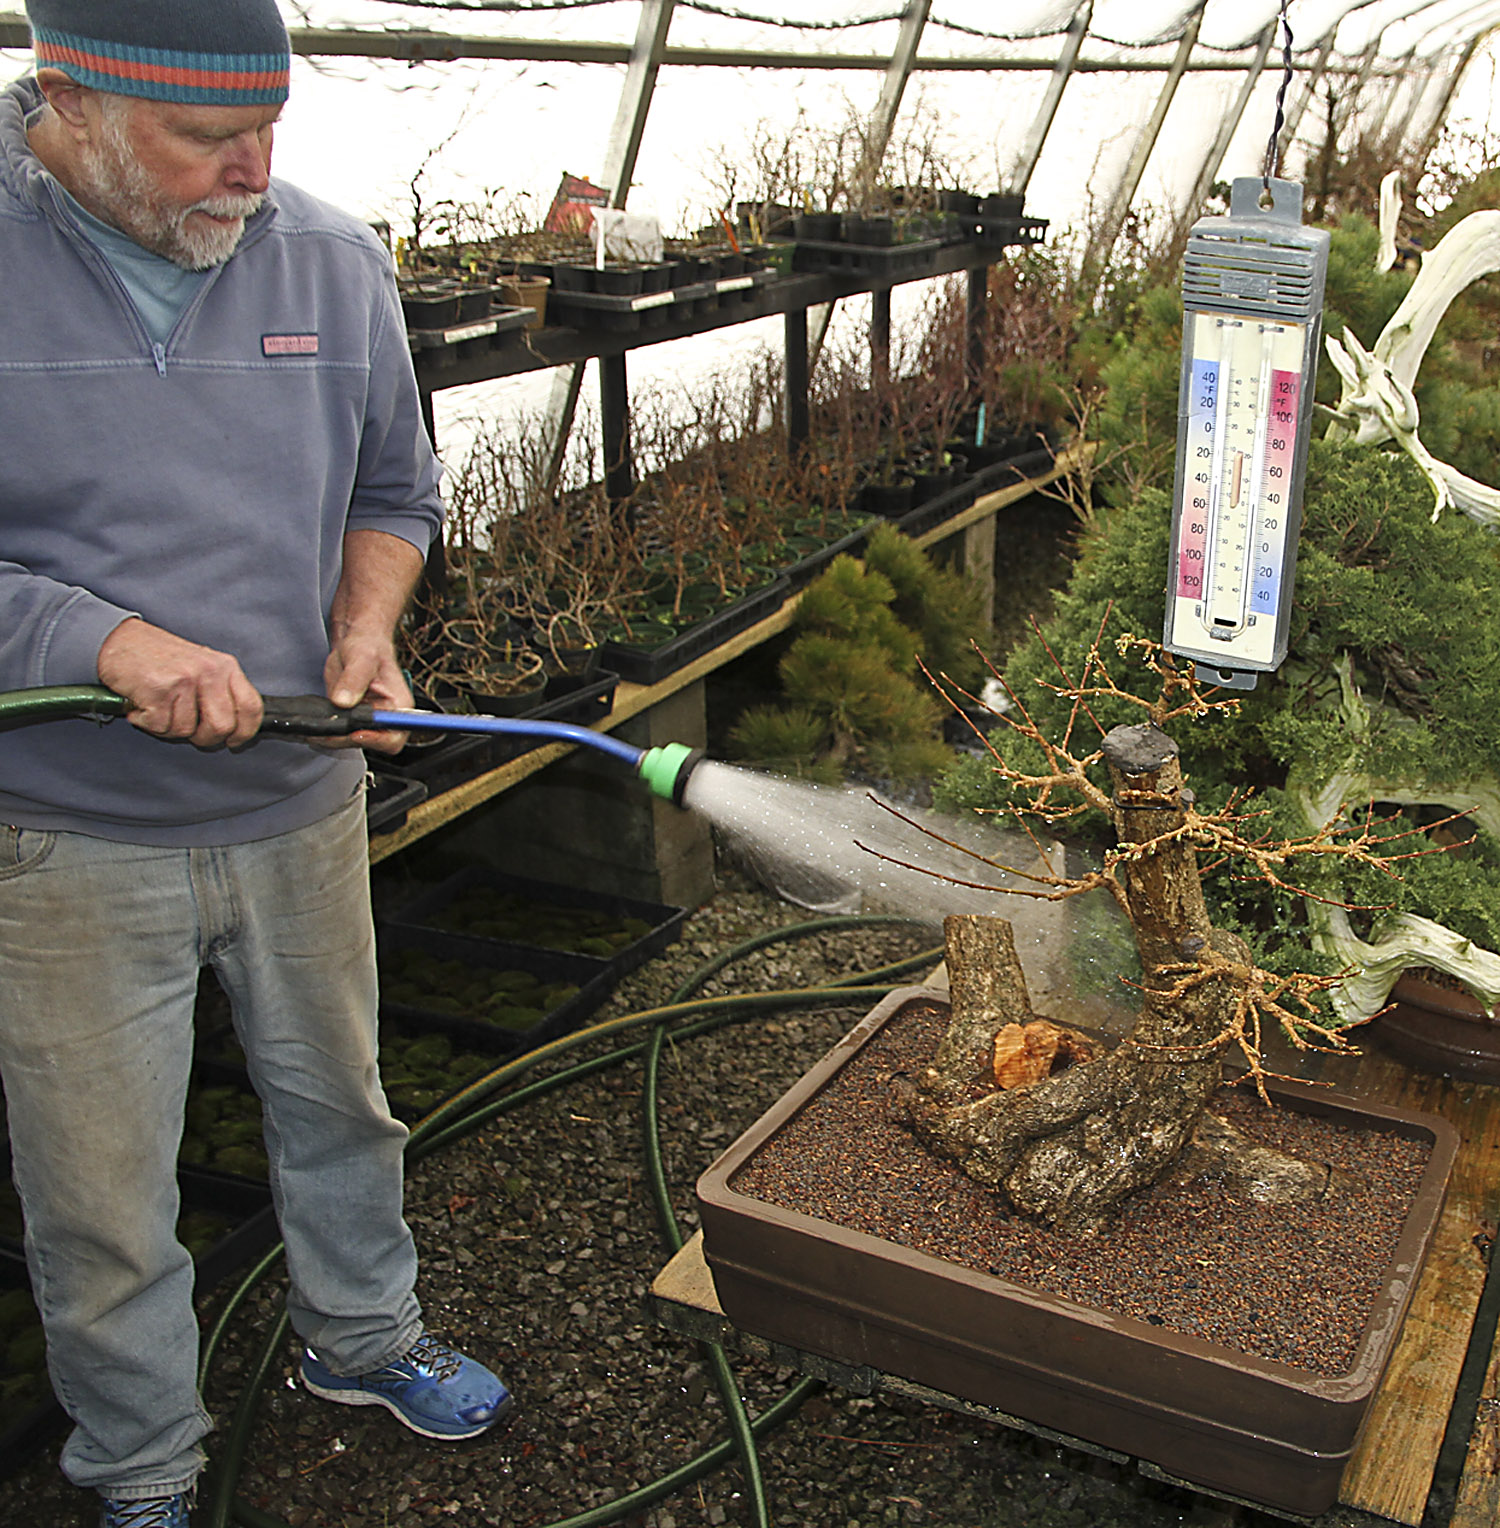
After completing the planting the wire on the bottom of the container is twisted to lock the plants into final positioning. They must not move around. Additional small pieces of thin wire might be added to the tops of the trees to keep them from moving. The planting is watered from the top with water and Superthrive until it runs clear through the bottom drainage holes. Then it is placed in a sunny area, out of the wind until new buds grow.


Image

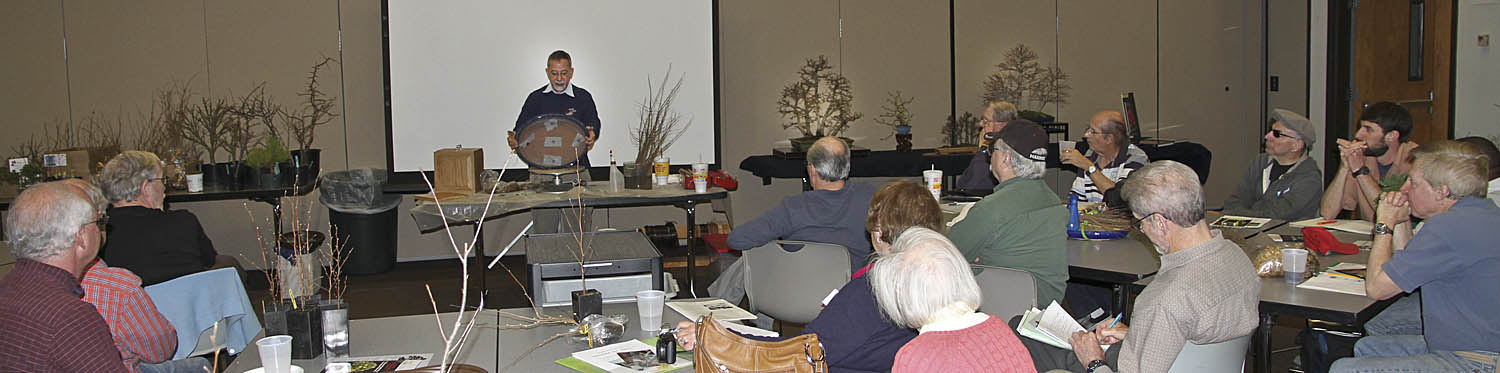
These are the identical techniques and theory I teach when presenting educational programs around the world. My next Group Planting Seminar will be held on Saturday, April 5, 2014 in Rochester, New York.


Image


Image


Classical Bonsai MasterClass Session III

Image

Today the final session of my Classical Bonsai MasterClass began with a discussion of the alcove display. In addition to exposing and teaching bonsai shaping techniques as well as horticultural tips to grow healthy beautiful bonsai, I feel it’s important to appreciate bonsai in a formal setting. It is not necessary to have a Japanese alcove, only an area in your home with a plain background so the tree is isolated so one can truly enjoy the beauty of the bonsai which are created and refined during workshops and grown outdoors.

As mentioned in during the previous sessions, seasonality is an important aspect of bonsai display and appreciation. The bonsai, scroll/painting or companion usually indicates the season. During the first two sessions of the Classical Bonsai MasterClass, a bonsai in flower and a deciduous tree just leafing out clearly indicated springtime, even though it was snowing outdoors. The scrolls which were displayed with the flowering and leaf emerging bonsai also featured flowers fading and cherries blossoming.

Today’s display was different however. An evergreen species bonsai was the main element on display and was combined with a scroll painting of the rising sun. Neither of these two objects indicated seasonality. So, the companion planting was used to convey the season. It was a bit difficult to first notice, but a small planting of Acorus sweet flag was combined with an overly large figurine of a Canadian goose. But, upon careful examination a young gosling was under the mother’s wing, thus suggesting spring time.

Image


After we discussed the formally presented display we spent a few minutes on the importance of suiseki when combined with bonsai. My well-known natural double hut stone from Puerto Rico was compared to a contemporary commercially produced hut stone from Japan, which was “enhanced” to appear natural.

Image

The group was offered several different options for the topic of the PowerPoint program. Everyone wanted to learn a bit more on the refinement of bonsai, so I showed my Refinement of Maple Bonsai program which covered trimming, shaping, container, soil mix and growing conditions for refining a bonsai which is the next step after developing a bonsai.

Image

The four students spent the remaining of the last day completing the shaping of their bonsai, starting the shaping of future bonsai and critiquing established trees. As interesting shaping techniques were used everyone gathered around to learn from the other trees.

ImageImage

Before wiring and shaping collected Engelman spruce by John Wiessinger

Image s

After shaping by John Wiessinger

To conclude the first series of the successful Classical Bonsai MasterClass sessions wine connoisseur, Joe Moore, brought a bottle of fine French champagne, complete with crystal glasses. Everyone partook of the liquid treat, including me, although I personally thought McDonald’s sweet tea tasted better.

I look forward to a new group of students in my next Classical Bonsai MasterClass.Image

Classical Bonsai MasterClass Session II

Image

The second session of the Classical Bonsai MasterClass began with discussing a different alcove display featuring a cascade style Kiyo Hime Japanese maple, just leafing out and ready for bud pinching and trimming. After discussing the formal display tradition and principles we went over how to correctly control the new growth of both developed and undeveloped deciduous bonsai. Since this bonsai was not bud pinched last season, most of the terminal buds will be shortened to maintain a compact form, yet presenting a light elegant feeling.

 Image

Wiring techniques were the main topic of the morning PowerPoint presentation. After a brief explanation of basic wiring, we quickly changed the topic to more specific applications for bonsai shaping and refinement. John Wiessinger brought in an old collected American larch from a bog in Maine. Relocating a lower heavy branch would improve the design. A sharp trunk splitter was first used to dislocate the desired branch from the trunk to create more branching in empty areas. John watched the process and did not cringe as the branch was popped out of the trunk, bent and relocated. The newly positioned branch was held in place with wire and a guy wire. Cut paste was used to fill in the open would to promote a quick callus covering. Small pieces of flakey American larch bark were pressed into the moist cut paste to disguise the open bark wound.

 Image


Image


Image


Image


Image


Image

Each student worked on their own bonsai, and when an interesting technique was used, everyone came to watch, discuss and learn. Kip Neal brought a huge Forsythia for additional training which he dug from a landscape a few years ago. In the first session he began to carve the massive lower trunk and completed the process during the second session.

 Image


Image


Image


Image

Then we all moved into the garage where there was more room to use the reciprocating saw to easily and quickly remove the old heavy roots. I guided my assistant, Alan Adair, with the cutting process while the students intensely watched as we sawed through the heavy woody root system to allow the tree to sit lower in the large training pot.

Image

Coarse soil with horticultural charcoal was used for most of the potting mix to promote fast growth of new branches from the old trunk. As the new adventitious buds grow each new shoot will be wired into the new desired positions.

 Image

After a full day of studying classical bonsai art training techniques we went for a quick dinner then everyone retired to rest for tomorrow’s final session.

Classical Bonsai MasterClass Session 1

Image
Yesterday we had the inaugural session of my new three day Classical Bonsai MasterClass which was limited to four students. The detailed instruction and individual help with the student’s bonsai will reinforce the principles and techniques learned from the program.

Image

We begin each day with an explanation of the display alcove with the main bonsai, accessory and scroll discussing how they relate to each other and the season of the year. After questions are answered a PowerPoint program is presented on the topic to be studied. The first program discussed aspects of Classical Bonsai design.

Image

Next came a critique where each student brought a bonsai for discussion and a bit of work. Diego Denair from Brazil did not bring actual trees, however brought many photos of his bonsai for advice. The Trident maple which Kip Neal brought needed an thread graft to place a branch in a needed area. So, out came the drill, tools and we proceeded to discuss and demonstrate how to thread graft using Kip’s bonsai.

Image

Joe Moore from Rochester, New York worked on a Japanese maple

Image

Dr. Diego Denari took a six hour bus ride from his home to the San Paulo, Brazil airport then spent the next day and a half traveling to Rochester. He worked on a Sargent juniper

Image

John Wiessinger, who writes the interesting column “Right Before Your Eyes” for International BONSAI magazine came from Ithaca, New York. He worked on a collected Engelman spruce

During the workshop which followed, each student worked on their own bonsai with my assistance. Great bonsai were brought in for advice and work, some for structural design, others for refinement.

After a short lunch break another PowerPoint presentation was made on pruning theory and techniques, which was followed by another workshop. Some of the bonsai from the morning session needed additional work, while other new trees were worked on. Each student brought several trees to the Classical Bonsai MasterClass which are protected in the garage and only brought into the studio at the right time. This way the studio was not crowded and everyone had ample room to work with the many tools.

Image
Kip Neal from Main continued to work on his Trident maple bonsai we thread grafted earlier and also on a huge Forsythia he has been training


Image

At the conclusion of the first day the group went to a nearby Chinese buffet for dinner and we next all proceeded to the March meeting of the Bonsai Society of Upstate New York. At the meeting I presented a PowerPoint presentation on the history, care and appreciation of Shohin Bonsai. This was followed by a short demo on a Little Gem dwarf spruce and explanation of the many shohin bonsai members brought in to share with others. We had over 50 members and two guests (from Brazil and Maine) at this meeting. Next I conduced a workshop for 11 students and Harvey Carapella and Marc Arpag assisted me.

Image

It was quite a long day for me, but the four students and 50 some members of our bonsai society enjoyed and more importantly had the opportunity to learn from my five decades of bonsai study. We still have two more intense days to study Classical Bonsai art, and I’m all ready and prepared to assist the four students.

Dr. David L. Andrews

Image 

I have had the pleasure of knowing Dr. David L. Andrews for over 40 years when we were both directors of the Bonsai Society of Greater New York. Dr. Andrews, retired prominent New York City orthopedic surgeon, was an early student of Yuji Yoshimura for over 40 years. He loved bonsai studied intensively and soon became skilled and knowledgeable in many aspects of bonsai. Rock plantings and pines interested him and he became an expert in their creation and propagation. Dr. Andrews freely shares his knowledge and artistry and has often presented programs with Mr. Yoshimura. When visiting nurseries he always selected the largest specimens for training into spectacular large size bonsai. As a past president of the Bonsai Society of Greater New York, Dr. Andrews frequently presented programs at meetings and conventions around the country because he loved the art and wanted to share with others. I believe he was the first non-Californian to be invited to demonstrate at a Golden State Bonsai Convention, several decades ago.

 Image

Dr. Andrews has not been actively involved with the bonsai community recently and planted all his bonsai into his large garden landscape. A few weeks ago Dr. Andrews told me he was going to move to New Hampshire and wanted to give all his bonsai containers to Chase Rosade and me. What a surprise and generous offer! Chase, Dr. Andrews and I coordinated our schedules and on Tuesday we met at his home in New Jersey, near the George Washington Bridge.

Image

Image

 Image

Blanket pads from U-Haul were used to carefully pack the containers

My son Chris drove six hours each way to New Jersey from Rochester to pick up the containers in my suburban and trailer. Bob Pfromm and Alan Adair joined us to help carefully load the heavy containers. The day before the trip I went to U-Haul and rented 24 packing blankets to protect the containers. These heavy blanket pads are excellent and a great deal too. They come six blankets in a bag for only $5 a day. Using the blankets we were able to carefully pack all the containers and stones and all arrived in Rochester unbroken or chipped.

Dr. Andrews neatly stacked over 400 empty bonsai in small piles for Chase and me to select from. They ranged from two inches to over three feet in size. We quickly took turns picking out piles of containers and flipped a coin for a few choice large or unusual containers. Most of the containers were old and showed great patina from the decades of use.

Image


Image


Image


Image


Image


Image

After cleaning two of the containers they look to be antique Chinese and photos are being identified in Japan as well as in the United States. There were two unusually long narrow containers and Chase and I each selected one. I have an idea for a different design group planting and am searching for the right plant material. Some of the containers had huge drainage holes while one small container had many small holes in a rosette pattern rather than the common size holes. Drainage screen is not necessary for this type of container. Most of the containers were old Japanese from famous Tokoname kilns. Some of the containers even had old price tags from California nurseries which have gone out of business 30 years ago. Some were originally priced at $3.

Image


Image


Since Dr. Andrews loves large rock planting bonsai he frequently traveled to Colorado to collect flat and curved granite slabs. Behind his home, near a gardening shed he had several piles of stones. I selected several of the smaller stones and Chase will pick up the larger rocks at a later date. We needed a shovel to unearth the flat stones which were still frozen to the ground. When selecting flat stones for bonsai it is best to make certain they are not broken, solid and thin. Ideally irregular interesting edges are preferred to create rock-planting bonsai. Avoid stones which have straight edges, or position them in the back of the planting where they will not be easily noticed. Sometimes flat edges can be carefully chipped to create a more irregular edge. The best stones are not completely flat, but rather are curved to hold the soil and tree. Of course size and weight is a consideration, that’s why Chase got the largest stones.

 Image

Image

Next to the piles of flat planting stones Dr. Andrews showed us two Trident maples and a few European hornbeam bonsai he planted in the garden a few decades ago. They were large bonsai all pruned and trimmed, ready for huge containers. I selected the smallest Trident maple and since Chase lives closer to Dr. Andrews than I do, he will return at a later date when the ground is not frozen to dig the remaining trees.

Image 

The small Trident maple I chose was started from a cutting Dr. Andrews obtained from another long time student of Yuji Yoshimura over 45 years ago. In order to develop a heavy trunk he allowed an escape branch to grow to a long length. Once the desired trunk size was developed, he pruned the escape branch. The basic structure of the bonsai has been developed and now needs to be refined. Next week I might use the Trident maple for my new three day Classical Bonsai MasterClass.

Image

When training bonsai in the ground for trunk development it is also important to think about the final desired size. Remember, the container and soil will also add weight to the bonsai which must be moved into a winter protection area in cold climates.

Included with the containers, Dr. Andrews had 12 boxes of old Japanese and English bonsai and suiseki magazines. Additionally there were boxes of historical notes and archives of the Bonsai Society of Greater New York and the American Bonsai Society. They will be cataloged and added to my bonsai reference library.

 Image

While Chris and my buddies were loading the containers and stones, Dr. Andrews asked me to walk through his garden of rare and unusual trees to identify some of the Japanese five-needle pines he had grafted decades ago and planted into the ground. I’ve never seen large sizes of the dwarf cultivars before. There were several four foot tall Nishiki black pines in addition to other rare pines. During our walk I noticed a large ten foot wide Birds nest spruce in his garden and he quickly pointed out that originally it was a 23 tree bonsai forest he planted in the ground. We walked through an orchard of large size apple trees, each pruned to look like a bonsai by Dr. Andrews. I found it interesting that he has transplanted most of the large apple orchard trees to better aesthetic locations. The orchard actually looked like a large forest bonsai, only the trees were approximately ten feet tall and growing in the ground.

 Image

This 10 foot Birds nest spruce was a 23 tree bonsai forest years ago

It was very generous of Dr. Andrews to give over 400 quality containers to Chase and me so others can appreciate and make use of the containers he collected and used for nearly five decades. It’s wonderful that Dr. Andrews continues to think about the future of the art and wanting to share his love with others. This gesture is typical of Dr. Andrews who often traveled during the night to bonsai gatherings bringing large demonstration material, teaching and returning to his busy medical practice in New York City. I hope he enjoys his retirement in his new home knowing that the love he has for his bonsai will be shared with others through the use of his containers.


The Kennett Collection Reduction Sale

Image

The Kennett Collection is the private bonsai collection of bonsai connoisseur Doug Paul who has created the finest bonsai collection in the United States. His fine eye and love of bonsai (and kopi) can be seen in each of the over 1,000 specimens he keeps surrounding his beautiful gardens and home in Kennett Square, Pennsylvania.

Image

Mr. Paul has traveled to Japan many times searching for fine quality bonsai to add to his collection. His love of Satsuki azaleas and Japanese five-needle pines is easily seen in the vast majority of the collection. He was the first American to display a bonsai in the Kokufu Bonsai Exhibition in Tokyo as well as other exhibitions. Select specimens which he has purchased are kept in Japan and displayed before importing into the United States.

A small full time staff care for the bonsai collection while world-class bonsai professionals from the United States, Japan, England and Italy regularly travel to Kennett Square to shape and train the trees.

Image

In order to make room for new specimens Mr. Paul needed to sell about 400 trees. Rather than selling them to professionals he chose to have a public auction on March 14-15-16, 2014 at a nearby garden center in Delaware where there was more room for the buyers as well as no sales tax. This way the public had a one-in-a-lifetime opportunity to add quality Japanese bonsai to their personal collections. It was very generous of him to price the bonsai at very low prices, even cheaper than he purchased them in Japan. Mr. Paul likes American and European bonsai containers and many of the bonsai sold were in expensive, one-of-a-kind containers. The prices of the bonsai ranged from $25 to $19,000.

All of the bonsai for sale were photographed ahead of time and posted in his web site so buyers could study and prepare their purchasing lists. The sale drew people from as far as Texas, Canada as well as most states east of the Mississippi River. Many prominent bonsai professionals were present adding to their personal collections as well as purchasing trees for their clients.

People began to gather well before the 10 am sale on Friday morning when the temperature was about 30F. There were perhaps 200 people in attendance and it looked more like a national bonsai convention than a private bonsai sale. Upon arrival buyers reached into a black box to get their wrist bands of 13 different colors which indicated the entry order into the sales area.

Image

Peter Warren from England organized and ran the sale and went over the rules before 10 am. People would be allowed in when their wrist band colors were announced for 10 minutes before the next group was allowed their turn for buying. A couple of minutes before 10am, the sign with the entry schedule was revealed. Peter reviewed the rules again and asked buyers to leave their trees until later in the morning to prevent confusion, which was an excellent idea.

Buyers had about 10 to 15 minutes to make their selection and only 3 trees could be purchased during their initial buying period. At 1pm the sale would be open to everyone and people could purchase additional trees. Also Peter announced that any cheating would not be tolerated and buyers would not be allowed to purchase any trees if caught. I did not see any cheating, but many disappointed buyers who were in the 13th group to enter. At the conclusion of his remarks Peter wished all buyers good luck.

Image

All the bonsai were well prepared and organized by species and size. Of course there was a large section of Satsuki azaleas and pine bonsai. Each tree had two labels with the item number and price. The white label remained on the tree, while if one wanted to purchase a tree they removed the yellow label. Therefore, once it was your turn to enter the sales area trees without a yellow label were already purchased. Buyers would then take their yellow labels into the heated tent with hot coffee and doughnuts to get a receipt of their purchases. At the next table the receipts were taken, paid for and returned to the lucky buyers to retrieved their trees. Only the staff, all in yellow hats, were allowed to pick up the trees and move them into the loading area. They even helped people pack their cars and trucks.

Image

Around noon all the buyers had entered and the sales area was nearly empty. It was unbelievable how fast the trees were sold. In some of the attached photos you will see empty tables with only a few trees remaining, however, if you look closely, very few were still for sale with the yellow labels. Only the white identification labels remained.

Image

During the sales period, Peter Warren from England, Minoru Akiyama from Japan as well as Suthin were there to assist people with their purchases and answer questions.

Image

Later on Friday afternoon it was announced that because of the lack of remaining bonsai the sale would close on Saturday at 1pm and would not open on Sunday as scheduled. You can’t sell trees if you don’t have them.

Image

Image

It was warming to me to see so many smiling happy people adding quality bonsai to their collection because of the generosity of Doug Paul. Hopefully the bonsai will be well cared for and shaped and perhaps displayed in a future US National Bonsai Exhibition.

Image

Image

Although my wife Diane and I were in the 8th entry group we were able to purchase 4 of my client’s top choices (3 yellow labels for me and 1 for Diane) for his personal bonsai collection. But, unfortunately none of the bonsai on our affordable list for resale purposes remained, except for one small Japanese five-needle pine nursery stock.

Bonsai we purchased for our client:

Image

Image

Image

Image

My purchase…….

Image

Mr. Paul needs to be thanked for making the trees available to the public for sale and also for the extremely well organized sales procedure and rules which were fair as well for everyone.